Home > Print Labels Using Barcode Scanner or Other Devices (P-touch Template) > Specify the Barcode Scanner Settings (Windows)
Specify the Barcode Scanner Settings (Windows)
Before connecting the barcode scanner to the printer, specify the barcode scanner settings using the P-touch Template Settings (in the Printer Setting Tool).
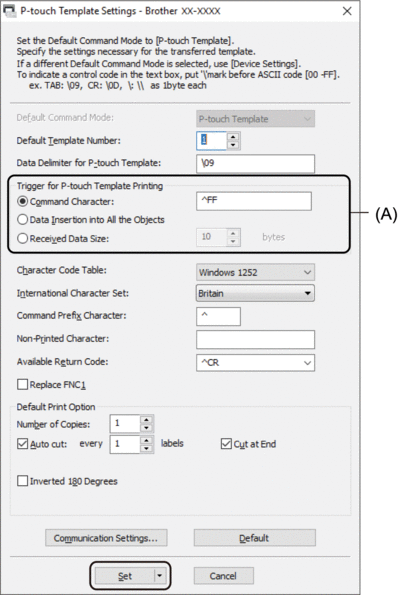
To put multiple object data on a label, or if you want to search the database and print: Enter "\09" in the Data Delimiter for P-touch Template: field.
To print immediately after reading a barcode: Enter "^FF" in the Trigger for P-touch Template Printing field as Command Character.
- Connect the printer and the computer via a USB cable, and then turn the printer on.
- Start the Printer Setting Tool.
Click .
- Click the P-touch Template Settings button.
- Select the settings you want, and then click Set.


- By default, printing begins when the code "^FF" is scanned from a barcode using a barcode scanner. (This can be changed with the settings highlighted by (A) in the previous image.)
If the Received Data Size option is selected with the number of bytes setting, the template is printed after the specified number of bytes have been scanned.
- Because the print mode setting returns to raster mode each time you print from the computer, you must change the setting to template mode again.
- If you turn off the printer and then turn it on again, the printer starts up in template mode.


