FAX-1800C
FAQs & Troubleshooting |

FAX-1800C
Date: 01/27/2014 ID: faq00000735_006
One or more of my colors are not printing (blank). What can I do?
Brother strongly recommends that customers do not use generic ink or refill their Brother ink cartridges. Using non-Brother supplies may affect the hardware performance, print quality and machine reliability since the ink formulation in genuine Brother ink cartridges prevent smearing and clogging of the print head. The Brother limited warranty does not apply to any problem that was caused by the use of unauthorized third party ink and/or cartridges.
-
Verify the ink cartridges are not empty.
Your Brother machine is equipped with an ink dot count that automatically monitors the ink level in each color cartridge. When the counter detects an ink cartridge is running out of ink, the machine will notify you with a message on the LCD. If the display indicates one or more of the colors are empty, replace the ink cartridge by following Step 2 below and replace the ink cartridges that are empty.
If the LCD does not read "Ink Empty", continue to Step 2 to make sure the silver tape was removed.
-
To verify the ink cartridges are installed correctly or to replace ink cartridges follow the procedure below:
a. Press the INK key.
b. Press the UP OR DOWN ARROW key to select "REPLACE INK".
c. Press the MENU/SET key. The display will show "PLS OPEN COVER".
d. Open the machine by pulling the top of the control panel cover toward you,
then lifting the top cover up toward the back of the unit
(you can use the plastic paper guides to lift).
e. Push the colored ink cartridge covers and then remove the ink cartridges.
Examine the Ink Exit Opening located on bottom of the ink cartridge
to identify if the opening is blocked.
f. If there is a solid circle of ink inside the opening with a glossy look
when the light shines on it, then the opening is blocked.
Go to Step 3 to clear the blocked opening.
g. If the opening is not blocked, go to Step 4 listed below.
-
Instructions for Removing Glue from the Opening on the Bottom of the Ink Cartridge:
a. You will need an object with a narrow point on the end to remove the glue
from the opening on the bottom of the ink cartridge. Brother recommends
the use of any of the following materials along with a newspaper and/or
a paper towel or napkin:
- A straight pin
- A needle
- A safety pin
- A push pin
b. Place a newspaper on the area where you will be performing the procedure
to prevent any ink from spilling on furniture or the floor.
c. Turn the defective ink cartridge upside down and locate the opening
where the glue is blocking the ink from exiting the cartridge.
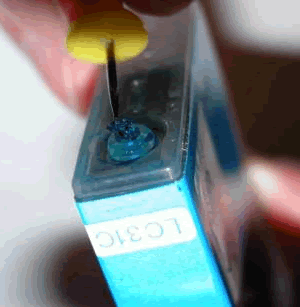
d. Using an object with a narrow point, i.e. a push pin,
gently puncture a hole into the glue around the outermost edge. Do not jam or
push the pin completely into the cartridge as this can damage the material inside
the cartridge.
e. Next, using a circular motion, gently pull the glue away from the plastic edge of the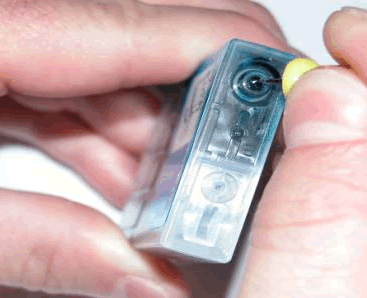
cartridge opening.

f. Make sure to keep the cartridge in an upright position.
Using the point of the pin, lift the glue debris out of the ink cartridge opening.
g. If the glue is difficult to pull off with the pin-like object, use a paper towel or plastic
gloves to grab the piece of glue from the cartridge. The glue must be completely
removed prior to replacing it into the machine. You want to avoid pieces of glue
clogging the print head and potentially damaging the machine.
h. The picture below shows a piece of glue removed from the ink cartridge. Once
removed, the glue can be discarded.
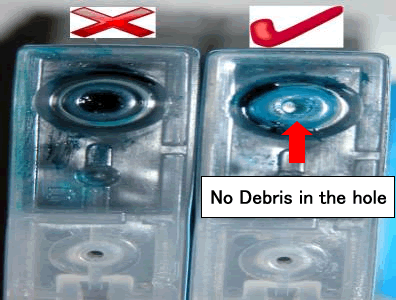
i. The picture below shows what a cartridge looks like before and after the glue is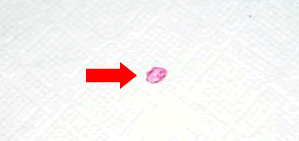
removed. Once there is no debris in the hole, the ink cartridge can be placed back
into the machine. Continue to Step 4.
- Insert the ink cartridge into the carriage (each position is color labeled) and push the END of the cover back down to close.
When closing the ink cover(s), DO NOT press PUSH. PUSH is only used to open the cover.
-
After installing the ink cartridge(s), close the top cover and then the control panel.
<Important>
The LCD will then display "Did you change (color) 1 Yes 2 No". The LCD will display this question for ALL 4 colors (not just the ones replaced). BE SURE to select 1 YES for each ink cartridge that was repaired. If 1 Yes is selected, the LCD will then display "Change to new (color) 1 Yes 2 No". Again, BE SURE to select 1 YES.
"Change to new (color)" will only appear if 1 Yes is selected for "Did you change (color)". If 2 NO is selected for the removed question, the LCD will then move on to the removed question for the next color.
-
After all the correct selections are made, the machine will then go into a cleaning.
-
Press MENU/SET, press the UP OR DOWN ARROW key to select "Test Print". Press the MENU/SET again to print out the Test Print Sheet.
-
If the "problem" color is still missing dashes on the Test Print Sheet, please proceed to Step 9. If the "problem" color appears correctly on the Test Print Sheet, then press the the STOP/EXIT key to return your Brother machine's display to the Date and time. The issue is resolved.
-
Press the INK Key.
-
Press the UP OR DOWN ARROW key to select "CLEANING"
-
Press the UP OR DOWN ARROW key to select the color that needs to be cleaned or you can choose clean All.
-
Press MENU/SET, then select "Test Print". Press MENU/SET again to print out the Test Print Sheet.
- If the color is still printing blank or missing any dashes, repeat Step 9 through 12 up to 4 more times.
If the color is still printing blank or missing dashes, call Brother Customer Service for assistance.
<In USA>
If your unit is still within warranty, please click here for a Brother Authorized Service Center near you.
If your unit is out of warranty, please click here for information on contacting the appropriate Customer Service Center.
FAX-1800C, MFC-3100C, MFC-3200C
If you need further assistance, please contact Brother customer service:
Content Feedback
Please note this form is used for feedback only.