ModerN 60e
FAQs & Troubleshooting |
ModerN 60e
Date: 07/05/2015 ID: faqh00000467_004
How do I thread my machine? (For models equipped with the needle threader)
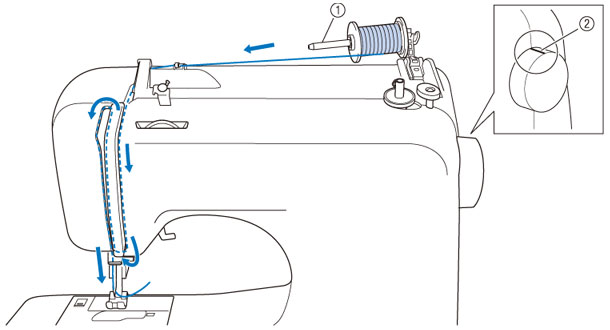 |
(1) Spool pin (2) Mark on the handwheel |
-
When threading the upper thread, carefully follow the instructions.
If the upper threading is not correct, the thread may become tangled or the needle may bend or break. - Never use a thread weight of 20 or lower.
-
Use the needle and the thread in the correct combination.
For details on the correct combination of needles and threads, refer to the table "Combination of fabric, thread and needle".
-
The needle threader can be used with a 75/11 through 100/16 home sewing machine needle.
However, the needle threader cannot be used with a 65/9 home sewing machine needle.
When using special thread such as transparent nylon thread or metallic thread, the needle threader cannot be used. - Thread with a thickness of 130/120 or thicker cannot be used with the needle threader.
- The needle threader cannot be used with the wing needle or the twin needle.
-
Turn on the sewing machine.

-
Raise the presser foot using the presser foot lever.

(1) Presser foot lever If the presser foot is not raised, the sewing machine cannot be threaded correctly.
-
Press
 (needle position button) once or twice to raise the needle.

If the needle is not correctly raised, the sewing machine can not be threaded.
Be sure to turn the handwheel so that the mark on the wheel points up before threading the sewing machine.
(1) Mark -
As shown, press down on the spool pin lever with your finger.
The spool pin swings up.
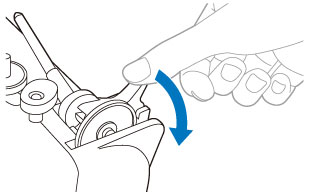
Do not grab the bar to raise the spool pin, otherwise, the spool pin may bend or break.
-
Remove the spool cap.
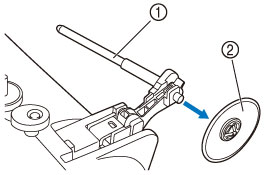
(1) Spool pin
(2) Spool cap
Be sure to raise the spool pin before use.
If thespool of thread is in the wrong place, or is set incorrectly, the thread may tangle on the spool pin and cause the needle to break. -
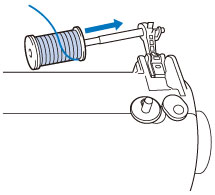
Fully insert the spool for the upper thread onto the spool pin.
Slide the spool onto the pin so that the spool is horizontal and the thread unwinds to the front at the bottom.
-
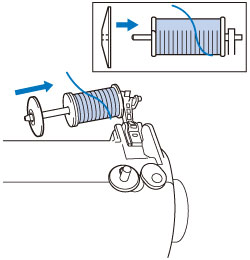
Slide the spool cap onto the spool pin.
With the slightly rounded side of the spool cap positioned toward the left, slide the spool cap onto the spool pin as far as possible to the right so that the spool is moved to the right end of the spool pin.
- If the spool or the spool cap is not positioned correctly, the thread may become tangled around the spool pin or the needle may break.
-
Three spool cap sizes are available, allowing you to choose a spool cap that best fits the size of spool being used.
If the spool cap is too small for the spool being used, the thread may catch on the slit in the spool or the needle may break.

When sewing with fine, cross-wound thread, use the small spool cap, and leave a small space between the cap and the spool.
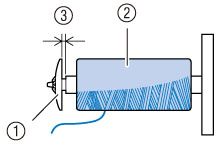
(1) Spool cap (small)
(2) Spool (cross-wound thread)
(3) Space -
While holding the spool with your right hand, and then pass the thread under the thread guide.
(1) Thread guide -
Pass the thread under the thread guide cover from the back to the front.
Hold the thread with your right hand so that there is no slack in the thread that is pulled out, and then pass the thread under the thread guide cover with your left hand.
(1) Thread guide cover -
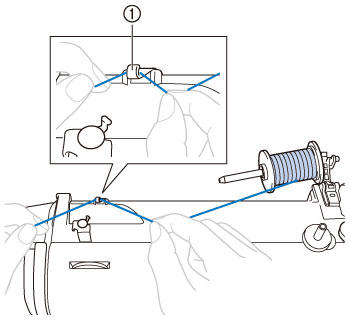
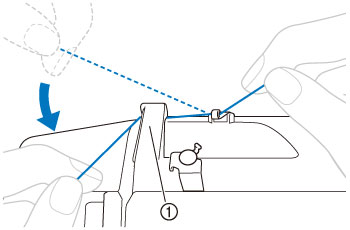
Feed the upper thread as shown in the illustration below.
-
Make sure you guide the thread through the thread take-up lever from right to left as shown in the illustration below.
(1) Thread take-up lever If the needle is not raised, the thread take-up lever cannot be threaded.
Be sure to press the needle position button to raise the needle before threading the thread take-up lever. -
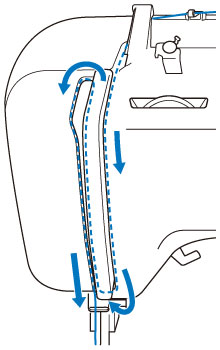
Put the thread behind the needle bar thread guide above the needle.
The thread can easily be passed behind the needle bar thread guide by holding the thread in your left hand, then feeding the thread with your right hand.
(1) Needle bar thread guide -
Turn off the sewing machine.

-
Lower the presser foot lever.

(1) Presser foot lever -
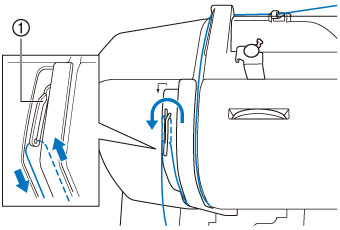
While lowering the needle threader lever, hook the thread onto the guide.

(1) Needle holder
(2) Needle threader lever
(3) Guide
-
Fully lower the needle threader lever.
The end of the needle threader rotates toward you and the hook passes through the eye of the needle.

-
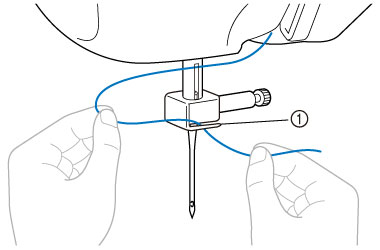
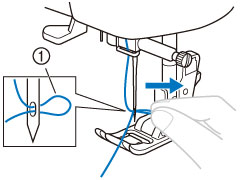
Catch the thread on the hook as shown below.
(1) Hook
(2) Thread -
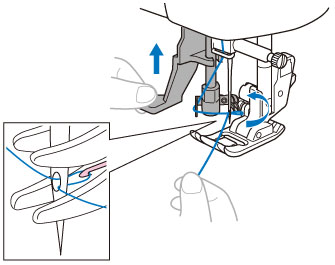
While lightly holding the thread, release the needle threader lever.
The hook will pull the thread through the needle.
-
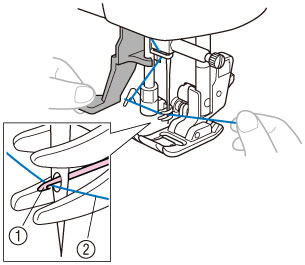
Pull the loop of the thread passed through the eye of the needle toward the rear of the machine.
(1) Loop of thread Be careful not to pull on the thread with force or it may bend the needle. -
Raise the presser foot lever.
(1) Presser foot lever -
Pass the end of the thread through the presser foot, and then pull out about 5 cm (2 inches) of thread toward the rear of the machine.
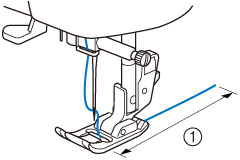
(1) 5 cm (2 inches) - If you incorrectly feed the thread you may cause sewing problems.
- If the thread does not pass through the eye of the needle, start from step 15 again.
AS-40, DS-140, DS-160, FS100WT, FS130QC, FS180QC, FS210, FS250FE, FS60, FS70WT, KD40, ModerN 210e, ModerN 60e, Style 100Q, Style 80e, Style-60e
If you need further assistance, please contact Brother customer service:
Content Feedback
Please note this form is used for feedback only.