LX25
FAQs & Troubleshooting |
LX25
Date: 03/04/2023 ID: faqh00000467_007
How do I thread my machine?
Upper threading
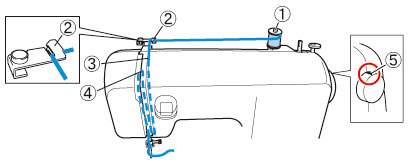
(1) Spool pin
(2) Thread guide (back)
(3) Thread guide (front)
(4) Thread take-up lever
(5) Mark on the handwheel
- When threading the upper thread, carefully follow the instructions. If the upper threading is not correct, the thread may become tangled or the needle may bend or break.
- Never use a thread weight of 20 or lower.
- Use the needle and the thread in the correct combination. For details on the correct combination of needles and threads, refer to the section of “FABRIC, THREAD, AND NEEDLE COMBINATIONS” on the Operation Manual.
- If you incorrectly feed the thread you may cause sewing problems.
-
Turn off the machine.

-
Raise the presser foot lever.
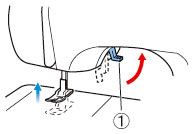
(1) Presser foot lever
-
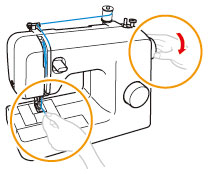
Raise the needle by turning the handwheel toward you (counterclockwise) so that the mark on the wheel points up.

(1) Mark on the wheel
If the needle is not correctly raised, the sewing machine can not be threaded.
-
Pull up the spool pin completely.
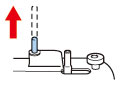
-
Put a spool of thread on this pin.
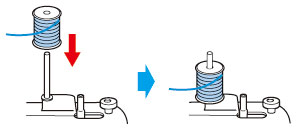
If the spool of thread is in the wrong place, or is set incorrectly, the thread may tangle on the spool pin and cause the needle to break.
-
While holding the thread from the spool with your right hand, pass the thread toward you, in the groove on the thread guide.
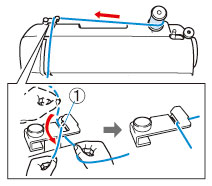
(1) Spring
Make sure that the spring in the groove catches the thread.
-
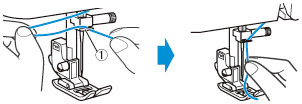
Feed the upper thread as shown in the following illustration.
-
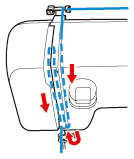
Make sure you guide the thread through the thread take-up lever from right to left as shown in the following illustration.
(1) Thread take-up lever
If the thread take-up lever is lowered, the upper thread can not be wrapped around the thread take-up lever.
Make sure you raise the needle by turning the handwheel toward you (counterclockwise) so that the mark on the wheel points up. -
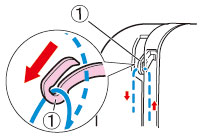
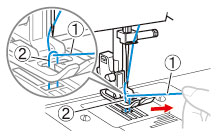
Put the thread behind the guide above the needle.
(1) Needle bar thread guide
The thread can easily be passed behind the needle bar thread guide by holding the thread in your left hand, then feeding the thread with your right hand.
-
Pass the thread through the eye of the needle from the front to the back.

Drawing up the lower thread
-
While lightly holding the end of the upper thread, slowly turn the handwheel toward you (counterclockwise) by hand to lower and then raise the needle.
-
Pull on the upper thread to draw up the lower thread.
(1) Upper thread
(2) Lower thread -
Pull out about 5 cm (2 inches) of both threads and put them toward the back of the machine under the presser foot.
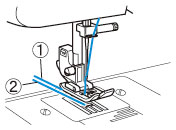
(1) Upper thread
(2) Lower thread
AE1700, AE2500, BQ17, JK1700, LX17, LX25, RL417, RL425, UJ417, XN1700, XN2500
If you need further assistance, please contact Brother customer service:
Content Feedback
Please note this form is used for feedback only.