DCP-117C
FAQs & Troubleshooting |
DCP-117C
Date: 12/03/2012 ID: faq00000495_002
Clear the paper jam or printer jam.
Follow the steps below to clear the paper jam or printer jam.
NOTE: Illustrations shown below are from a representative product and may differ from your Brother machine.
Case1: Paper is jammed inside the paper tray
Follow the steps below to clear the paper jam inside the paper tray.
- Unplug the machine from the AC power outlet (electrical socket).
- Unplug the telephone line cord from the machine.
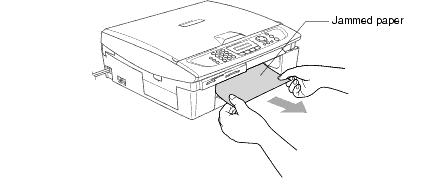
- Pull the paper tray out of the machine.

- Pull out the jammed paper to remove it.
- Put the paper in the paper tray.
- Put the paper tray back in the machine.
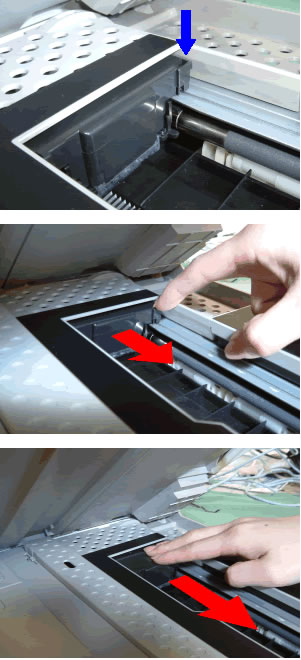
- Check inside the machine.
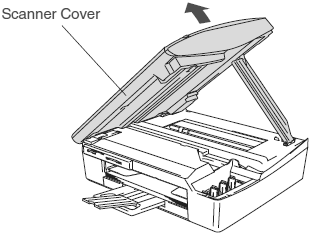
- Lift the scanner cover to the open position until it locks securely into the open position.
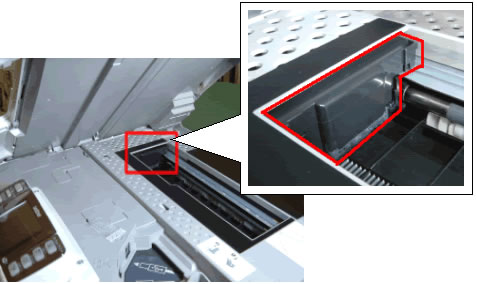
- Check the print head's position. In the example photo the print head is positioned at the left hand side of the platen area.
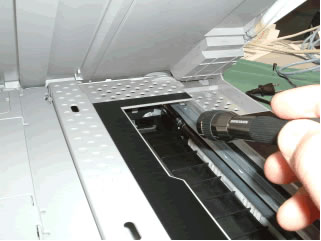
- Gently move the print head to the center.
- Unplug the machine from the power source before you move the print head using your hand.
-
Be careful to not force the print head to move.
If the print head is positioned at the far right hand side, you cannot move it. Please contact Brother Customer Service from "Contact Us".
- Carefully check under the print head and remove any pieces of paper remaining under the print head.
Use a flashlight if necessary to check thoroughly.
- Carefully check the left and right side corners and remove any pieces of paper.
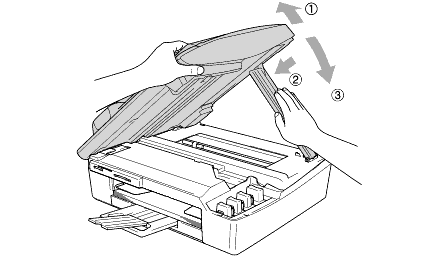
- Lift the scanner cover to the open position until it locks securely into the open position.
- Lift the scanner cover to release the lock. Gently push the scanner cover support down and close the scanner cover.

- Plug the power cord back into the AC power outlet (electrical socket) and power the unit back ON.
- Plug the telephone line cord into the machine.
- Verify the error message is cleared.
To prevent paper jams, do not put multiple kinds of paper in the paper tray at the same time.
If the message continues to appear on the LCD, the machine will require repair. Please contact Brother Customer Service from "Contact Us".
Case2: Paper is jammed inside the machine
Follow the steps below to clear the paper jam inside the machine.
- Unplug the machine from the AC power outlet (electrical socket).
- Unplug the telephone line cord from the machine.
- Remove the jam clear cover on the back of the unit. Pull the jammed paper out of the machine.

- Re-insert the jam clear cover.
- If you can not pull out the jammed paper, lift the scanner cover from the right-hand side of the machine until it locks securely into the open position.
- Check inside the machine.

- Lift the scanner cover to the open position until it locks securely into the open position.
- Check the print head's position. In the example photo the print head is positioned at the left hand side of the platen area.

- Gently move the print head to the center.

- Unplug the machine from the power source before you move the print head using your hand.
-
Be careful to not force the print head to move.
If the print head is positioned at the far right hand side, you cannot move it. Please contact Brother Customer Service from "Contact Us".
- Carefully check under the print head and remove any pieces of paper remaining under the print head.

Use a flashlight if necessary to check thoroughly.
- Carefully check the left and right side corners and remove any pieces of paper.
- Lift the scanner cover to the open position until it locks securely into the open position.
- Lift the scanner cover to release the lock. Gently push the scanner cover support down and close the scanner cover.
- Plug the power cord back into the AC power outlet (electrical socket) and power the unit back ON.
- Plug the telephone line cord into the machine.
- Verify the error message is cleared.
To prevent paper jams, do not put multiple kinds of paper in the paper tray at the same time.
If the message continues to appear on the LCD, the machine will require repair. Please contact Brother Customer Service from "Contact Us".
DCP-110C, DCP-115C, DCP-117C, DCP-310CN, DCP-315CN, MFC-210C, MFC-215C, MFC-410CN
If you need further assistance, please contact Brother customer service:
Content Feedback
Please note this form is used for feedback only.