Innov-is XV
FAQs & Troubleshooting |
Innov-is XV
Date: 27/08/2014 ID: faqh00100036_002
Tangled thread on wrong side of fabric
Symptom / Cause
-
The thread becomes tangled on the lower side of the fabric.
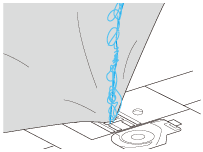
- After starting sewing, a rattling noise is made and sewing cannot continue.
-
Looking under the fabric, there is tangled thread in the bobbin case.
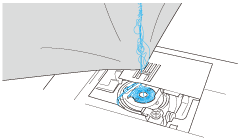
If the upper thread is incorrectly threaded, the upper thread passed through the fabric cannot be firmly pulled up and the upper thread becomes tangled in the bobbin case, causing a rattling noise.
Remedy / Check details
Remove the tangled thread, and correct the upper threading according to the following procedure.
- Turn off the sewing machine.
-
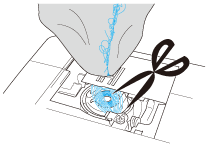
Remove the tangled thread. If it cannot be removed, cut the thread with scissors.
-
If the threads remain in the bobbin case, remove the needle plate cover, and then remove the threads.
If the bobbin was removed from the bobbin case, install the bobbin in the bobbin case correctly.
Refer to "How do I set the bobbin?". - Remove the upper thread from the machine.
- Turn on the sewing machine.
-
Raise the presser foot using the presser foot lever.
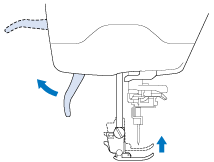
(1) Presser foot lever
If the presser foot is not raised, the sewing machine cannot be threaded correctly.
-
Raise the needle by turning the handwheel toward you (counterclockwise) so that the mark on the wheel points up, or press “Needle Position” button once or twice to raise the needle.
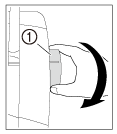
(1) Mark
or 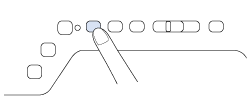
-
While holding the thread with both hands, pull the thread up from under the thread guide plate.
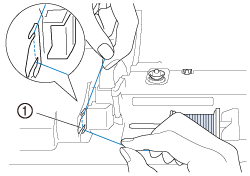
(1) Thread guide plate
-
While holding the thread in your right hand, pass the thread through the thread guide in the direction indicated.
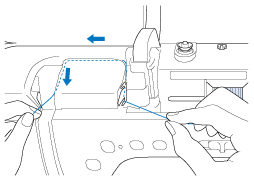
-
Guide the thread down, up, then down through the groove, as shown in the illustration.
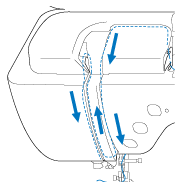
Look in the upper groove area to check if the thread catches on the take-up lever visible inside the upper groove area.
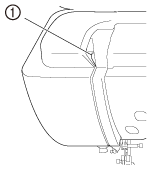
(1) Look in the upper groove area -
Pass the thread through the needle bar thread guide (marked “6”) by holding the thread with both hands and guiding it as shown in the illustration.
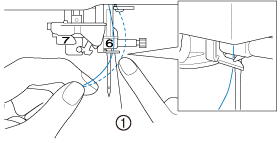
(1) Needle bar thread guide
-
Press the “Presser Foot Lifter” button to lower presser foot.

-
Pass the thread through the thread guide disks (marked “7”). Make sure that the thread passes through the groove in the thread guide.
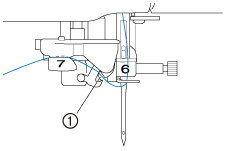
(1) Groove in thread guide
-
Pull the thread up through the thread cutter to cut the thread, as shown in the illustration.
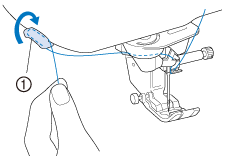
(1) Thread cutter
When using thread that quickly winds off the spool, such as metallic thread, it may be difficult to thread the needle if the thread is cut.
Therefore, instead of using the thread cutter, pull out about 80 mm (approx. 3 inches) of thread after passing it through the thread guide disks (marked “7”).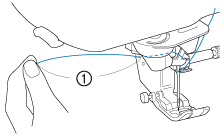
(1) 80 mm (approx. 3 inches) or more -
Press the “Automatic Threading” button to have the machine automatically thread the needle.

When the “Automatic Threading” button is pressed, the presser foot will be automatically lowered. After threading is finished, the presser foot moves back to the position before the “Automatic Threading” button was pressed.
-
Carefully pull the end of the thread that was passed through the eye of the needle.
If a loop was formed in the thread passed through the eye of the needle, carefully pull on the loop of thread through to the back of the needle.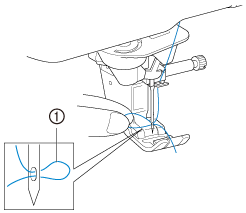
(1) Loop of thread
Pulling the loop of thread gently will avoid needle breakage.
-
Pull out about 100-150 mm (approx. 4-6 inches) of the thread, and then pass it under the presser foot toward the rear of the machine.
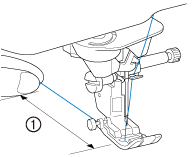
(1) About 100-150 mm (approx. 4-6 inches)
Some needles cannot be threaded with the needle threader. In this case, instead of using the needle threader after passing the thread through the needle bar thread guide (marked “6”), manually pass the thread through the eye of the needle from the front.
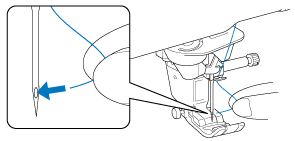
-
Press the “Presser Foot Lifter” button to raise the presser foot.

Innov-is XV
If you need further assistance, please contact Brother customer service:
Content Feedback
Please note this form is used for feedback only.