MW-145MFi
FAQs & Troubleshooting |
MW-145MFi
Date: 05/13/2020 ID: faqp00010545_001
How can I create a table and join cells? (P-touch Editor 5.x for Windows)
The following describes how to insert a table, join cells, and reverse the background and text using the label below as an example. (Apply the same procedure for your printer and tape width. The printer and tape width used here are the PT-2430PC and 24 mm.)

-
Create a new layout.
-
Click the
 [New/Open] button in the command bar.
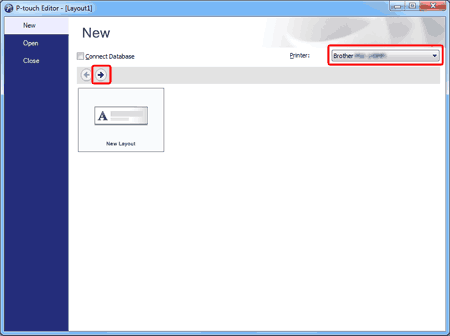
 - Select the printer in the printer combo box.
-
Select a new layout and click the
 button.
-
Click the
-
Specify the label length.
-
If the paper properties are not shown, click the
 [Paper] button in the command bar.
 -
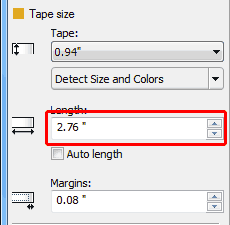
In the tape length field under the tape size, set the length to [2.76"] or [70 mm] using the spin box
 .
.
You can also directly enter the tape length. Even if "Auto" is shown in the tape length field, you can directly enter [2.76] or [70] or click and operate the spin box.
-
When a background theme is shown, set the [Purpose] drop-down list to "Normal Format".

-
If the paper properties are not shown, click the
-
Insert a table.
-
Click [Table] in the Draw/Edit toolbar.

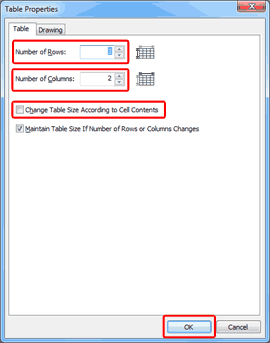
The [Table Properties] dialog box appears. -
Specify "3" in the [Number of Rows:] field and "2" in the [Number of Columns] field.
Clear the "Change Table Size According to Cell Contents" check box, and click [OK].
The table appears.

-
Click [Table] in the Draw/Edit toolbar.
-
Join the cells in the first row to create one cell.
-
Click the cell at the left end of the first row.
While holding down the Shift key, click the cell at the right end.

-
Click the
 [Join Cells] button in the Table Properties bar.

The cells will merge.

-
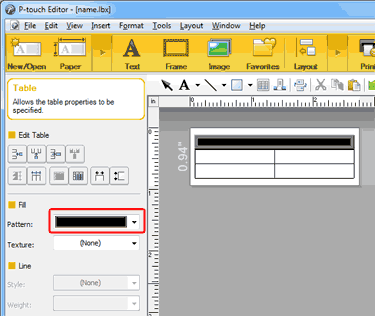
Change the [Pattern] in the Table Properties bar to black.
The background color of the joined cells will change to black.
-
Click the cell at the left end of the first row.
-
Type the text.
-
Click the
 [Text] button in the command bar.
 -
Click [Properties] in the Draw/Edit toolbar.

-
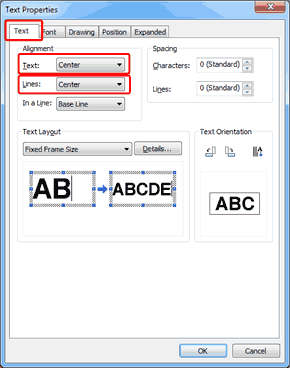
On the [Text] tab, set [Text] to "Center" and [Lines] to "Center".
-
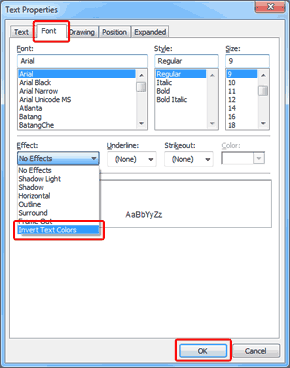
On the [Font] tab, set [Effects] to "Invert Text Colors" and click [OK].
-
Type "Fixed Asset".

- Press the Tab key and move to the lower cell.
- Type "Equipment Management Department" and press the Tab key.
-
Type "ABCDE Planning Department" and press the Tab key.
Then, type "Fixed Asset Code" and [01234567890].

The table is now created.
-
Click the
MW-145MFi, MW-260MFi, PJ-822, PJ-823, PJ-862, PJ-863, PJ-883, PT-P710BT, PT-P910BT
If you need further assistance, please contact Brother customer service:
Content Feedback
To help us improve our support, please provide your feedback below.
Step 1: How does the information on this page help you?
Step 2: Are there any comments you would like to add?
Please note this form is used for feedback only.