MFC-9130CW
FAQs & Troubleshooting |
MFC-9130CW
Date: 05/23/2022 ID: faq00003062_002
Configure and use the Scan to E-mail Server feature.
This function is called "Scan to E-mail Attachment" and differs from "Scan to E-mail server" feature this FAQ is referring to. Click here to see if you want to know how to use "Scan to E-mail Attachment" feature.
In order to use the Scan to E-mail Server option, the Brother machine will need to be connected to a network and have access to a POP3 and SMTP server. If you do not have this information, please contact your Internet Service Provider or Network Admin to obtain the information.
I: Set up Scan to E-mail (E-Mail Server)
-
Print the network configuration report to obtain the IP address of the Brother machine. (Click here to see how to print the Network Configuration List.)
-
Open a web browser (such as Internet Explorer) and enter in the IP address of the Brother machine as http://[your Brother machine's IP address].
IP address of the Brother machine is listed on the Network Configuration Sheet.
-
Click the Network tab.
-
Click Protocol.
-
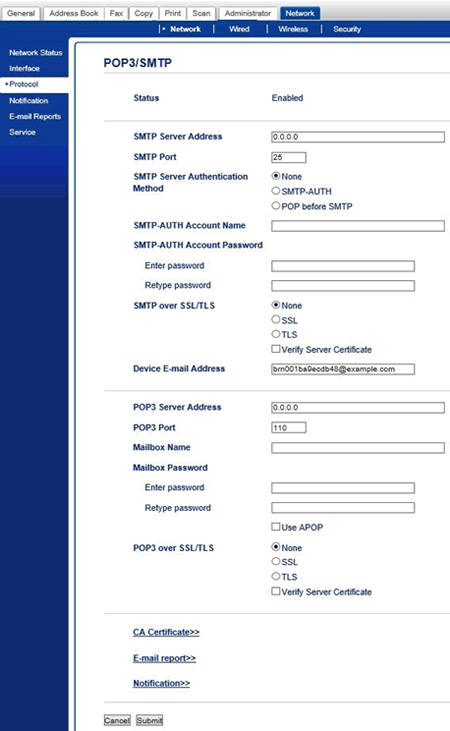
Place a check next to POP3/SMTP if it is not already checked, then click Advanced Setting.
-
Within this section, you will be able to configure your Incoming and Outgoing mail server settings. Fill in all the requested information on this page. If you are unsure about any of these settings, contact your Internet Service Provider or Network Admin for support:
-
SMTP Server Address: This field displays the Host Name or IP address of an SMTP mail server (outgoing E-mail Server) on your network. (Ex: smtp.example.net or 192.0.0.1) If you are using the DNS name of the SMTP E-mail server, you must use the FQDN (Full Qualified Domain Name) such as smtp.example.net
-
SMTP Port: Specify the destination port number of the SMTP server that you will connect to.
-
SMTP Server Authentication Method: Specify the authentication method for the SMTP server. This value determines which type of method is used to authenticate the user to the SMTP server. The options are as follows:
-
None: Does not authenticate to the SMTP Server.
-
SMTP-AUTH: Uses the method which is SMTP Authentication. If this method is used, it is necessary to set the SMTP account details correctly.
- POP before SMTP: Uses the method "POP before SMTP". If this method is used, it is necessary to set POP3 account settings correctly.
-
None: Does not authenticate to the SMTP Server.
-
SMTP-AUTH Account Name/Password: Specify a name and password to be validated with the SMTP server and retype the password for comparison. To set for no password, enter a single space.
-
SMTP over SSL/TLS: You can choose the encryption method between the machine and the SMTP server. You may check or uncheck Verify Server Certificate, which verifies the certificate between the machine and the SMTP server.
-
Device E-mail Address: Enter the e-mail address of the printer. If an administrator address has not been correctly entered, the Notification Mail will be sent to the printer. If you do not set a printer e-mail address, the Notification Mail is not sent to the administrator.
-
POP3 Server Address: This field determines the host name or IP address of the POP3 server (incoming e-mail server). (Ex: pop.example.net -or- 192.0.0.1)
If you are using the DNS name of the POP3 E-mail server you must use the FQDN (Fully Qualified Domain Name) such as pop.example.net. -
POP3 Port: Specify the destination port number of the POP3 server that you will connect to.
-
Mailbox Name/Password: Specify a mailbox name and password on the POP3 server where the Internet print jobs are to be retrieved. To set for no password, enter a single space
-
Use APOP: Check this box to specify whether APOP is used or not when logging in to the POP3 server.
-
POP3 over SSL/TLS: You can choose the encryption method between the machine and the POP3 server. You may check or uncheck Verify Server Certificate, which verifies the certificate between the machine and the POP3 server.
- Segmented Message Timeout: If a print job is separated into multiple email messages using the segmented message feature of the print server, this value indicates how long the print server will wait for all of the segments of the message to arrive.
-
SMTP Server Address: This field displays the Host Name or IP address of an SMTP mail server (outgoing E-mail Server) on your network. (Ex: smtp.example.net or 192.0.0.1) If you are using the DNS name of the SMTP E-mail server, you must use the FQDN (Full Qualified Domain Name) such as smtp.example.net
-
Click Submit. You will briefly see a message stating: Data updated successfully.
-
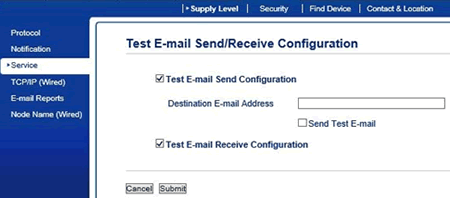
A screen will appear labeled: Test E-Mail Send/Receive Configuration. Choose from the following options then click Submit:
-
Test E-mail Send Configuration
-
Destination E-mail Address: Enter the destination e-mail address.
-
Send Test E-mail
- Test E-mail Receive Configuration
-
Test E-mail Send Configuration
- You will see a message stating: Testing Email Configuration followed by the test results. Once you have are finished viewing the results, click OK.
II: To setup and Scan to E-mail Server using Speed Dial locations
-
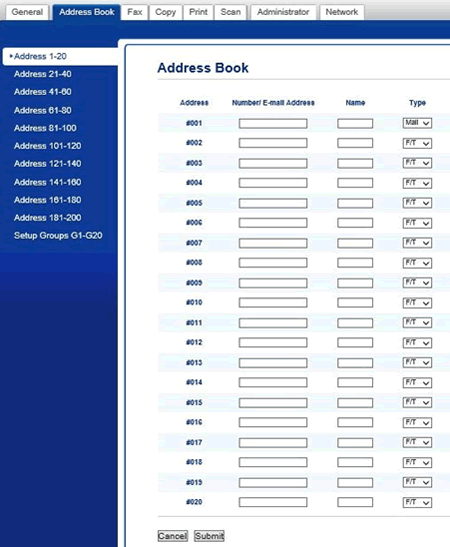
While still within the Web Home Page, click on the Address Book tab.
-
Choose a set of Speed Dial locations that you want to use. For example choose Address 1-20 to store into a speed dial location between 1 and 20.
-
For each storage location that you wish to program, enter the following information:
-
Number/E-mail Address: The recipient's email address.
-
Name: The recipient's name.
- Type: Select Mail.
-
Number/E-mail Address: The recipient's email address.
-
Click Submit.
-
After the Speed Dial locations are configured and you want to Setup Group locations, click Setup Groups G1-G20. Configure the following settings for each group:
-
Address #: Choose a vacant Speed Dial location to store you group.
-
Name: The group's name.
- Members: Click Select and choose the members to include in this group by placing a check next to each desired Speed Dial location.
-
Address #: Choose a vacant Speed Dial location to store you group.
-
Click Submit.
III: Scan to E-mail Server without using One-Touch or Speed Dial numbers:
-
Load your document.
-
Press
 (Scan) on the Brother machine's display (hereinafter called LCD).
-
Swipe left or right to display
 (to E-mail Server).
-
Press
 (to E-mail Server). The icon moves to the middle of the LCD and is highlighted in blue.
-
Press OK.
-
Press Address Book or Manual to input the E-mail address.
-
If you choose Manual, enter the E-mail address using the character buttons on the LCD and then press OK.
-
If you choose Address Book, select the E-mail address and press OK.
-
If you choose Manual, enter the E-mail address using the character buttons on the LCD and then press OK.
-
Press OK.
-
Do one of the following:
-
To change the settings, press Options, and then select the button you want to change. Follow the machine's instructions.
To set your own default settings: after making changes to settings, press the Set New Default option, and then press Yes. To restore the factory settings: Press Factory Reset, and then press Yes. -
Press Start to start scanning without changing additional settings.
-
To change the settings, press Options, and then select the button you want to change. Follow the machine's instructions.
-
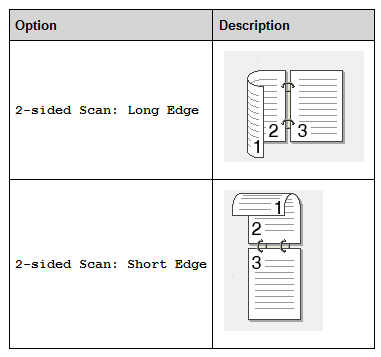
To scan both sides of the document (for MFC‑9340CDW only):
-
Press 2-sided Scan, and then select the document type.
-
Press 2-sided Scan, and then select the document type.
-
Select the scan settings you want to change:
-
Scan Type
-
Resolution
-
File Type
-
Glass Scan Size
-
File Size
If you want to save the settings as a shortcut, press Save as Shortcut. -
Scan Type
- Press Start. The machine starts scanning.
Related FAQs
MFC-9130CW, MFC-9330CDW, MFC-9340CDW
If you need further assistance, please contact Brother customer service:
Content Feedback
Please note this form is used for feedback only.