CV3440
FAQs & Troubleshooting |
CV3440
Date: 01/11/2018 ID: faqh00100908_001
How do I thread the machine?
Before threading, turn off the machine for safety.
Before starting threading the machine, make sure that "Preparation before threading" has been done.
Threading steps are as follows.
- Threading the looper
- Threading the left needle
- Threading the center needle
- Threading the right needle
Threading the looper
Run the thread in the sequence illustrated, following the blue line and the numbers next to each threading point.
-
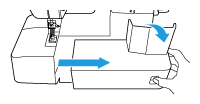
Open the front cover by sliding it to the right and guiding the top toward you.
-
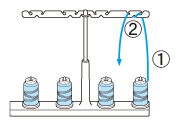
Pull the thread off the spool and directly up through thread holder (1) and thread holder (2) on the thread tree, from back to front.
-
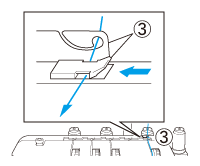
Pass the looper thread (3) as shown in the illustration.
-
Make sure that the thread is passed under the pretension plate on the thread guide. (A)
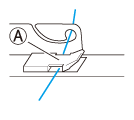
-
When using thick thread, such as decorative thread, as the looper thread, run the thread as shown in the illustration.
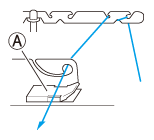
Do not run the thread through (A) when using thick thread.
-
Make sure that the thread is passed under the pretension plate on the thread guide. (A)
-
Pass the thread through the tension disc (4) in the channel next to the tension dial marked with a blue
 .
.
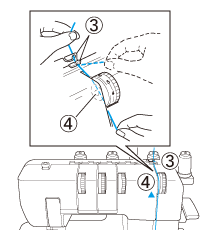
-
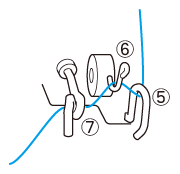
Guide the thread down the channel and through threading points (5) - (9), following the numerical order in the illustration.
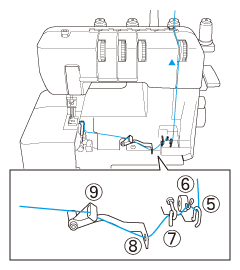
- Make sure that the thread is passed under the thread guide (5) in the looper thread take-up.
- Make sure that the thread is passed over the looper thread spring (6).
- Make sure that the thread is passed through the loop of the thread guide (7).
-
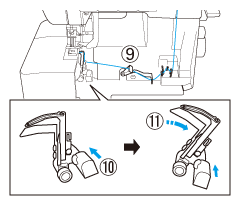
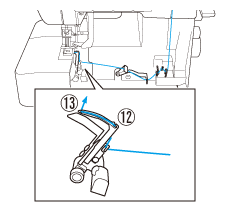
After running the thread to (9), push the looper release lever (10) to move the looper to the right (11), and then run the thread through (12) - (13).
-
Pull about 10 cm (4 inch) of thread through the eye of the looper.
-
While pushing the looper (14), return the looper to its original position.
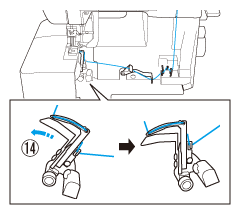
- Close the front cover.
Threading the needles
About needle threads used by the various stitches:
When sewing a cover stitch on back side, thread the needles as follows.
- The triple cover stitch (three-needle, four-thread cover stitch) uses the left needle thread, center needle thread and right needle thread.
- The two-needle, three-thread cover stitch (Wide) ( 6 mm (15/64 inch)) uses the left needle thread and right needle thread.
- The two-needle, three-thread cover stitch (Narrow) ( 3 mm (1/8 inch)) uses the center needle thread and right needle thread.
- The chain stitch uses the center needle thread and looper thread.
When threading the needles, always thread in the following order: left needle, center needle and right needle.
1. Threading the left needle
Run the thread in the sequence illustrated, following the yellow numbers and ![]() (yellow) marks next to the threading points.
(yellow) marks next to the threading points.
-
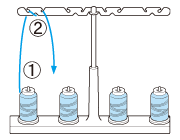
Pull the thread off the spool and directly up through thread holder (1) and thread holder (2) on the thread tree, from back to front.
-
Pass each thread through (3), shown in the illustration.
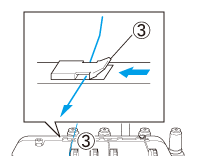
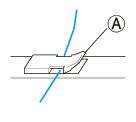
Make sure that the thread is passed under the pretension plate on the thread guide. (A)
-
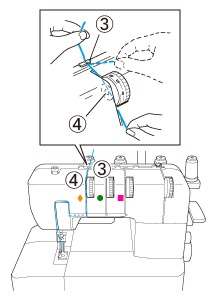
Pass the thread through the tension disc (4) in the channel next to the tension dial.
-
Guide the thread down the channel and across through threading points (5) - (8) next to the color marks, following the numerical order in the illustration.

(A) Pass the left needle thread through the left side of the branching plate.
(B) Center needle thread
(C) Right needle thread
(D) Branching plate-
Make sure that the thread is passed under the tension plate on the needle bar.

-
Make sure that the thread is passed behind the thread guide on the needle bar.

-
Make sure that the thread is passed under the tension plate on the needle bar.
-
Pass the thread through the eye of the needle, front to back. (9)

2. Threading the center needle
Run the thread in the sequence illustrated, following the green numbers and ![]() (green) marks next to the threading points.
(green) marks next to the threading points.
-
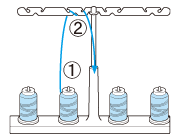
Pull the thread off the spool and directly up through thread holder (1) and thread holder (2) on the thread tree, from back to front.
-
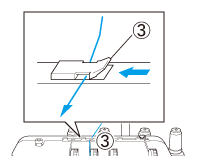
Pass each thread through (3), shown in the illustration.
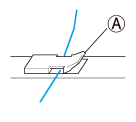
Make sure that the thread is passed under the pretension plate on the thread guide. (A)
-
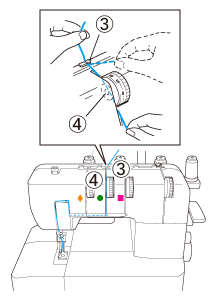
Pass the thread through the tension disc (4) in the channel next to the tension dial.
-
Guide the thread down the channel and across through threading points (5) - (8) next to the color marks, following the numerical order in the illustration.

(A) Left needle thread
(B) Pass the center needle thread through the right side of the branching plate.
(C) Right needle thread
(D) Branching plate-
Make sure that the thread is passed under the tension plate on the needle bar.

-
Make sure that the thread is passed behind the thread guide on the needle bar.

-
Make sure that the thread is passed under the tension plate on the needle bar.
-
Pass the thread through the eye of the needle, front to back. (9)

3. Threading the right needle
Run the thread in the sequence illustrated, following the pink numbers and ![]() (pink) marks next to the threading points.
(pink) marks next to the threading points.
-
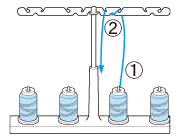
Pull the thread off the spool and directly up through thread holder (1) and thread holder (2) on the thread tree, from back to front.
-
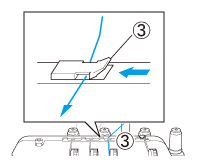
Pass each thread through (3), shown in the illustration.
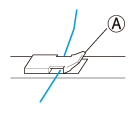
Make sure that the thread is passed under the pretension plate on the thread guide. (A)
-
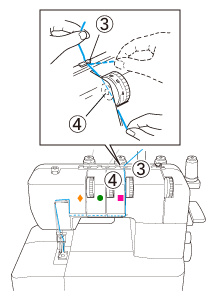
Pass the thread through the tension disc (4) in the channel next to the tension dial.
-
Guide the thread down the channel and across through threading points (5) - (8) next to the color marks, following the numerical order in the illustration.

(A) Left needle thread
(B) Center needle thread
(C) Pass the right needle thread through the right side of the branching plate.
(D) Branching plate-
Make sure that the thread is passed under the tension plate on the needle bar.

-
Make sure that the thread is passed behind the thread guide on the needle bar.

-
Make sure that the thread is passed under the tension plate on the needle bar.
-
Pass the thread through the eye of the needle, front to back. (9)

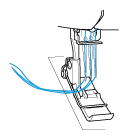
Pull about 6 cm (about 2-1/2 inches) of thread through the eye of the needle.
CV3440
If you need further assistance, please contact Brother customer service:
Content Feedback
Please note this form is used for feedback only.