PT-H500
FAQs & Troubleshooting |

PT-H500
Date: 03/16/2020 ID: faqp00001475_007
How do I set tape margins and what features are they?
-
Press the Label key.
-
Select "Cut Option" using the Up or Down arrow key, and then set the value by using the Left or Right arrow key.
-
Press the OK or Enter key to apply the settings.
* New settings are NOT applied if you do not press the OK or Enter key.
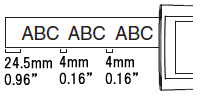
Large Margin
-
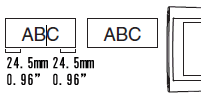
- Automatically cuts the tape after each label is printed, leaving a margin of 24.5 mm/0.96" on each end.
Small Margin
-
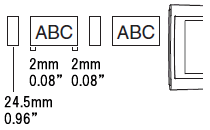
- Automatically cuts a piece of blank tape before printing the first label and then cuts the tape after each label is printed, leaving a 2 mm/0.08" margin at both ends of each label.
Chain
-
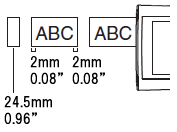
- Automatically cuts a piece of blank tape before printing the first label and then cuts the tape after each label is printed, leaving a 2 mm/0.08" margin at both ends of each label.
- Once the last label is printed, the tape is not fed and cut. Press the Feed & Cut key to feed and cut the tape.
No Cut
-
- Select this setting when printing multiple copies of a label and you do not want the labels cut after each label is printed, or when using Fabric Iron-On Tapes or other special tapes that cannot be cut by the tape cutter of the P-touch labeler.
-
Once the label is printed, the tape is not fed and cut. Press the Feed & Cut key to feed and cut the tape.
When using the special tapes that cannot be cut by the tape cutter of the P-touch labeler, remove the tape cassette from the P-touch labeler and use scissors to cut the tape.
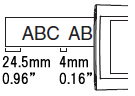
Special tape
-
When multiple copies are printed one time:
When a label is printed two times:
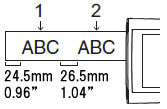
1. 1st print
2. 2nd print - Select this setting when using special tape.
- When using Fabric Iron-On Tapes, select "No Cut" for Cut Options before printing. After printing, remove the tape cassette from the P-touch labeler and use scissors to cut the tape.
PT-H500
If you need further assistance, please contact Brother customer service:
Content Feedback
To help us improve our support, please provide your feedback below.
Step 1: How does the information on this page help you?
Step 2: Are there any comments you would like to add?
Please note this form is used for feedback only.