MFC-J5930DW
FAQs & Troubleshooting |

MFC-J5930DW
Date: 01/23/2018 ID: faq00002978_009
Set up a Scan to FTP Profile
Set up a Scan to FTP Profile to scan and upload the scanned data directly to an FTP location.
We recommend Microsoft® Internet Explorer® 8/11 and Microsoft Edge™ for Windows, and Safari 9 for Macintosh. Please also make sure that JavaScript and Cookies are always enabled in whichever browser you use. If a different web browser is used, make sure it is compatible with HTTP 1.0 and HTTP 1.1.
-
Start your web browser.
Type "http://machine's IP address" in your browser's address bar (where "machine's IP address" is the IP address of the machine or the print server name).
For example: http://192.168.1.2
If you have previously set a password, type it, and then click .
. - Click the Scan tab.
- Click the Scan to FTP/Network menu in the left navigation bar.
-
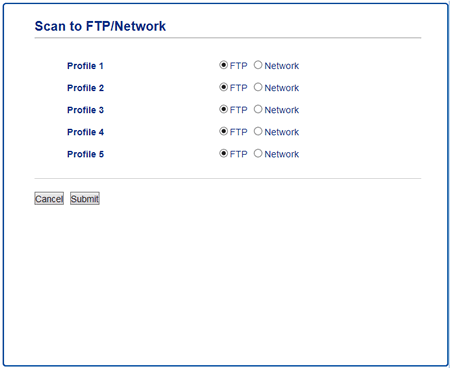
Select the FTP option, and then click Submit.

- Click the Scan to FTP/Network Profile menu in the left navigation bar.
- Select the profile you want to set up or change.
- In the Profile Name field, type a name for this server profile (up to 15 alphanumeric characters). The machine will display this name on the LCD.
- In the Host Address field, type the Host Address (for example: ftp.example.com; up to 64 characters) or the IP address (for example: 192.23.56.189).
- Change the Port Number setting used to access the FTP server. The default for this setting is port 21. In most cases this setting does not need to be changed.
- In the Username field, type a user name (up to 32 characters) that has permission to write data to the FTP server.
- In the Password field, type the password (up to 32 characters) associated with the user name you entered in the Username field. Type the password again in the Retype password field.
- To scan securely using SSL/TLS communication, set the SSL/TLS option. Change the CA Certificate setting, if needed.
-
In the Store Directory field, type the path (up to 60 characters) to the folder on the FTP server where you want to send your scanned data. Do not type a slash mark at the beginning of the path (see example).

- Click the File Name drop-down list, and then select a file name from the preset names provided, or from user-defined names. You can set the user-defined names and file name style in the Scan File Name menu in the left navigation bar.
- Click the Quality drop-down list, and then select a quality setting. If you choose the User Select option, the machine will prompt users to select a setting each time they use the scan profile.
- Click the File Type drop-down list, and then select the file type you want to use for the scanned document. If you choose the User Select option, the machine will prompt users to select a setting each time they use the scan profile.
- Click the Document Size drop-down list, and then select your document size from the list. This is necessary to make sure the scanned file is the correct size.
- If you want to scan a document printed on long paper using the ADF, select the On option from the Scan Long Paper (ADF) option. (Available only for certain models)
- Select Auto from the ADF Auto Deskew option, to set the machine to correct document skewing automatically as the pages are scanned from the ADF. (Available only for certain models)
- If you want to remove blank pages of the document from the scanning results, select the On option from the Skip Blank Page option. (Available only for certain models)
- Click the Remove Background Color drop-down list, and then select the level from the list. You can use this feature to remove the background color of documents to make the scanned data more legible.
- Set the Passive Mode option to off or on depending on your FTP server and network firewall configuration. The default setting is on. In most cases this setting does not need to be changed.
- Click Submit.
Using the following characters: ?, /, \, ", :, <, >, | or * may cause a sending error.
Related FAQs
MFC-J5330DW, MFC-J5830DW(XL), MFC-J5930DW, MFC-J6530DW, MFC-J6535DW(XL), MFC-J6930DW, MFC-J6935DW
If you need further assistance, please contact Brother customer service:
Content Feedback
To help us improve our support, please provide your feedback below.
Step 1: How does the information on this page help you?
Step 2: Are there any comments you would like to add?
Please note this form is used for feedback only.