MFC-9840CDW
FAQs & Troubleshooting |
MFC-9840CDW
Date: 07/20/2022 ID: faq00002702_000
Configure and use the Scan to OCR feature in Windows.
The Scan to OCR feature allows you to scan a document and have it automatically converted by ScanSoft PaperPort into an editable text file and have the result displayed in your word processing application for viewing and editing.
Click the link for steps:
-
To configure the Scan to OCR feature
-
To use the Scan to OCR feature from the ContorlCenter3
-
To use the Scan key on the Brother machine
I. To configure the Scan to OCR feature:
-
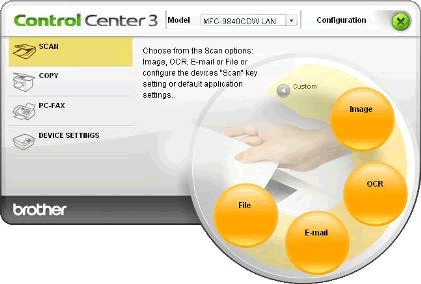
Open the ControlCenter3 by clicking Start => (All) Programs => Brother => [model name] => ControlCenter3. The ControlCenter3 application will be loaded in the Task Tray near the system clock.
-
Double-click on the ControlCenter3 icon located in the Task Tray to launch the program window.
-
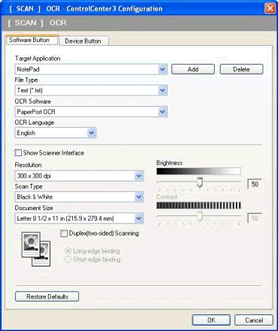
Click on Configuration => Scan => OCR. The Scan to OCR configuration window will appear.
-
The Software Button tab configures the Scan to OCR button within the ControlCenter3 software interface. The Device Button tab configures the Scan to OCR key on the Brother machine. Choose the tab you want to configure. Not all options are available on both tabs.
-
You can configure the following properties:
-
Target Application: This is the application that you would like to launch automatically, once the scan is complete.
-
File type: The format that the file will be saved in.
-
OCR Software: Choose the OCR engine you would like to use. We recommend using PaperPort OCR.
-
OCR Language: Select the language of your document.
-
Show Scanner Interface: Check this box if you want to pre-scan the document and crop a portion of the page before completing the scan. This option is only available within the Software Button tab.
-
Resolution: This is how sharp an image will be based on the dots per inch scanned (DPI). The higher the DPI the clearer the image will be, however the scan time and document size will increase.
-
Scan type: This is the color scan option. The higher the color quality selected the longer the scan job will take to complete and the file size will be.
-
Document Size: Set the size of the document being scanned.
-
Brightness: Adjust the setting (-50 to 50) to obtain the best image. The default value is 0, representing an average. You can set the level by dragging the slide bar to the right or left to lighten or darken the image respectively. You can also type a value in the box for the setting.
This option is not available if the Scan Type is set to Black & White or 24-bit color.
- Duplex (two-sided) Scanning: Check this box if you want to 2-sided(duplex) scan your document. You will also need to choose your binding option this option and choose your binding option 2sided (L) edge or 2sided (S) edge depending on your document layout. This option is only available in the Software Button tab.
-
Target Application: This is the application that you would like to launch automatically, once the scan is complete.
- Once you have configured each setting click OK. All subsequent scans will use these settings.
II. To use the Scan to OCR feature from the ContorlCenter3:
-
Place the document to be scanned on the scanner Flatbed or Automatic Document Feeder (ADF) depending on the model of your Brother machine.
-
Open the ControlCenter3 by clicking Start => (All) Programs => Brother => [model name] => ControlCenter3. The ControlCenter3 application will be loaded in the Task Tray near the system clock.
-
Double-click on the ControlCenter3 icon located in the Task Tray to launch the program window.
-
On the Scan menu left-click the OCR button.
- The document will now scan.
III. To use the Scan key on the Brother machine:
-
Open the ControlCenter3 by clicking Start => (All) Programs => Brother => [model name] => ControlCenter3. The ControlCenter3 application will be loaded in the Task Tray near the system clock.
-
Place the document to be scanned on the scanner Flatbed or into the Automatic Document Feeder (ADF), depending on the model of your machine.
-
Press the SCAN key on the Brother machine.
-
Press the UP OR DOWN ARROW key to select Scan to OCR and press OK.
-
Choose:
-
1 Sided
-
2 Sided (L) edge
- 2 Sided (S) edge
If you want to scan a document using the 2-sided(duplex) scanning feature, you need to put the document in the ADF and then choose 2sided (L) edge or 2sided (S) edge depending on your document layout.
-
1 Sided
-
For network users only:
-
Press the UP OR DOWN ARROW key to select destination PC that you want to receive the scan and press OK.
- If the LCD prompts you to enter a PIN, enter the 4-digit PIN for the destination PC and press OK.
-
Press the UP OR DOWN ARROW key to select destination PC that you want to receive the scan and press OK.
- Press BLACK (MONO) START or COLOR (COLOUR) START to begin the process. The document will now scan.
DCP-9045CDN, MFC-9840CDW
If you need further assistance, please contact Brother customer service:
Content Feedback
Please note this form is used for feedback only.