Step 1: Please check the following points.
- Check that you use the paper that meets our specification.
Please refer to "What is the recommended paper?".
- Check that the drum units and toner cartridges are installed properly.
Please refer to the instructions, "How do I replace a drum unit?" and "How do I replace the toner cartridge?".
If you still have a print quality problem, please go to the
Step 2.
Step 2: Please click the IMAGE which is similar to the problem you have.
White lines, bands or ribbing across the page:
 |
- The drum unit may be damaged. Put in a new drum unit as follows:
- Click here to print the chart. [185KB/ PDF]
- Compare your printed document with the printed chart to identify the color of the drum unit causing the problem.
- Replace the drum unit of the color.
Please refer to the instructions, "How do I replace the drum unit?". |
Back To Top >>
Colors are light or unclear on the whole page:
Back To Top >>
Vertical streaks in a light background:
 |
- Clean the LED heads as follows:
- Click here to print the chart. [345KB/ PDF]
- Compare your printed document with the printed chart to identify the color of the LED head causing the problem.
- Wipe the windows of the LED head with a dry lint free soft cloth.
Please refer to the instructions, "How do I clean the LED head?". |
Back To Top >>
White spots or hollow print:
 |
- Clean the drum unit as follows:
- Click here to print the chart. [345KB/ PDF]
- Compare your printed document with the printed chart to identify the color of the drum unit causing the problem.
- Clean the drum unit of the color.
Please refer to the instructions, "How do I clean the drum unit?".
- Make sure that the media type settings in the printer driver and in the machine's Paper Type menu matches the type of paper you are using. We recommend trying to change Thick Paper or Thicker Paper mode in the printer driver, and Thick or Thicker in the machine's Paper Type menu setting.
- Check the machine's environment. Conditions such as high humidity can cause white spots or hollow print.
Temperature: 10ºC to 32.5ºC (50ºF to 90.5ºF)
Humidity: 20% to 80% (without condensation) |
Back To Top >>
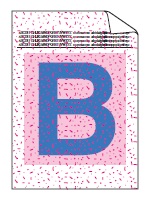
Toner scatter or toner stain:
 |
- Check the machine's environment. Conditions such as high humidity can cause white spots or hollow print.
Temperature: 10ºC to 32.5ºC (50ºF to 90.5ºF)
Humidity: 20% to 80% (without condensation)
- The toner cartridge may be damaged. Put in a new toner cartridge as follow:
- Click here to print the chart. [345KB/ PDF]
- Compare your printed document with the printed chart to identify the color causing the problem.
- Replace the toner cartridge of the color.
Please refer to the instructions, "How do I replace the toner cartridge?".
- If the problem continues, the drum unit may be damaged. Put in a new drum unit of the color causing the problem.
Please refer to the instructions, "How do I replace the drum unit?". |
Back To Top >>
All one color:
 |
- The drum unit may be damaged. Put in a new drum unit as follows:
- Click here to print the chart. [345KB/ PDF]
- Compare your printed document with the printed chart to identify the color of the drum unit causing the problem.
- Replace the drum unit of the color.
Please refer to the instructions, "How do I replace the drum unit?". |
Back To Top >>
Uneven density appears periodically across the page:
Back To Top >>
Wrinkle:
Back To Top >>
Offset image:
 |
- Make sure that the media type settings in the printer driver and in the machine's Paper Type menu matches the type of paper you are using.
- Make sure that two gray levers inside the back cover are in the up position.
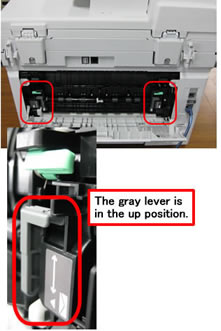
- Check the machine's environment. Conditions such as high humidity can cause white spots or hollow print.
Temperature: 10ºC to 32.5ºC (50ºF to 90.5ºF)
Humidity: 20% to 80% (without condensation)
- The drum unit may be damaged. Put in a new drum unit as follows:
- Click here to print the chart. [345KB/ PDF]
- Compare your printed document with the printed chart to identify the color of the drum unit causing the problem.
- Replace the drum unit of the color.
Please refer to the instructions, "How do I replace the drum unit?". |
Back To Top >>
Poor fixing:
Back To Top >>
Curled or wavy:
Back To Top >>
Envelope creases:
Back To Top >>
White streaks or bands down the page:
Back To Top >>
Colored streaks or bands down the page:
 |
- Clean all four corona wires (one for each color) inside the drum unit by sliding the green tab. After completing the cleaning, make sure the corona wire cleaners are at their home positions.
Please refer to the instructions, "How do I clean the corona wire?".
- The toner cartridge may be damaged. Put in a new toner cartridge as follow:
- Click here to print the chart. [185KB/ PDF]
- Compare your printed document with the printed chart to identify the color causing the problem.
- Replace the toner cartridge of the color.
Please refer to the instructions, "How do I replace the toner cartridge?".
- If the problem continues, the drum unit may be damaged. Put in a new drum unit of the color causing the problem.
Please refer to the instructions, "How do I replace the drum unit?". |
Back To Top >>
Colored lines across the page:
 |
- The toner cartridge may be damaged. Put in a new toner cartridge as follow:
- Click here to print the chart. [345KB/ PDF]
- Compare your printed document with the printed chart to identify the color causing the problem.
- Replace the toner cartridge of the color.
Please refer to the instructions, "How do I replace the toner cartridge?".
- If the problem continues, the drum unit may be damaged. Put in a new drum unit of the color causing the problem.
Please refer to the instructions, "How do I replace the drum unit?". |
Back To Top >>
Completely blank or some colors are missing:
 |
- The toner cartridge may be damaged. Put in a new toner cartridge as follow:
- Click here to print the chart. [345KB/ PDF]
- Compare your printed document with the printed chart to identify the color causing the problem.
- Replace the toner cartridge of the color.
Please refer to the instructions, "How do I replace the toner cartridge?".
- If the problem continues, the drum unit may be damaged. Put in a new drum unit of the color causing the problem.
Please refer to the instructions, "How do I replace the drum unit?". |
Back To Top >>
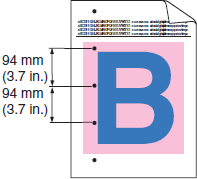
Colored spots at 94mm (3.7in.):
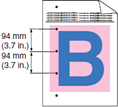 |
- The drum unit may have glue from a label stuck on the drum surface. Clean the drum unit as follow:
- Click here to print the chart. [345KB/ PDF]
- Compare your printed document with the printed chart to identify the color causing the problem.
- Clean the drum unit of the color.
Please refer to the instructions, "How do I clean the drum unit?".
- If the problem continues, the drum unit may be damaged. Put in a new drum unit of the color causing the problem.
Please refer to the instructions, "How do I replace the drum unit?". |
Back To Top >>
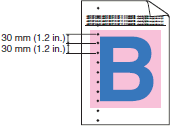
Colored spots at 30mm (1.2in.):
Back To Top >>
Color misregistration:
 |
- Make sure that the machine is on a solid level surface.
- Perform the auto color registration using the control panel. If the problem continues, perform the manual color registration using the control panel.
Please refer to the instructions, "How do I adjust the print position of each color?".
- The drum unit may be damaged. Put in a new drum unit as follow:
- Click here to print the chart. [345KB/ PDF]
- Compare your printed document with the printed chart to identify the color causing the problem.
- Replace the drum unit of the color.
Please refer to the instructions, "How do I replace a drum unit?".
- If the problem continues, the belt unit may be damaged. Put in a new belt unit.
Please refer to the instructions, "How do I replace the belt unit? ". |
Back To Top >>
Uneven density or faded:
 |
- Fully open the top cover and then close it again.
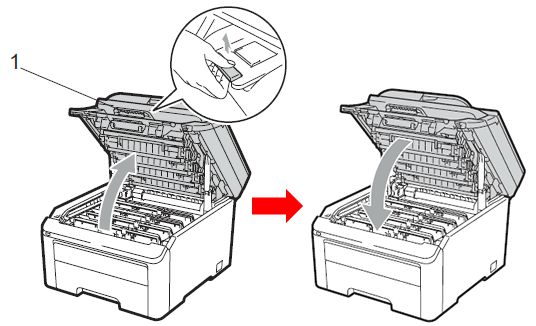
|
Back To Top >>
