MFC-8710DW
FAQs & Troubleshooting |
MFC-8710DW
Date: 11/24/2022 ID: faq00002978_002
Configure and use the Scan to FTP feature
The Scan to FTP feature allows you to scan a black and white or color document directly to an FTP server on your local network or on the Internet. The details required to use Scan to FTP can be entered by using the Web Based Management to pre-configure and store the details in an FTP profile.
Scan to FTP is available only after FTP profiles have been configured.
Click the link for steps:
To configure the FTP profiles for the Scan to FTP feature:
-
Print the network configuration report to obtain the IP address of the Brother machine.(Click here to see how to print the Network Configuration List.)
-
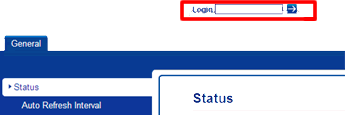
Open web-based management on a computer connected to the same network as your Brother machine. To use web-based management, open a web browser (such as Internet Explorer) and enter in the IP address of the Brother machine from the Network Configuration List. (Ex: http://[IP address of your machine])
If you have configured a password on your machine's network card, you must first enter the network password in the Login field at the top of the screen and then press .
.
-
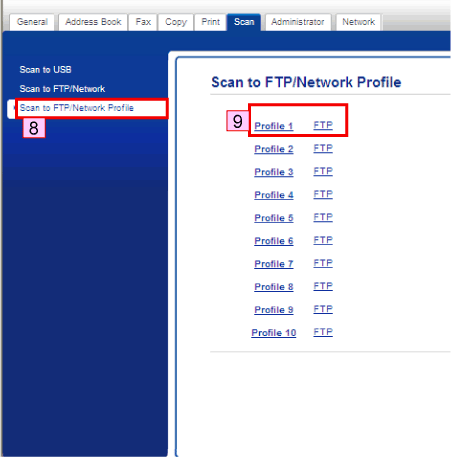
Click the Scan tab.
-
Select the Scan to FTP/Network menu.
-
Select the FTP option for the profile you want to use for Scan to FTP.
-
Under Create a User Defined File Name, you may enter a file name to be used as the prefix for scanned documents. You can store two user defined File Names in addition to the seven preset File Names.
A maximum of 15 characters can be entered. -
Once all changes have been made, click Submit.

-
Click Scan to FTP/Network Profile.
-
Click the Profile Name you want to configure and change the scan to FTP settings.
-
Enter in the following information:

Profile Name:
Enter the name that you want to use for the profile of the FTP server. You will see this name on the Brother machine when using the Scan to FTP feature. (Up to 15 characters)
Host Address:
Enter the Host Address (Up to 64 characters), which is the domain name of the FTP server you want to connect to, or the IP address of the FTP server. (ex: ftp.example.com or 192.23.56.189)
Username:
Enter the username that has been registered with the FTP server for the machine. (Up to 32 characters)
New Password/Retype Password:
Enter the password that has been registered with the FTP server for the machine. (Up to 32 characters)
Store Directory:
Enter the destination folder where your document will be stored on the FTP server. Make sure you enter a forward slash before the directory path /. (ex: /brother/abc) (Up to 60 characters)
File Name:
Select the file name you want to use as a prefix to the scanned document. It helps you identify the scanned document. You can choose from seven preset and two user defined File Names. The file name that will be used for your document will be the file name you chose plus the last 6 digits of the flatbed/ADF scanner counter plus the file extension. (ex: Estimate098765.pdf). You can also manually enter a file name up to 15 characters.
Quality:
Select the scan quality. If you choose the User Select option, the machine will prompt users to select a setting each time they use the scan profile.
File Type:
Select the file type you want to use for the scanned document. If you choose the User Select option, the machine will prompt users to select a setting each time they use the scan profile.
- If you choose Secure PDF, the machine will ask you to enter a 4-digit password using the numbers 1-9 before it starts scanning.
- If you choose SIGNED PDF, you must install and then configure a certificate to your machine using Web Based Management.
Glass Scan Size:
Select your document size. This is necessary to make sure the scanned file is the correct size. If you choose the User Select option, the machine will prompt users to select a setting each time they use the scan profile.
File Size:
Select your file size. If you choose the User Select option, the machine will prompt users to select a setting each time they use the scan profile.
Passive Mode:
Set passive mode OFF or ON depending on your FTP server and network firewall configuration. By default this setting is ON.
Port Number:
Enter the port number used to access the FTP server. By default the port is 21 but you may modify it if your server uses a different port. - Once you have entered in the settings click Submit.
To use the Scan to FTP feature:
-
Load your document on the scanner.
-
Press Scan.
-
Press the Up or Down arrow key to select Scan to FTP and press OK.
- If your machine does not support Duplex Scan, go to STEP 5.
- If your machine does support Duplex Scan, go to STEP 4.
-
Press the Up or Down arrow key to select 1 sided, 2 sided (L) edge, 2 sided (S) edge and press OK.
-
Press the Up or Down arrow key to select one of the Scan to FTP profiles listed and press OK.
- If the profile is complete, you will automatically go to STEP 10.
- If User Select was configured using Web Based Management, you will be prompted to choose the scan quality, file type and file size from the control panel.
- If the profile is not complete, for instance, the quality or file type are not chosen, you will be prompted to enter any missing information in the following steps.
-
Choose one of the following options:
- Press the Up or Down arrow key to select: Color 100 dpi, Color 200 dpi, Color 300 dpi, Color 600 dpi, Color Auto, Gray 100 dpi, Gray 200 dpi, Gray 300 dpi or Gray Auto. Press OK. Continue to STEP 7.
-
Press the Up or Down arrow key to select: B&W 300 dpi, B&W 200 dpi or B&W 200x100 dpi. Press OK. Continue to STEP 8.
-
Press the Up or Down arrow key to select: PDF, PDF/A, Secure PDF, Signed PDF, JPEG or XPS. Press OK. Continue to STEP 9.
-
Press the Up or Down arrow key to select: PDF, PDF/A, Secure PDF, Signed PDF or TIFF. Press OK. Continue to STEP 10.
- If you choose Secure PDF, the machine will ask you to enter the 4-digit password before it starts scanning.
- If you choose Signed PDF, you must install and then configure a certificate to your machine using Web Based Management.
-
Press the Up or Down arrow key to select: Small, Medium or Large.Press OK and continue to STEP 10.
-
Do one of the following:
- If you want to start scanning, press Start and continue to STEP 13.
- If you want to change the file name, continue to STEP 11.
-
Press the Up or Down arrow key to choose the file name you want to use and press OK. Press Start and continue to STEP 13.
If you want to change the file name manually, continue to STEP 12. -
Press the Up or Down arrow key to choose <Manual>. Press OK.
- Enter the file name you want to use (up to 32 characters) and press OK.
- Press Start.
- The LCD shows "Connecting". When the connection to the FTP server is successful the machine starts the scanning process.
Related FAQs
DCP-8110DN, DCP-8150DN, DCP-8155DN, MFC-8510DN, MFC-8710DW, MFC-8810DW, MFC-8910DW
If you need further assistance, please contact Brother customer service:
Content Feedback
To help us improve our support, please provide your feedback below.
Step 1: How does the information on this page help you?
Step 2: Are there any comments you would like to add?
Please note this form is used for feedback only.