MFC-5860CN
FAQs & Troubleshooting |
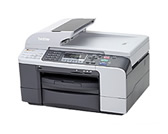
MFC-5860CN
Date: 03/06/2008 ID: faq00002490_001
How do I clear the message "No Paper Fed" from the display?
The message "No Paper Fed" may appear on the display if the Brother machine is out of paper, the paper is not loaded properly in the paper tray or the jam clear cover located in the back of the machine is not installed properly.
To resolve this issue follow the steps below:
[Check] Verify the paper is loaded properly in the paper tray.
If the paper is loaded NOT properly in the tray, insert the paper into the tray by following the procedure below:
- Remove the paper tray or the paper tray #1/ Top Tray (if available) from the machine.
Adjust the Paper Side Guides, located on either side of the tray to fit the width of the paper you are using. The guides should just barely make contact with the paper edges.
- Adjust the Paper Length Guide to the size of paper you are using. The pointer on the Paper Length Guide should line up with the indicator mark for the paper size.
When the Paper Length Guide is adjusted correctly the leading edge of the paper will NOT be in contact with the back end of the paper tray.
- Fan the stack of paper well to avoid paper jams. The paper must be uniformly stacked (same size, type and weight). Do not use paper that is damaged, curled, wrinkled, and irregularly shaped, extremely shiny, highly textured or paper that was previously printed by a printer.
- Gently insert the paper into the paper tray, print side down and leading edge (top of the paper) in first. Be careful not to push the paper in too far; it may lift at the back of the tray and cause feed problems. Also, be sure to follow the paper specifications and paper tray capacity information listed below:
Plain Copy Paper (17lb to 32lb) = Up to 100 sheets of letter size or 50 sheets of legal-size.
Ink Jet Paper (17lb to 53lb) = Up to 20 sheets.
Glossy Paper (up to 58lb) = Up to 20 sheets.
If the message "No Paper Fed" continues to appear on the LCD take out the jammed paper depending on where it is jammed in the machine by following the procedure below:
- Unplug the machine from the AC power outlet and pull the paper tray or the paper tray #1/ Top Tray (if available) out of the machine.
- Look for any loose paper, jammed paper or foreign objects in the area of the machine where the paper tray was installed.
- Lift the paper tray cover to open. Remove any paper remaining in the tray.
- Reset the machine by lifting the scanner cover from the front of the machine and then closing it.
If you cannot remove the jammed paper from the front of the machine, or the error message still appears on the LCD after you have removed the jammed paper, please go to the next step.
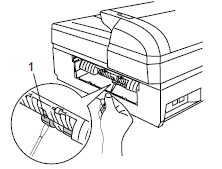
- Remove the Jam Clear Cover (1) from the back of the machine and pull the jammed paper out of the machine.
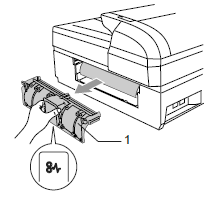
DO NOT place the jam clear cover face down as shown in the illustration. Doing this may damage the cover and cause paper jams.
Clean the Paper Pick-up Roller (1) with isopropyl alcohol on a cotton swab.
- Reinstall the Jam Clear Cover. Make sure the rear cover is completely on. When installed it should be flush with the back of the machine. Turn the machine around.
- Lift the scanner cover (1) from the front side of the machine until it locks securely into the open position.Make sure that there is no jammed paper left in the corners of the machine.
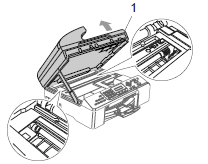
If the paper is jammed under the print head, verify that the machine is unplugged from the power source, and then move the print head to take out the paper.
- Lift the scanner cover to release the lock (1). Gently push the scanner cover support down (2) and close the scanner cover (3).
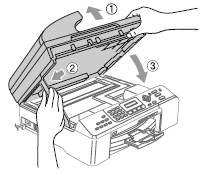
- Push the paper tray firmly back into the machine and re-connect the power cord.
- Test by printing a Help List:
a. Press Menu.
b. Press the up or down keys to choose "Print Reports" and press OK.
c. Press the up or down keys to choose "Help List" and press OK
d. Press Black Start.
If a different message is displayed on the LCD refer to the necessary solution for the message being displayed.
If the message "No Paper Fed" continues to appear on the LCD go to Step 11.
- Remove the paper tray or the paper tray #1/ Top Tray (if available) from the machine.
- Look inside the machine, where the paper tray was installed and locate the white plastic paper pick-up shoe.
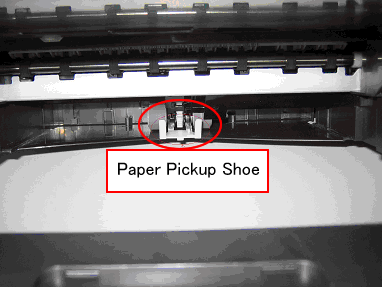
If the white plastic shoe is missing see warranty information listed in the end of the steps.
- Install the Paper tray back inside the machine. Verify the paper tray is seated properly in the machine. Push the tray all the way in and you should hear a snap or click once the tray is in the proper position.
- Press the Stop/Exit key.
If the problem continues see warranty information listed below:
- In USA
If your unit is still within warranty, please click here for information on how to contact Customer Service Center for assistance.
If your unit is out of warranty, please click here to locate a Brother Authorized Service Center near you.
- In Canada
For the Brother Customer Service telephone numbers for assistance in Canada, please click here.
- In Latin America
For the Brother Customer Service telephone numbers for assistance in Latin America, please click here.
MFC-5460CN, MFC-5860CN
If you need further assistance, please contact Brother customer service:
Content Feedback
Please note this form is used for feedback only.

