TD-2130N
FAQs & Troubleshooting |

TD-2130N
Date: 10/16/2019 ID: faqp00100409_002
Adding a custom media size for continuous tape (Linux®)
To add a custom media size for continuous tape, do the following:
-
Run the command to add a custom media size.
-
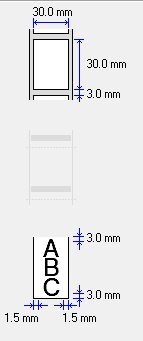
Add a new Label Format with the "New Label Format" name and set the 30mm width and length and the 3mm label gap:
"brpapertoollpr_td2020 -P TD-2020 -n Paper_Name -w 30 -h 30 -g 3.0 -b 3 -t 3 -r 1.5 -l 1.5 -S [0/1/2] [-m 0.0 -o 0.0]" [enter]
(Type the whole command as a single line before you press enter):
In the case of S=0,1 then program not need (-m 0.0 -o 0.0).
-P Printer Name, e.g. TD-2020
-n New Label Name
-w label width
-h label length
-g label spacing
-b bottom margin
-t top margin
-r right margin
-l left margin
-S 0/1/2(0:Continuous Length Tape/1:Die-Cut Label/2:Media With Marks)
-m mark
-o mark offset
Example:
brpapertoollpr_td2020 -P TD-2020 -n Paper_Name -w 30 -h 30 -g 3.0 -b 3 -t 3 -r 1.5 -l 1.5 -S [0/1/2] [-m 0.0 -o 0.0]

-
Remove the Label Format with the "New Label Format" name:
"brpapertoollpr_td2020 -P TD-2020 -d Paper_Name" [enter]Enter the Width and Height/Length in mm.
Superuser authorization is required.
-
Add a new Label Format with the "New Label Format" name and set the 30mm width and length and the 3mm label gap:
-
Select the new media size from "Set Printer Options" in "http://localhost:631/printers".
-
Try a test print from "Print Test Page".
TD-2020/2020A, TD-2120N, TD-2125N, TD-2125NWB, TD-2130N, TD-2135N, TD-2135NWB
If you need further assistance, please contact Brother customer service:
Content Feedback
To help us improve our support, please provide your feedback below.
Step 1: How does the information on this page help you?
Step 2: Are there any comments you would like to add?
Please note this form is used for feedback only.