HL-6180DW
FAQs & Troubleshooting |
HL-6180DW
Date: 11/19/2014 ID: faq00002991_000
I cannot print automatically a document that has different paper sizes.
You can set the Brother machine to automatically select the appropriate paper tray based on the paper size.
If you select Auto Select as the Paper Source, the application will automatically print from the appropriate tray based on the document's paper size. Auto Select is the default setting of the printer driver. For this feature to work, the tray settings must be defined from the machine's control panel, the printer driver must be configured properly, and the paper size must be configured properly within the document's properties.
-
Verify the paper size and type you wish to print on can be used in the paper tray you are loading the paper in.
Click here to see information for the acceptable paper. -
When you change the size of paper in the tray, you will also need to change the setting for the paper size at the same time.
To set the Paper Size:- Press the Up or Down arrow key to select Paper Tray. Press OK.
-
Press the Up or Down arrow key to select Tray1 Size, MP Size, or Tray2 Size* and press OK.
* NOTE: Tray2 Size is only available if the second paper tray has been installed. - Press the Up or Down arrow key to select the paper size that is loaded in the tray and then press OK to save the setting. The display will read "Accepted".
- Press Cancel to exit the menu.
- Repeat STEPS a - d for each paper tray.
-
Setup the paper tray in the printer driver. Follow the instructions for your operating system.
Windows | Macintosh
(Windows)- Open the Printer Properties. Click here to see how to open the Printer Properties.
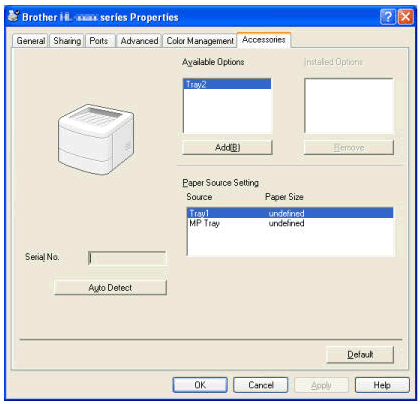
- Click the Accessories tab and click Auto Detect, once the lower tray has been detected then click Apply.
- If the Paper Size is undefined or the same size paper is defined for each tray, the printer will automatically print from the next available paper tray if the paper tray becomes empty.
- Under certain conditions Auto Detect may not be available. If this situation occurs, you can manually add the options you have installed. In Available Options, select the option you have installed, click Add and then Apply.
- Go to STEP 4.
(Macintosh)
The printer driver is already configured for use with the lower paper tray. No additional steps are required. Continue to the next step.
-
Print a document.
If you try to print a PDF document, go to STEP 5.
If you try to print other document, continue to the following steps.
(Windows)
The document should print the pages from the paper trays based on the paper size configured for that paper tray. If the document does not print correctly, you should contact the program manufacturer to inquire how to print a document with mixed paper sizes.
(Macintosh)
You will need to configure the paper size for each page of the document.- From the application, click File and Page Setup.
-
Make sure the Brother machine is selected next to Format for.
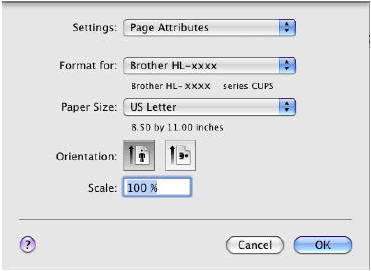
- Click OK.
- For each page of the document that is a different paper size, you will need to set the paper size in Page Setup.
- Place the mouse cursor on a page that is a different paper size.
- Click File and Page Setup.
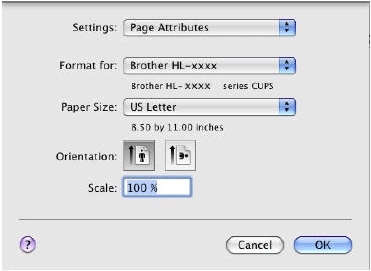
- Next to Paper Size, select the Paper Size for that specific page.
- Click OK.
-
Repeat STEPS e - h for each page of the document.
- Print the document, the document should print the pages from the paper trays based on the paper size configured for that paper tray. If the document does not print correctly, you should contact the program manufacturer to inquire how to print a document with mixed paper sizes.
-
The instructions below are provided by Adobe. If these instructions do not work, please contact Adobe for further assistance printing a PDF file with mixed paper sizes.
Follow the instructions for your operating system.
Windows | Macintosh
(Windows)- Click File and Print.
- You may wish to select Fit for Size Options.
-
Select Choose paper source by PDF page size.
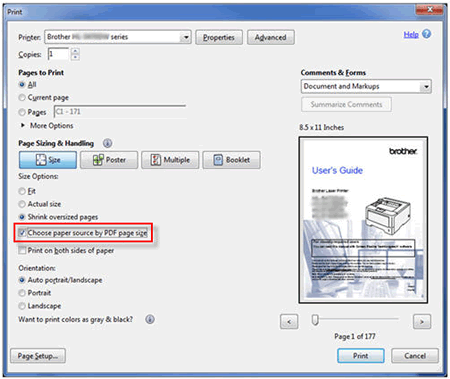
- Click Print or OK to print the document.
- If the document does not print correctly with these instructions, please contact Adobe for further assistance printing a PDF file with mixed paper sizes.
(Macintosh)- Click File and Print.
-
Newer versions of Adobe Reader have an option to select Choose paper source by PDF page size.
- If this option is listed, select it and click Print.
-
If this option is not listed, continue to STEP c.

-
Click the Printer… button at the bottom.
A pop up window may appear stating the ensure full print capabilities to set all print options from the Application print dialog box instead of from the Print Setup dialog box. Click Yes to open the Print Setup dialog box.
-
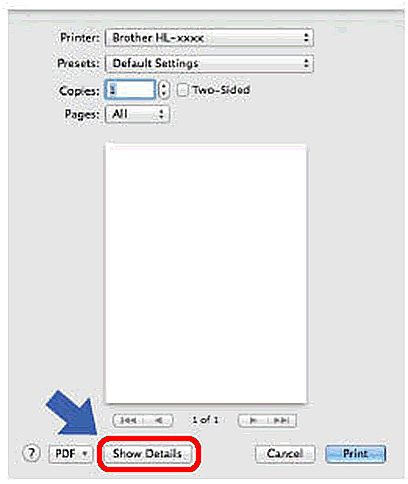
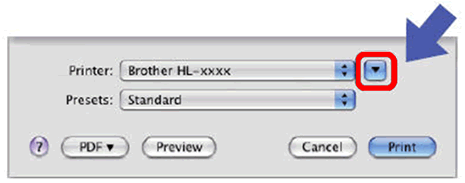
If Printer and Presets are the only options on the Print window, follow the steps below for your operating system.
OS X 10.7 or later : Click the Show Details button to the bottom to expand the Print window.
Mac OS X 10.5 - 10.6: Click the the disclosure triangle beside the Printer pop-up menu to expand the Print window.
- Click on the drop menu (Layout or Copies & Pages) and click on Paper Handling.
-
Select Scale to fit paper size.
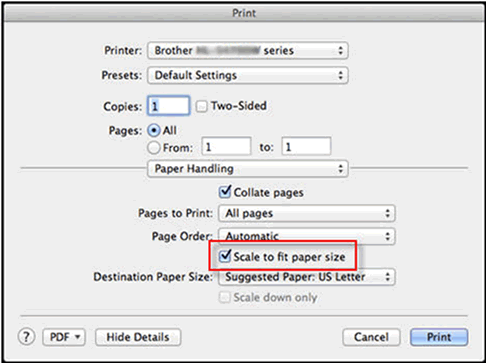
-
After you change any settings, if you want to save the current settings, you will need to save it as a preset.
OS X 10.7 or later: Click on Default Settings next to Presets then select Save Current Settings as a Preset…. Type a name for this preset and click OK. This will be the default setting each time you print.
Mac OS X 10.5 - 10.6: Click on Standard next to Presets then select Save As. Type a name for this preset and click OK. Each time the Print window is opened, click Standard next to Presets and select the name of the Preset you wish to use.
-
Click Print to print the document.
-
If the document does not print correctly with these instructions, please contact Adobe for further assistance printing a PDF file with mixed paper sizes.
HL-5470DW, HL-5470DWT, HL-6180DW, HL-6180DWT
If you need further assistance, please contact Brother customer service:
Content Feedback
Please note this form is used for feedback only.