HL-2600CN
FAQs & Troubleshooting |
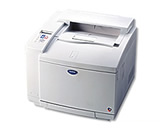
HL-2600CN
Date: 09/29/2014 ID: faq00002297_001
How should I maintain the printer?
Printer exterior cleaning:
Clean the printer exterior as follows:
-
Turn off the printer and unplug the power cord.
-
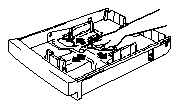
Remove the Paper Cassette from the printer.
-
Wipe the printer body with a soft cloth to remove dust. Dip the cloth in water and wring it out thoroughly for cleaning.
- Use water for cleaning. Cleaning with volatile liquids such as thinner or benzine will damage the surface of the printer.
- DO NOT use cleaning materials that contain ammonia. They could damage the printer, particularly the toner cartridges.
-
Clean the Paper Guide with a dry soft cloth. If paper and foreign objects are stuck in the Paper Cassette, remove them.
-
Install the Paper Cassette into the printer.
-
Plug the power cord into the AC outlet, and then turn on the printer.
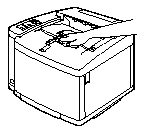
Periodic Printer Cleaning(Printer interior):
- If your clothes are smeared with toner, wipe off the toner with a dry cloth and immediately wash the clothes in cold water to avoid stains.
-
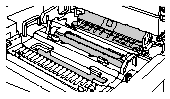
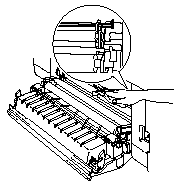
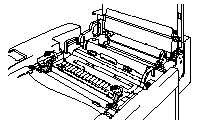
The Fusing Unit and the parts around it are HOT! Never touch the shaded areas shown below.
- Never touch or clean the Transfer Roller because print quality may be adversely affected.
- Be careful not to inhale the toner.
-
Turn off the printer and unplug the power cord.
-
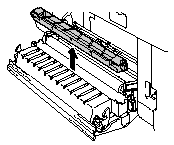
Open the Rear Access Cover.
-
Clean the Registration Roller and the Paper Pick-up Roller with a dry soft cloth to prevent paper jams.
Be sure not to break the Actuator while cleaning the Paper Pick-up Roller.

-
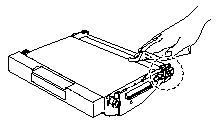
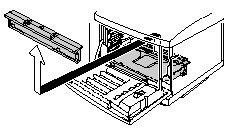
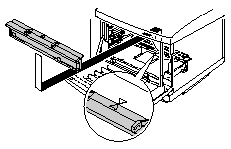
Remove the Paper Discharger from the Transfer Unit.
-
Clean the Paper Discharger Case Housing with a dry cotton cloth. Clean the Corona Wire and the inside of the Paper Discharger Case with a dry cotton swab.
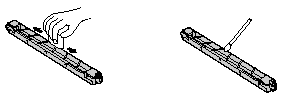
- Re-install the Paper Discharger into the Transfer Unit.
- Do not break the vinyl string on top of the Paper Discharger Case while cleaning the Paper Discharger.
- Do not break the Corona Wire.
-
Close the Rear Access Cover.
-
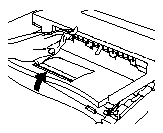
Open the Top Cover slightly so you can clean the Exit Roller. This will help to prevent paper jams at the paper exit and dirt from appearing on your printouts.
-
Open the Front Cover, and then open the Top Cover.
-
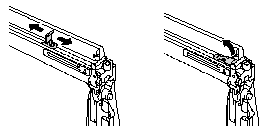
To release the lock, pull the green Belt Cartridge Lock Levers on both sides toward you.
-
Remove the OPC Belt Cartridge from the printer.
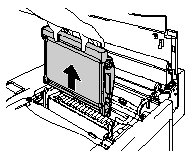
- Do not touch the OPC Belt surface with bare hands or gloves.
- If the Belt is exposed for more than two minutes to a light source of 800 lux, the Belt may be damaged.
-
Clean the OPC Belt Cartridge and the OPC Belt Cartridge Case with a dry cotton cloth.
-
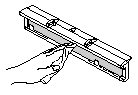
Clean the Corona Wire. Remove any toner on the Corona Wire with the Corona Wire Cleaner supplied with the Corona Case by sliding the Corona Wire Cleaner gently from left to right.
- Do not break the Corona Wire.
- Place the Corona Wire Cleaner back to the original position after cleaning the Corona Wire.
- Remove all the Toner Cartridges from the printer.
-
Use the fingers of both hands to hold the two knobs on the Dustproof Glass, and then remove it from the Laser Unit by lifting it up.
-
Clean the surface of the Dustproof Glass with a dry cotton swab.
-
Re-install the Dustproof Glass by aligning the
 marks on the Laser Unit and the Dustproof Glass; This will ensure that it is correctly in place and cannot move.
-
Re-install all the Toner Cartridges and the OPC Belt Cartridges.
- Close the Front Cover and the Top Cover.
NEVER use Alcohol or other similar solvents for cleaning the dustproof glass, otherwise it will be a cause of image failure.
HL-2600CN
If you need further assistance, please contact Brother customer service:
Content Feedback
Please note this form is used for feedback only.