DC200ULE
 |
FAQs & Troubleshooting |
Notes for CaptureMat function
To use the CaptureMat function, a camera used for photographing must first be registered with DesignNCut Manager.
This FAQ described notes for CaptureMat function.
Photograph the included calibration sheet to register the calibration data of the camera.
Data for adjusting the distortion, etc., of the camera used for photographing must first be registered with DesignNCut Manager.
Notice when photographing the calibration sheet
Notice when when photographing the material for cutting (drawing)
Notice the following points when photographing the calibration sheet
| Dos |
Don'ts |
-
Smooth out the calibration sheet before photographing.
-
Make sure that the calibration sheet is not dirty, wrinkled or folded before taking a photo.
-
If the calibration sheet is dirty, has marks, wrinkled or folded print a new copy and use the new copy to calibrate your chosen device.
You can download the calibration sheet from this site, and print it with your printer. Click here to download the Letter size. Click here to download the A4 size.
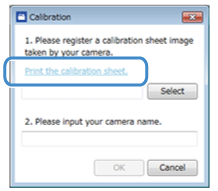
It can also be downloaded by clicking [Print the calibration sheet.] on the DesignNCut Manager.

|
-
Do not photograph a calibration sheet that is dirty, has marks, wrinkled or folded.

|
-
Place the calibration sheet on a flat surface to photograph.
|
|
-
Make sure that the camera lens is clean and not dirty.
-
Set the picture size ratio of the camera as 4:3.
If the setting is 16:9, change it to 4:3.
|
-
When taking a photo, do not zoom or use a flash.
|
-
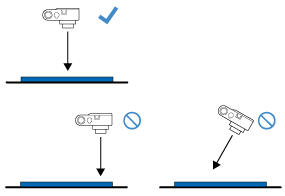
Hold the device and make sure that it is level.
|
-
Do not misalign the device and sheet.
-
Do not take the photo at a far distance from the sheet.
-
Do not take the photo too close to the sheet.

|
-
Make sure to capture all of the dots on the calibration sheet and nothing else.
|
|
-
When photographing, make sure that there are no objects or shadows on the calibration sheet.
|
-
Do not photograph under a bright light.
|
Notice the following points when photographing the material for cutting (drawing)
| Dos |
Don'ts |
-
Use a 12" x 12" (305 mm x 305 mm) cutting mat with CaptureMat function which is compatible with DesignNCut.
|
-
Do not use 12" x 24" (305 mm x 610 mm)) in cutting mats or mats without the CaptureMat function. They will not work with DesignNCut.
|
|
|
|
-
Make sure that the camera lens is clean and not dirty.
-
Set the picture size ratio of the camera as 4:3.
If the setting is 16:9, change it to 4:3.
|
-
When taking a photo, do not zoom or use a flash.
|
-
Attach the material inside of the adhesive area of the mat.
*Attach a part to be cut to the center of the mat.
|
|
-
Place the mat on a flat surface to photograph.
|
|
-
Hold the device and make sure that it is level.
|
-
Do not misalign the device and sheet.
-
Do not take the photo at a far distance from the sheet.
-
Do not take the photo too close to the sheet.

|
-
Photograph the entire 12" x 12" (305 mm x 305 mm) cutting mat with nothing else around your mat.
|
|
-
When photographing, make sure that there are no objects or shadows on the calibration sheet.
|
-
Do not photograph under a bright light.
|
If you need further assistance, please contact Brother customer service:
Content Feedback
To help us improve our support, please provide your feedback below.
Step 1: How does the information on this page help you?
Step 2: Are there any comments you would like to add?
Please note this form is used for feedback only.


