CP60X
FAQs & Troubleshooting |
CP60X
Date: 11/05/2020 ID: faqh00000633_022
How do I change the needle ?
- Only use recommended home sewing machine needles. Use of any other needle may bend the needle or damage the machine.
- Never use bent needles. Bent needles can easily break, possibly resulting in injuries.
Checking the needle
Before using the needle, place the flat side of the needle on a flat surface and check that the distance between the needle and the flat surface is even.
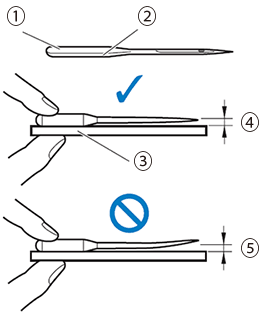 |
(1) Flat side (2) Needle type marking (3) Flat surface (4) Even (5) Not even |
Replace the needle in cases such as the four described below:
- If an unusual sound is produced when the needle enters the fabric while sewing trial stitches at low speed. (The tip of the needle may be broken or dull.)
- If stitches are skipped. (The needle may be bent.)
- Generally, after completing one project, such as a piece of clothing.
- Generally, after using three full bobbins of thread.
Replacing the needle
-
Turn off the machine.
Before replacing the needle, be sure to turn off the machine. If you accidentally step on the foot controller and the machine starts to sew, you could be injured.
- Raise the presser foot lever to raise the presser foot.
-
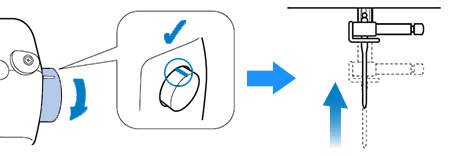
Raise the needle to its highest position by turning the handwheel toward you (counterclockwise).
-
Remove the presser foot.
For details, refer to "How do I remove or attach the presser foot ?". - Before replacing the needle, cover the hole in the needle plate with fabric or paper to prevent the needle from falling into the machine.
-
Hold the needle with your left hand, and then use a screwdriver to turn the needle clamp screw toward you (counterclockwise) to remove the needle.
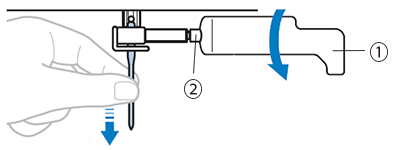
(1) Screwdriver
(2) Needle clamp screw
Do not apply a strong force when loosening or tightening the needle clamp screw, otherwise certain parts of the machine may be damaged.
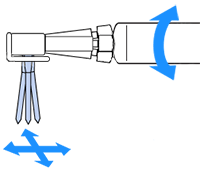
-
With the flat side of the needle toward the rear of the machine, insert the new needle until it touches the needle stopper.
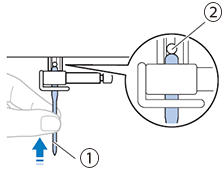
(1) Make the flat side face back
(2) Insert until the needle touches the needle stopper -
Using the screwdriver tighten the needle clamp screw by turning it clockwise.
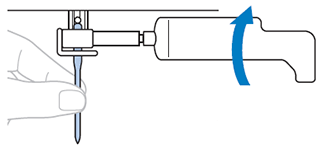
Be sure to insert the needle until it touches the needle stopper and securely tighten the needle clamp screw with the screwdriver, otherwise the needle may break or damage may result.
- Attach the presser foot.
Related FAQs
CE1150, CP2160F, CP2160L, CP2160M, CP2160P, CP2160R, CP2160W, CP60X, CP80X, CS5055
If you need further assistance, please contact Brother customer service:
Content Feedback
Please note this form is used for feedback only.
Please do not enter contact information or any other personal information here.
(We will not respond to any Feedback you send us.)