1034D
FAQs & Troubleshooting |
1034D
Date: 12/24/2015 ID: faqh00000497_000
Threading the lowerlooper
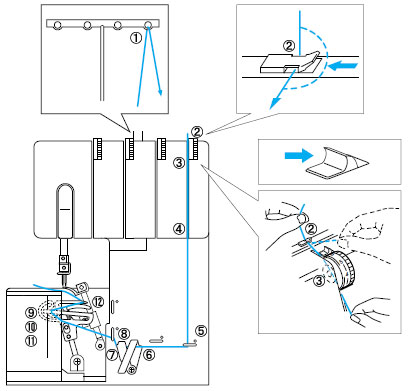
Run the thread in the sequence illustrated, following the blue color and the numbers next to each threading point.
-
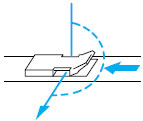
Open the front cover by sliding to the right and guiding the top toward you.
-
Pull the thread off the spool and directly up through the thread guide on the thread tree from back to front.
Pull the thread about an extra 15cm (6inches) through the front of the thread tree.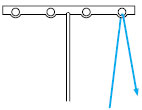
-
Pass the thread through the proper thread guide.
-
Slide and hold the thread tension release button to the right, then pass the thread through the tension disc which is in the channel next to the blue tension adjustment dial.
Release the button.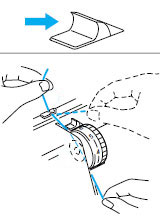
-
Guide the thread down the channel and pass the thread through the threading points next to the blue color marks following the numerical order in the accompanying illustration up to the lowerlooper threading lever.
If the lowerlooper thread breaks during sewing, cut and remove thread from both of the needles.
Before re-threading the lowerlooper, make sure that the lowerlooper re-threading is done exactly as diagrammed above.
The machine will not operate properly if the threading is not done in the proper sequence.
-
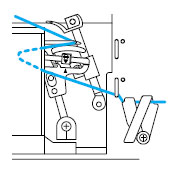
Slide the lowerlooper threading lever to the right.

(1) Lowerlooper
(2) Lowerlooper threading leverWhen sliding the lowerlooper threading lever to the left, always make sure that the two pink triangular marks line up as illustrated.
-
Position the thread under the hook (left end) of the threading lever.
Place the thread through the eye of the lowerlooper.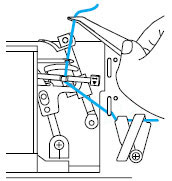
Thread the needles after the lowerlooper and upperlooper have been threaded.
-
Holding the end of the thread, slide the lowerlooper threading lever to the left which returns it to its standard position.

Slide the threading lever only in the directions shown by the arrow. Forcefully moving the threading lever in any other direction may damage it.
-
Make sure that the pink triangular marks line up.
1034D, 1134DW/ 1134D, 1634D, DZ1234, DZ1234
If you need further assistance, please contact Brother customer service:
Content Feedback
Please note this form is used for feedback only.
Please do not enter contact information or any other personal information here.
(We will not respond to any Feedback you send us.)