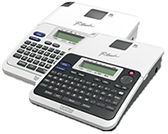
PT-2040
FAQs & Troubleshooting |

PT-2040
Date: 05/15/2020 ID: faqp00000848_014
I want my printer to use less tape for each label.
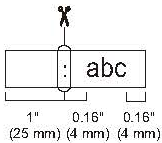
Due to the construction of the tape mechanism, one inch (25 mm) margin that is produced prior to every label cannot be eliminated. However, when you print more than one label continuously, the subsequent labels can be printed without the excess tape.
The following methods are useful for reducing tape use:
1. Check the margin settings before printing
2. When printing multiple labels
1. Check the margin settings before printing
-
Press the [Function] key (
 ).
). -
Press the [Cursor] key (
 ) until [Margin] is displayed.
 -
Press the [OK] key (
 ).
). -
Make sure that [Narrow] is selected. If not, press the [Cursor] key (
 ) until [Narrow] is displayed.
 -
Press the [OK] key (
 ).
).
Then you can change the margin to narrow before and after text.

2. When printing multiple labels
To reduce the margin size of the second and subsequent labels, print multiple labels consecutively using either the same or different layout for the labels.
Using the same layout for multiple labels
To feed the tape correctly, the printer will automatically set a wider left margin for the first label only. The second and subsequent labels will have narrow margins.

-
Press the [Function] key (
 ).
). -
Press the [Cursor] key (
 ) until [Margin] is displayed.
 -
Press the [OK] key (
 ).
). -
Press the [Cursor] key (
 ) until [Chain Print] is displayed.
 -
Press the [OK] key (
 ).
).
- Enter the text.
-
Press the [Feed/Print] key (
 ), then [Set 1-9?1] is appears on the LCD. Press the [Cursor] key (
  ) to select your desired number of copies. (1-9).
 -
Press the [OK] key (
 ).
).When [Chain Print] is set, feed the tape before using the cutter otherwise a part of the text may be cut off.
Be sure to feed the tape before cutting the tape. Press the [Shift] key ( ) and [Feed/Print] key (
  ) to feed the tape.
 -
After the tape is fed, press the cutter lever to cut off the chain of labels.

Using different layouts for multiple labels
To feed the tape correctly, the printer will automatically set a wider left margin for the first label only. The second and subsequent labels will have narrow margins.

-
Press the [Function] key (
 ).
). -
Press the [Cursor] key (
 ) until [Margin] is displayed.
 -
Press the [OK] key (
 ).
). -
Press the [Cursor] key (
 ) until [Chain Print] is displayed.
 -
Press the [OK] key (
 ).
).
- Enter the text.
-
Press the [Feed/Print] key (
 ), then [Set 1-9?1] is appears on the LCD. Press the [Cursor] key (
  ) to select your desired number of copies. (1-9).
 -
Press the [OK] key (
 ).
). -
Press the [Escape] key (
 ) to edit the next label.
- Clear the text, enter the text for the next label.
-
Repeat step g to j until all labels have been created, and then press the [Feed/Print] key (
 ).
). -
When the last label is printed, be sure to press the [Shift] key (
 ) and [Feed/Print] key (
  ).
).When [Chain] is set, feed the tape before using the cutter otherwise a part of the text may be cut off.
Be sure to feed the tape before cutting the tape. Press the [Shift] key (
 ) and [Feed/Print] key (
  ) to feed the tape.
 -
After the tape is fed, press the cutter lever to cut off the chain of labels.

PT-2040
If you need further assistance, please contact Brother customer service:
Content Feedback
Please note this form is used for feedback only.