Innov-is NS1150E
FAQs & Troubleshooting |
Innov-is NS1150E
Date: 07/31/2023 ID: faqh00000639_002
How do I attach or remove the embroidery frame ?
Using the appropriate frame for the pattern size
Select a frame that is slightly larger than the pattern size. Available frame options are displayed on the screen.
![]() : Shows whether or not the large/extra large (multiposition) frame can be used.
: Shows whether or not the large/extra large (multiposition) frame can be used.
![]() : Shows whether or not the medium frame can be used.
: Shows whether or not the medium frame can be used.
![]() : Shows whether or not the small frame can be used.
: Shows whether or not the small frame can be used.
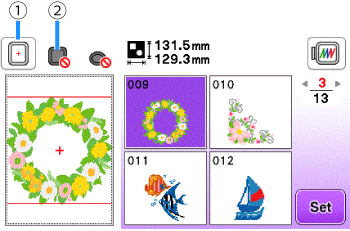 |
(1) White : Can be used (2) Gray : Cannot be used |
If you use a frame that is too small, the presser foot may strike the frame during sewing and cause injury or may damage your machine.
Attaching the Embroidery Frame
Wind and insert the bobbin before attaching the embroidery frame making sure to use the recommended bobbin thread.
- Raise the presser foot lever to raise the presser foot.
-
While lightly holding the lever on the frame holder to the left, align the two pins on the embroidery frame holder with the mounting brackets on the frame, and then press the frame into the embroidery frame holder until a click is heard.
Hold the lever lightly to the left.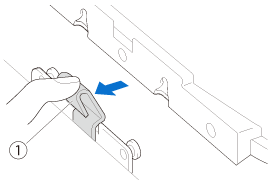
(1) Lever
Press the front mounting bracket onto the pin until it fits into place.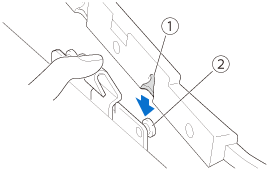
(1) Front mounting bracket
(2) Front pin
Press the back mounting bracket onto the pin.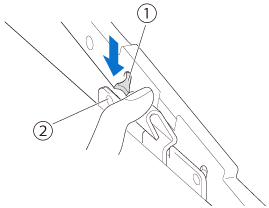
(1) Back mounting bracket
(2) Back pin
- Be sure to completely insert both pins. If only one of the pins is inserted, the pattern may not turn out correctly.
-
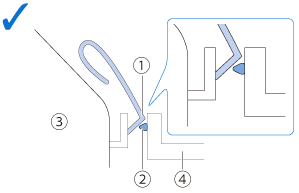
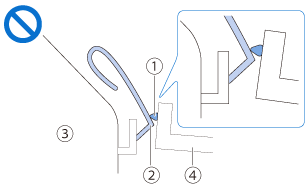
Make sure that the notch on the side of the embroidery frame fits firmly under the bend in the lever.

(1) Notch on embroidery frame
(2) Bend in lever
(3) Carriage
(4) Embroidery frame
Notch (1) fits firmly under the bend in the lever (2).
Notch (1) does not fit firmly under the bend in the lever (2).
 |
(1) Notch on embroidery frame (2) Bend in lever (3) Carriage (4) Embroidery frame |
Correctly set the embroidery frame into the embroidery frame holder. Otherwise, the presser foot may hit the embroidery frame, resulting in injury.
Removing the Embroidery Frame
-
Raise the presser foot lever to raise the presser foot.
-
While pushing the lever of the embroidery frame holder to the left, slightly lift the back and then the front of the embroidery frame up to clear the pins and then remove.
Hold the lever lightly to the left.
(1) Lever
Remove the back mounting bracket from the pin.
(1) Back mounting bracket
(2) Back pin
Remove the front mounting bracket from the pin.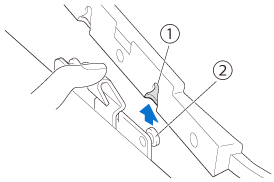
(1) Front mounting bracket
(2) Front pin
Do not hit the needle with your finger or the embroidery frame. It may cause injury or needle breakage.
Innov-is NS1150E, Innov-is NS1250E, Innov-is NS2750D, Innov-is NS2850D, PE800, PE900, SE1900, SE1950, SE2000
If you need further assistance, please contact Brother customer service:
Content Feedback
Please note this form is used for feedback only.