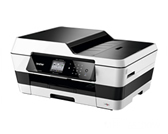
MFC-J6520DW
FAQs & Troubleshooting |

MFC-J6520DW
Date: 04/16/2014 ID: faq00002123_041
I am using Voice Over Internet Protocol (VoIP) and am having problems sending faxes.
- Click here If you want to know how to send a fax.
- Click here If you are only having problems sending faxes to one particular number.
Follow these steps to resolve the issue:
-
If you are only having problems sending faxes outside your area code, make sure you have long-distance service on your telephone line.
If you do not have long-distance service, you will not be able to send long-distance faxes.- If you are having problems sending faxes inside and outside your area code, go to Step 2.
-
Verify information is displayed on the machine's display(hereinafter called LCD).
- If the LCD displays the Home screen, go to Step 3.
-
If the LCD displays a menu screen, follow these steps:
-
Press
 (Home).
 - Go to Step 3.
-
Press
- If the LCD displays an error message (for example, Paper Jam) or status message (for example, Replace Ink), refer to the solution that addresses the message.
-
If the LCD is blank, follow these steps:
-
Touch the LCD to make sure the machine isn't in Sleep Mode.
- If the LCD is no longer blank, go to Step 3.
- If the LCD is still blank, go to Step b.
-
Press
 on your Brother machine's control panel to verify the machine is powered on.
- If your machine is off, its LCD will be blank.
-
Do one of the following:
- If the LCD is no longer blank, go to Step 3.
- If the LCD is still blank, go to Step d.
-
Verify the Brother machine's power cord is directly connected from the Brother machine to the power outlet.
- If the Brother machine's power cord is directly connected to the power outlet, go to Step e.
-
If the Brother machine's power cord is connected to a surge protector or power switch, follow these steps:
- Remove the Brother machine's power cord from the surge protector or power switch.
- Plug the Brother machine's power cord directly into the power outlet.
- Go to Step e.
-
Do one of the following:
- If the LCD is no longer blank, go to Step 3.
- If the LCD is still blank, go to Step f.
-
Connect the machine to a different, known-working power outlet.
-
Do one of the following:
- If the LCD is no longer blank, go to Step 4.
- If the LCD is still blank after you connect the machine to another known-working outlet, please contact Brother Customer Service from "Contact Us."
-
Touch the LCD to make sure the machine isn't in Sleep Mode.
-
Make sure the machine has a dial tone.
-
Press
 (Fax).
 -
Do one of the following:
-
If
 (Sending Faxes) appears on the LCD, press it.
 -
If
 (Sending Faxes) does not appear on the LCD, go to Step c.
-
If
-
Press Hook.
-
Listen for a dial tone.
-
Press Hook.
-
Press
 (Home).
- If there is a dial tone, go to Step 5.
-
If there is no dial tone, make sure one end of the telephone cord is connected to the VoIP system:
When using VoIP, one end of the telephone cord may be connected to a modem, interface box, phone adapter, splitter, etc.. This is determined by your VoIP provider.- If the telephone cord is not connected to your VoIP system or you are unsure of how to connect the Brother machine to the VoIP system, contact your VoIP provider.
- If the telephone cord is connected to the VoIP system, go to Step g.
-
Is the other end of the telephone cord directly connected to the jack labeled LINE on the Brother machine?
- If the telephone cord is directly connected to the Brother machine's LINE jack, go to Step 4.
- If the telephone cord is not directly connected to the Brother machine's LINE jack, go to Step h.
-
Plug the telephone cord directly into the jack labeled LINE on the Brother machine.
-
Check for a dial tone:
-
Press
 (Fax).
 -
Do one of the following:
-
If
 (Sending Faxes) appears on the LCD, press it.
 -
If
 (Sending Faxes) does not appear on the LCD, go to Step iii.Press Hook.
-
If
- Listen for a dial tone.
- Press Hook.
-
Press
 (Home) .
- If there is a dial tone, go to Step 5.
- If there is still no dial tone, go to Step 4.
-
Press
-
Press
-
Test the VoIP system with a known-working telephone and known-working telephone cord:
-
Remove the telephone cord from the VoIP system.
If you are unsure of how the telephone cord is connected to the VoIP system, contact your VoIP provider for assistance.
-
Use a known-working telephone cord to connect a known-working extension telephone to the same jack on the VoIP system.
-
Lift the telephone's handset.
-
Listen for a dial tone.
-
Hang up the telephone's handset.
- If the telephone does not have a dial tone, the issue is related to the VoIP system or equipment. You must contact your VoIP provider for assistance.
- If the telephone has a dial tone, go to Step f.
-
Disconnect the telephone cord from the telephone.
-
Directly connect the telephone cord to the jack labeled LINE on your Brother machine.
-
Check for a dial tone:
-
Press
 (Fax).
 -
Do one of the following:
-
If
 (Sending Faxes) appears on the LCD, press it.
 -
If
 (Sending Faxes) does not appear on the LCD, go to Step iii.
-
If
- Press Hook.
- Listen for a dial tone.
- Press Hook.
-
Press
 (Home).
- If there is a dial tone, go to Step 5.
- If there is still no dial tone, please contact Brother Customer Service from "Contact Us."
-
Press
-
Remove the telephone cord from the VoIP system.
-
Although your Brother machine does not support the use of VoIP, it has a Compatibility setting that lowers its modem speed.
Changing the Compatibility to Basic (for VoIP) may help if you're having problems sending and receiving faxes over VoIP.
Follow these steps to adjust the compatibility setting:-
Press
 (Settings).
 -
Press All Settings.
-
Press Up or Down arrow key to display Initial Setup.
-
Press Initial Setup.
-
Press Up or Down arrow key to display Compatibility.
-
Press Compatibility.
-
Press Basic (for VoIP).
-
Press
 (Home).
If you change the Compatibility to Basic (for VoIP):
- The machine will print all received faxes in black and white.
- The Error Correction Mode (ECM) feature will only be available for color fax sending.
-
Press
-
Send someone a test fax:
NOTE: Illustrations shown below are from a representative product and may differ from your Brother machine.-
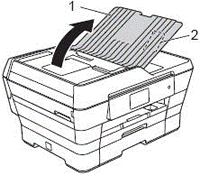
Open the ADF Document Support (1) and the ADF Document Output Support Flap (2)

-
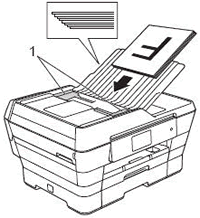
Place the document(s) you want to send into the ADF face up, top edge first until you feel it touch the roller.
-
Insert the document underneath the paper guides (1).

- After you put your document(s) in the ADF, the Brother machine's LCD should display ADF Ready.
-
Insert the document underneath the paper guides (1).
-
Do one of the following:
- If the LCD displays ADF Ready, go to Step e.
- If the LCD continues to display the Home screen or a menu screen, go to Step d.
-
Make sure the document is between 5.8 and 11.7 inches wide and 5.8 and 17 inches long. If the document is fewer than 5.8 inches wide, the document sensors will not detect it. You will need to use a wider sheet of paper.
- If the LCD displays ADF Ready, go to Step e.
- If the document meets the above-listed specifications and the LCD continues to display the Home screen or a menu screen when you place a document into the ADF, please contact Brother Customer Service from "Contact Us."
-
Press
 (Fax).
-
Do one of the following:
-
If
 (Sending Faxes) appears on the LCD, press it.
 -
If
 (Sending Faxes)does not appear on the LCD, go to Step g.
-
If
-
Dial a known-working fax number.
-
You can use the dial pad to manually dial the number, press
 (Address Book), or press
  (Call History) to use the Outgoing or Incoming Call History.
 -
If you are using access numbers for calling cards or long-distance security codes, or if you must press 9 to access an outside line and a pause is required between the dialing of those numbers and the fax number, be sure to press Pause when needed.
- Pressing Pause will insert a 3.5-second pause between numbers.
-
You can press Pause as many times as needed to increase the length of the pause.
Redial will turn into Pause after you dial the number.
-
You can use the dial pad to manually dial the number, press
-
Do one of the following:
-
To send a black and white fax, follow these steps:
When manually sending a fax by pressing Hook to listen for a dial tone before dialing, make sure you wait until you hear the receiving machine's fax tones before you press Fax Start on the Brother machine.
-
Press Fax Start.
The machine will send the fax. - Go to Step 7.
-
Press Fax Start.
-
To send a color fax, follow these steps:
- Press Options.
- Press Up or Down arrow key to display Color Setting.
- Press Color Setting.
-
Press Color.
When manually sending a fax by pressing Hook to listen for a dial tone before dialing, make sure you wait until you hear the receiving machine's fax tones before you press Fax Start on the Brother machine.
- Press OK.
-
Press Fax Start.
The machine will send the fax. - Go to Step 7.
-
To send a black and white fax, follow these steps:
-
Open the ADF Document Support (1) and the ADF Document Output Support Flap (2)
-
Do one of the following:
- If the recipient received the fax, your Brother machine is functioning properly.
- If the recipient did not receive the fax, go to Step 8.
-
In addition to lowering the modem speed, keep in mind there are many environmental parameters that can also affect faxing over VoIP. Try the following:
- Verify no other applications or computers are downloading files. While VoIP operates separately from the computer and they do not normally interfere with each other, the amount of data that can be transmitted from all devices on the system at one time is limited. If a fax is being sent or received and a computer begins downloading, it will consume bandwidth and could prevent the fax from going through.
- Resend the fax at an "off-peak" time. VoIP is an Internet application, so it is susceptible to network congestion. If you have ever noticed a website that usually loads quickly taking a long time to load, then you have experienced network congestion. Because faxing is a time-sensitive process, network congestion on your VoIP system may cause fax transmissions to time out before your machine can fully send them. You may be able to avoid this by sending the fax later.
- Contact your VoIP provider and ask if they can optimize the network settings for fax transmission.
MFC-J6520DW, MFC-J6720DW, MFC-J6920DW, MFC-J6925DW
If you need further assistance, please contact Brother customer service:
Content Feedback
Please note this form is used for feedback only.