TD-4410D
FAQs & Troubleshooting |
TD-4410D
Date: 04/03/2024 ID: faqp00100449_000
How to set the Cutter
Movie: How to set the Cutter
*The video clip is being streamed from YouTube.
> To change the Cutting Options (except for TD-4420DN(FC)/4550DNWB(FC)):
-
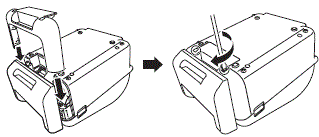
Make sure you disconnect the printer from the AC power outlet.

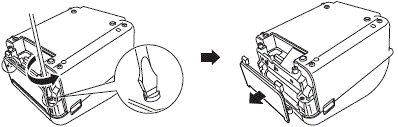
-
Place the printer upside down.
-
Remove the front cover base using a flathead screwdriver.

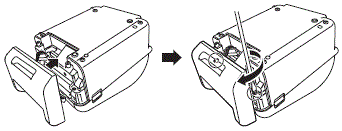
-
Remove the front cover using a flathead screwdriver.
-
Attach the cutter using a flathead screwdriver.
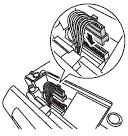
-
Connect the connector of the cutter to the printer.
-
Reattach the front cover base using a flathead screwdriver.
Change the Cutting Options (except for TD-4420DN(FC)/4550DNWB(FC))
After attaching the cutter, set the printer driver cutting options.
-
Turn on the printer.
-
Open the printer preferences menu as follows:
Windows 11
Click Start > Settings > Bluetooth & devices > Printers & scanners.
Click the printer you want to set up, and then click Open print queue > Printer > Printing Preferences....
Windows 10 / Windows Server 2016 / Windows Server 2019:
Click Start > Settings > Devices > Printers & scanners.
Click the printer you want to set up, and then click Open queue > Printer > Printing Preferences.
Windows 8 / Windows 8.1 / Windows Server 2012 / Windows Server 2012 R2:
Click Control Panel in the Apps screen. Click Hardware and Sound > Devices and Printers.
Right-click the printer you want to set up, and then click the Printing preferences menu.
Windows 7 / Windows Server 2008 / Windows Server 2008 R2:
Click Start > Devices and Printers. Right-click the printer you want to set up, and then click the Printing preferences menu.
- Check the Cut Every check box, and then select where to cut when multiple labels are printed.
-
Check the Cut at End check box.
- Click OK.
Label Cutting Options
|
Auto Cut |
Cut at End | Image |
|---|---|---|
| Off | On | 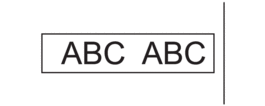 |
| Off | Off | 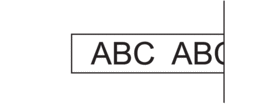 |
| On | On or Off | 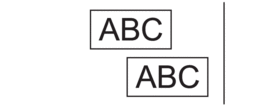 |
TD-4410D, TD-4420DN, TD-4520DN, TD-4550DNWB
If you need further assistance, please contact Brother customer service:
Content Feedback
To help us improve our support, please provide your feedback below.
Step 1: How does the information on this page help you?
Step 2: Are there any comments you would like to add?
Please note this form is used for feedback only.