Innov-is NV180
FAQs & Troubleshooting |
Innov-is NV180
Date: 18/04/2018 ID: faqh00101022_000
How to sew reverse stitches or reinforcement stitches
Sewing reverse/reinforcement stitches
Reverse/reinforcement stitches are generally necessary at the beginning and end of sewing.
Depending on the selected stitch, reverse or reinforcement stitches are sewn while ![]() (Reverse/Reinforcement stitch button) is kept pressed.
(Reverse/Reinforcement stitch button) is kept pressed.
With reinforcement stitches, 3 to 5 stitches are sewn at the same place. With reverse stitches, the stitching is sewn in the opposite direction.
| No. | 1-01 | 1-03 | 1-08 |
| Stitch |
When any other stitch is selected, pressing
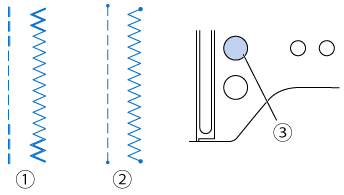 |
(1) Reverse stitch (2) Reinforcement stitch
(3) |
Automatic reverse/reinforcement stitching
After selecting a stitch pattern, turn on the automatic reverse/reinforcement stitching function before sewing, and the machine will automatically sew reinforcement stitches (or reverse stitches, depending on the stitch pattern) at the beginning and end of sewing.
-
Select a stitch.
For details on selecting a stitch, refer to “Basic sewing“.
-
Press
 to set the automatic reverse/reinforcement stitching function.
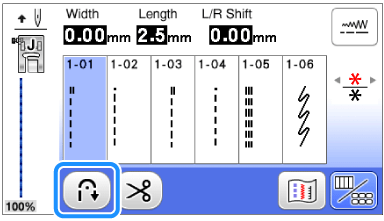
>> The key will display as .
.
-
Set the fabric in the start position and begin sewing.
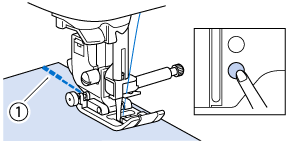
(1) Reverse stitches
(or reinforcement stitches)>> The machine will automatically sew reverse stitches (or reinforcement stitches) and then continue sewing.
-
Once you have reached the end of the stitching, press
 (Reverse/Reinforcement stitch button).
>> The machine will sew reverse stitches (or reinforcement stitches) and stop.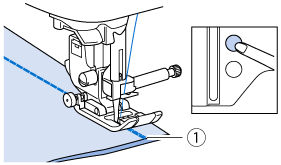
(1) Reverse stitches
(or reinforcement stitches)
Related FAQs
Innov-is M380D, Innov-is NV180, Innov-is NV180D, Innov-is NV180K
If you need further assistance, please contact Brother customer service:
Content Feedback
Please note this form is used for feedback only.
Please do not enter contact information or any other personal information here.
(We will not respond to any Feedback you send us.)