Innov-is NV180
FAQs & Troubleshooting |
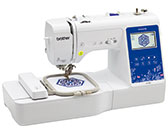
Innov-is NV180
Date: 21/07/2017 ID: faqh00100741_000
How do I hoop the fabric in the embroidery frame?
- Use fabrics with a thickness of less than 2 mm (1/16 inch). Using fabrics thicker than 2 mm (1/16 inch) may cause the needle to break.
- Always use a stabilizer material for embroidery when embroidering stretch fabrics, lightweight fabrics, fabrics with a coarse weave, or fabrics which cause pattern shrinkage. Otherwise, the needle may break and cause injury.
Attaching iron-on stabilizers (backing) to the fabric
For best results in your embroidery projects, always use stabilizer material for embroidery.
-
Press the iron-on stabilizer material to the wrong side of the fabric.
Use a piece of stabilizer which is larger than the embroidery frame being used.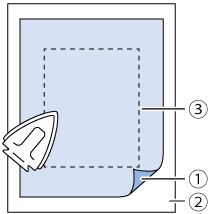
(1) Fusible side of stabilizer
(2) Fabric (wrong side)
(3) Size of the embroidery frame-
When embroidering small pieces of fabric that cannot be hooped on an embroidery frame, use stabilizer material as a base. After lightly ironing the fabric to the stabilizer material, hoop it in the embroidery frame. If stabilizer material cannot be ironed onto the fabric, attach it with a basting stitch. After completing the embroidery, remove the stabilizer material carefully.
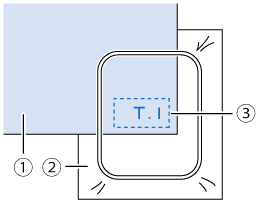
(1) Fabric
(2) Stabilizer
(3) Basting -
When embroidering on thin fabrics such as organdy or lawn, or on napped fabrics such as terry cloth or corduroy, use water soluble stabilizer (sold separately) for best results. The water soluble stabilizer material will dissolve completely in water, giving the project a more attractive finish.
-
In the case of thick terry cloth towels we recommend that you place a piece of water soluble stabilizer on the top surface of the towel. This will help to reduce the nap of the toweling and result in more attractive embroidery.
- When using fabrics that cannot be ironed (such as terry cloth or fabrics that have loops which expand when ironed) or in places where ironing is difficult, position the stabilizer material under the fabric without fusing it, then position the fabric and stabilizer in the embroidery frame, or check with your authorized Brother dealer for the correct stabilizer to use.
-
When embroidering small pieces of fabric that cannot be hooped on an embroidery frame, use stabilizer material as a base. After lightly ironing the fabric to the stabilizer material, hoop it in the embroidery frame. If stabilizer material cannot be ironed onto the fabric, attach it with a basting stitch. After completing the embroidery, remove the stabilizer material carefully.
Inserting the Fabric
If you use a frame that is too small, the presser foot may strike the frame during embroidering and cause injury or may damage your machine.
If the fabric is not securely held in the embroidery frame, the embroidery pattern will embroider out poorly. Insert the fabric on a level surface, and gently pull the fabric taut in the frame, being careful not to distort hooped fabric.
-
Loosen the embroidery frame adjustment screw and remove the inner and outer frames, placing the outer frame on a flat surface.
Separate the inner and outer frame by removing inner frame upward.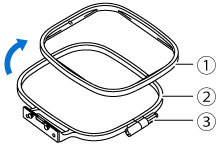
(1) Inner frame
(2) Outer frame
(3) Adjustment screw
-
Place the fabric with the stabilizer material on top of the outer frame.
Have the right side of the fabric facing up.
-
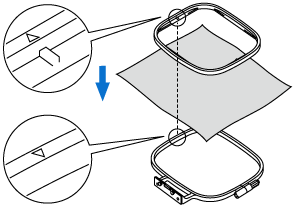
Press the inner frame in from the top of the fabric.
Line up on the inner frame and
  on outer frame.
-
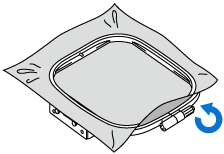
Tighten the adjustment screw by hand just enough to secure the fabric.
-
Gently remove the fabric from the frame without loosening the adjustment screw.
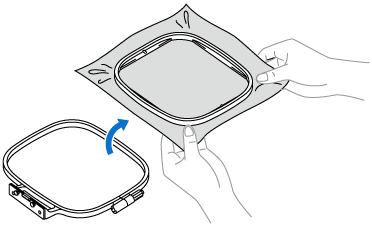
This precautionary step will help reduce pattern distortion while embroidering.
-
Press the inner frame in from the top of the fabric again, lining up
 on the inner frame and
  on outer frame.
Press the inner frame into the outer frame.
-
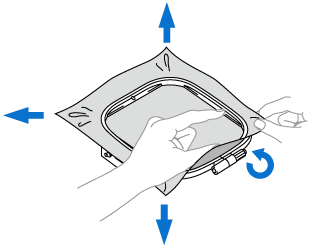
Tighten the adjustment screw while removing any slack in the fabric by hand. The goal is to have a drum-like sound when the fabric is struck lightly.
Using the embroidery sheet
When you want to embroider the pattern in a particularplace, use the embroidery sheet with the frame.
-
With a chalk pencil, mark the area of the fabric you want to embroider.
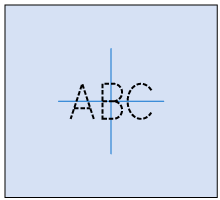
-
Place the embroidery sheet on the inner frame.
-
Line the mark on the fabric up with the base line on the embroidery sheet.
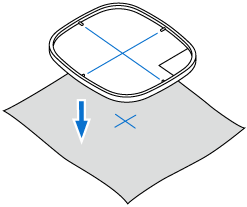
-
Place the inner frame with the fabric on the outer frame and adjust the fabric if needed to align marks on fabric with the embroidery sheet.
For details, refer to “Inserting the Fabric“ .
-
Remove the embroidery sheet.
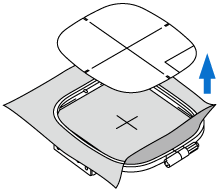
Innov-is M330E, Innov-is M380D, Innov-is NV180, Innov-is NV180D, Innov-is NV180K, Innov-is NV18E
If you need further assistance, please contact Brother customer service:
Content Feedback
Please note this form is used for feedback only.