PDS-6000F
FAQs & Troubleshooting |
PDS-6000F
Date: 10/23/2018 ID: faq00000261_058
Clean the scanner
NOTE: Illustrations shown below are from a representative product and may differ from your Brother machine.
Clean the Scanner Glass
-
Press and hold down
 (Power button) to turn the machine off.
 - Lift the document cover.
-
Clean the scanner glass under the document cover with a soft, lint-free cloth moistened with water.
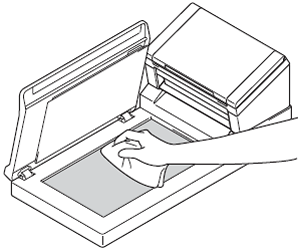 In addition to cleaning the scanner glass and glass strip with a soft, lint-free cloth moistened with water, run your finger tip over the glass to see if you can feel anything on it. If you feel dirt or debris, clean the glass again, concentrating on that area. You may have to repeat the cleaning process three or four times. To test, scan after each cleaning.
 -
Close the document cover.
Clean the inside of your machine
A spot of dirt or correction fluid on the glass strip may cause poor-quality scans. If a vertical line appears in the scanned data or if parts of the document are missing, you must clean the inside of the machine.
Follow the steps below to clean the inside of your scanner.
-
Unplug the machine from the AC power outlet (electrical socket).
-
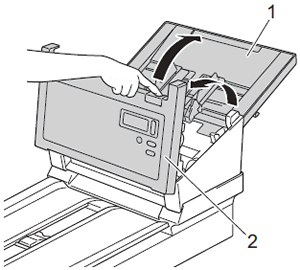
Open the Top Cover (1) and the ADF Cover (2).
-
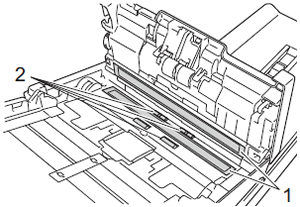
In the ADF unit, clean the glass strips (1) and feed rollers (2) with a soft lint-free cloth moistened with water.
-
Press and hold the buttons (1) on the inside of the Front Cover, and then pull the Reverse Roller Cover (2) down.

-
Pinch the Reverse Roller (1) and pull it out of the machine.

-
Clean the Reverse Roller with a soft lint-free cloth moistened with water.
-
Pinch the Reverse Roller and reinstall it in the machine.
-
Securely close the Reverse Roller Cover until the hooks snap into the ADF Cover.
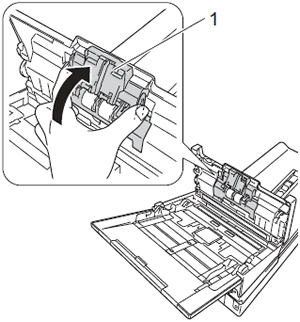
-
Slide the document guides (1) as far apart as possible and pull the Roller Cover (2) down.
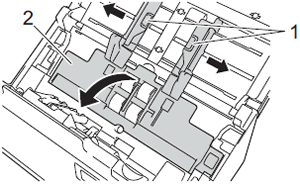
-
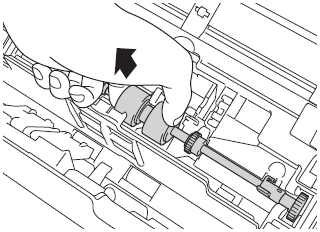
Pinch the Pick-up Roller and pull it out of the machine.
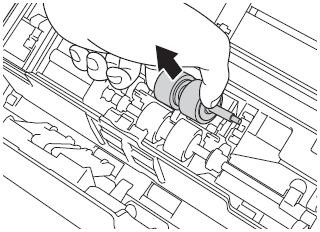
-
Pull the blue hook on the Separation Roller down.
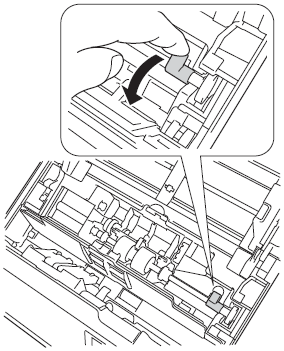
-
Pinch the Separation Roller and pull it out of the machine.
-
Clean the Pick-up Roller and the Separation Roller with a soft lint-free cloth moistened with water.
-
Pinch the Separation Roller and reinstall it in the machine.
-
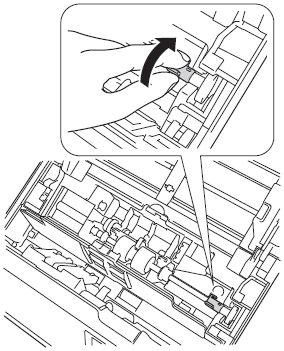
Lift the blue hook that you pulled down in the STEP 11.
-
Pinch the Pick-up Roller and reinstall it in the machine.
-
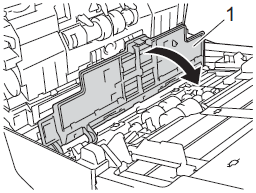
Close the Roller Cover (1).
-
Close the Front Cover and the Top Cover.
- Plug the power cord back into the AC power outlet (electrical socket).
In addition to cleaning the glass strips with a non-flammable glass cleaner, run your fingertip over the glass to see if you can feel anything on it. If you feel dirt or debris, clean the glass again concentrating on that area. You may need to repeat the cleaning process three or four times. To test, scan a document after each cleaning attempt.
|
|
|
|
| When there is a spot of dirt or correction fluid on the glass strip the scanned sample shows a vertical line. | After the glass strip is cleaned the vertical line is gone. |
PDS-5000F, PDS-6000F
If you need further assistance, please contact Brother customer service:
Content Feedback
Please note this form is used for feedback only.

