HL-2270DW
FAQs & Troubleshooting |
HL-2270DW
Date: 17/07/2018 ID: faq00000063_034
Print on labels and envelopes from the manual feed slot.
Please follow the steps below to print on labels and envelopes from the manual feed slot.
When the face-up output tray is pulled down, the machine has a straight paper path from the manual feed slot through to the back of the machine. Use this paper feed and output method when you want to print on labels or envelopes. For the recommended paper to use, please refer to the FAQ, "What is the recommended paper?"
Envelopes and labels can be fed from the manual feed slot only. Do not use the paper tray.
-
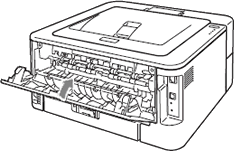
Open the back cover (face-up output tray).
- If you print on labels, go to STEP 3.
- If you print on envelopes, go to STEP 2.

-
<For printing envelopes only>
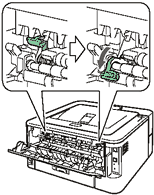
Pull down the two green levers, one on the left-hand side and one on the right-hand side, as shown in the illustration below.
-
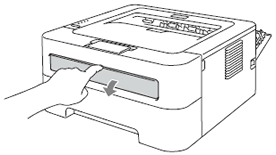
Open the manual feed slot cover.
-
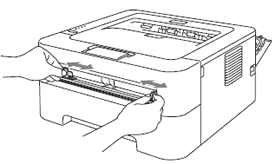
Using both hands, slide the manual feed paper guides to the width of the paper that you are going to use.
-
Using both hands, put one full sheet of labels or one envelope in the manual feed slot until the front edge touches the paper feed roller. When you feel the machine pull it in, let go.

DO NOT insert labels that have previously been used or that have some labels missing from the sheet. It may cause serious jams and the damage to your Brother machine.
Once the machine has grasped the sheet of labels or envelope, let go. The side to be printed should be faced up. The machine will hold the sheet or envelope in place until the print data is sent to the machine.
- Put one full sheet of labels or one envelope into the manual feed slot with the side to be printed face up.
- Make sure that the full sheet of labels or the envelope is straight and in the proper position on the manual feed slot. If it is not, it may not be fed properly, resulting in a skewed printout or a paper jam.
- DO NOT put more than one full sheet of labels or one envelope in the manual feed slot at any one time, as it may cause a jam.
- If you put any Media (paper, envelope and so on) in the manual feed slot before the machine is in the Ready mode, the media may be ejected without being printed on.
- The machine automatically turns on the Manual Feed mode when you put paper in the manual feed slot.
-
Select the following from each drop-down list menu of the printer driver.
For Windows users:
-
Paper size:
Envelopes: Com-10, DL, C5, Monarch, DL Long Edge, Customized paper size
Labels: A4, Letter
When you use Envelope #10, select "Com-10" for Paper size. For other envelopes which are not listed in the printer driver, such as Envelope #9 or Envelope C6, select "User Defined" for Paper size.
- Media Type: Envelopes, Env. Thin, Env. Thick, Label
- Paper Source: Manual
For Macintosh users:
-
Paper size:
Envelopes: #10 Envelope, DL Envelope, C5 Envelope, Monarch Envelope, DL Long Edge, Manage Custom Size
Labels: A4, US Letter
When you use Envelope #10, select "#10 Envelope" for Paper size. For other envelopes which are not listed in the printer driver, such as Envelope #9 or Envelope C6, select "Manage Custom Size" for Paper size.
- Media Type: Envelopes, Env. Thin, Env. Thick, Label
- Paper Source: Manual
-
Paper size:
- Send the print data to the machine.
-
After the printed page comes out of the machine, put in the next full sheet of labels or envelope as shown in STEP 5. Repeat for each page that you want to print.
- When you finished printing on labels, go to STEP 10.
-
When you finished printing on envelopes, go to STEP 9.
- Remove each sheet of labels or envelope as soon as it has been printed. Stacking them may cause the paper to jam or curl.
- If an envelope is creased after they are printed, please refer to FAQ, "Envelope creases".
- If envelopes get smudged during printing, set the Media Type to "Thick Paper" or "Thicker Paper" to increase the fixing temperature.
-
<For Windows users only>
If the DL size double flap envelopes are creased after printing, select "DL Long Edge" for Paper Size from the Basic tab. Put a new DL size double-flap envelope in the manual feed slot with the longest edge of the envelope in first, then print again. - Envelope joints that are sealed by the manufacturer should be secure.
- All sides of the envelope should be properly folded without wrinkles or creases.
-
<For printing envelopes only>
When you have finished printing, reset the two green levers that were pulled down in STEP 2 back to their original positions.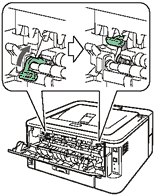
-
Close the back cover of the machine.
Related FAQs
HL-2130, HL-2240D, HL-2270DW
If you need further assistance, please contact Brother customer service:
Content Feedback
Please note this form is used for feedback only.