RJ-4230B
FAQs & Troubleshooting |

RJ-4230B
Date: 02/05/2018 ID: faqp00100254_004
Using P-touch Template Settings
P-touch Template mode provides functions for inserting data from an external device (such as a barcode reader, controller or programmable logic device connected to the printer) into text and barcode objects in layouts saved on the printer, useful for printing templates and barcodes.
For more information on P-touch Template, download the P-touch Template Manual / Command Reference (English only) from the [Manuals] page.
To use the P-touch Template Settings, please follow the steps below:
-
Open the Printer Setting Tool.
Refer to the FAQ: "Using the Printer Setting Tool (for Windows)"
-
Select P-touch Template Settings.
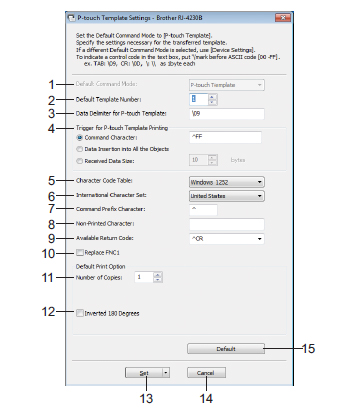
The P-touch Template Settings dialog box appears.
-
Specify or change the settings.
See below for detailed information.
P-touch Template Settings Dialog Box

-
Default Command Mode
Specifies the P-touch Template mode as the default mode.
To change the mode, use the Device Settings.
-
Default Template Number
Specify a template number to select as default when the printer is turned on.
However, if a template is not to be transferred to the printer, do not specify a template number.
-
Data Delimiter for P-touch Template
A symbol used to indicate the boundaries between groups of data in a file.
Between 1 and 20 characters can be specified.
-
Trigger for P-touch Template Printing
You can specify a trigger to begin printing from a number of options.
[Command Character]: Printing starts when the command character specified here is received.
[Data Insertion into All the Objects]: Printing starts when the delimiter for the last object is received.
[Received Data Size]: Printing starts when the number of characters specified here is received. However, delimiters are not counted in the number of characters.
-
Character Code Table
Select one of the following three character code sets.
Available settings: [Windows 1251], [Windows 1252], [Windows 1250 Eastern Europe], [Brother standard], [Unicode]
-
International Character Set
Lists character sets for specific countries or regions.
Available settings: [United States], [France], [Germany], [Britain], [Denmark], [Sweden], [Italy], [Spain], [Japan], [Norway], [Denmark II], [Spain II], [Latin America], [Korea], [Legal]
The following 12 codes are switched depending on the country or region selected from the list above: 23h 24h 40h 5Bh 5Ch 5Dh 5Eh 60h 7Bh 7Ch 7Dh 7Eh
For switched characters, download the P-touch Template Manual / Command Reference (English only) from the [Manuals] page.
-
Command Prefix Character
Specifies the prefix character code, which identifies commands used in P-touch Template mode.
-
Non-Printed Character
Characters specified here are not printed when data is received. Specify 1 to 20 characters.
-
Available Return Code
The line feed code is used when feeding data to indicate that the following data should be moved to the next line in a text object. One of the following four line feed codes can be selected, or 1 to 20 characters can be specified as the line feed code.
Available settings: [^CR], [\0D\0A], [\0A], [\0D]
-
Replace FNC1
See the P-touch Template Manual / Command Reference (English only) from the [Manuals] page -
Number of Copies
Set the number of copies. A number between 1 and 99 can be specified.
-
Inverted 180 Degrees
If this check box is selected, the data will be printed after it has been rotated 180 degrees. -
Set
After the [Set] button is clicked, the settings are saved as an .ini file when the dialog box is closed.
To save the specified settings in a command file, select [Save in Command File] from the drop-down menu. The saved command file can be used with the mass storage feature to apply the settings to a printer.
-
Cancel
Cancels the settings and closes the dialog box. The settings will remain unchanged.
-
Default
Click this button to return the settings to their factory defaults.
RJ-4230B, RJ-4250WB
If you need further assistance, please contact Brother customer service:
Content Feedback
To help us improve our support, please provide your feedback below.
Step 1: How does the information on this page help you?
Step 2: Are there any comments you would like to add?
Please note this form is used for feedback only.