MFC-J470DW
FAQs & Troubleshooting |
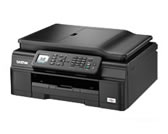
MFC-J470DW
Date: 15/07/2016 ID: faq00002780_001
Change the scan settings for scanning from ControlCenter4 or the SCAN key (For Windows)
This FAQ explains how to change the settings (such as Resolution, File Type) used for scanning from ControlCenter4 or when using the SCAN key on your Brother machine.
- Click here to see how to change the settings for scanning from Home Mode of ControlCenter4.
- Click here to see how to change the settings for scanning from Advanced Mode of ControlCenter4.
- Click here to see how to change the settings for scanning by pressing the SCAN key on your Brother machine.
NOTE: Illustrations shown below are from a representative product and operating system, and may differ from your Brother machine and operating system.
<How to change the settings for scanning from Home Mode of ControlCenter4>
In Home Mode, you can configure Document Type and Scan Size before scanning a document.
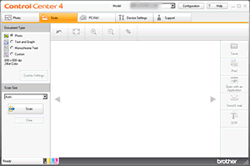
Document Type:
The following three basic settings are available:
- Photo: Resolution: 600x600dpi, Scan Type: 24bit Color
- Text and Graph: Resolution: 300x300dpi, Scan Type: 24bit Color
- Monochrome Text: Resolution: 200x200dpi, Scan Type: Black and White
You can also set and store your preferred settings for Document Type.
-
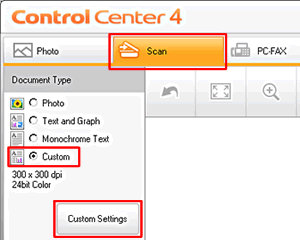
Click the Scan tab and choose Custom. Then, click Custom Settings.
-
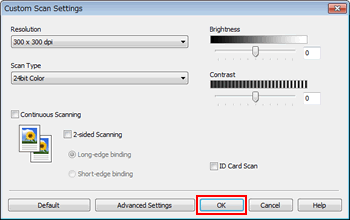
The Custom Scan Settings window will appear. Configure the settings and click OK.
Scan Size:
Choose your document size from the Scan Size drop-down list.
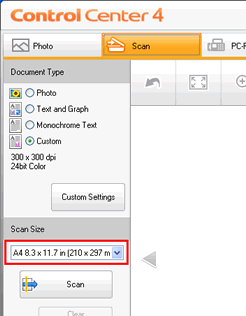
You can choose other settings, such as File Type, File Name and Scan Location (or Destination Folder), after scanning.
<How to change the settings for scanning from Advanced Mode of ControlCenter4>
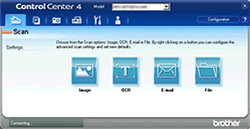
In Advanced Mode, there are four scan options: Scan to File, Scan to E-mail, Scan to OCR and Scan to Image. You can configure the advanced scan settings for each option.
-
Scan to File
This allows you to scan a document to a pre-defined folder. Click here to see the details of how to change settings for Scan to File. -
Scan to E-mail
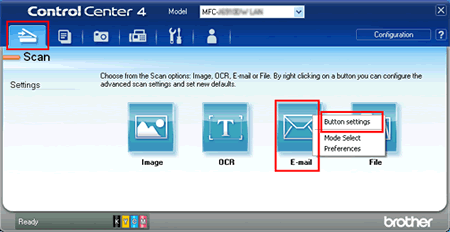
This allows you to scan a document to your default E-mail application and send the scanned job as an attachment. Click here to see the details of how to change settings for Scan to E-mail. -
Scan to OCR
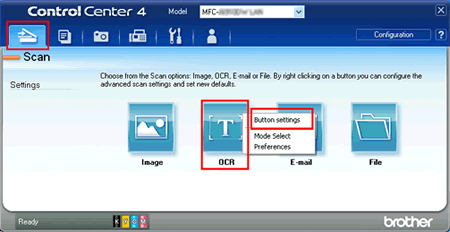
This allows you to scan a document and convert it into text. The text can be edited using your preferred word processing software. Click here to see the details of how to change settings for Scan to OCR.Scan to OCR is not available for some countries.
-
Scan to Image
This allows you to scan an image directly into your graphics application for image editing. Click here to see the details of how to change settings for Scan to Image.
How to change settings for Scan to File:
-
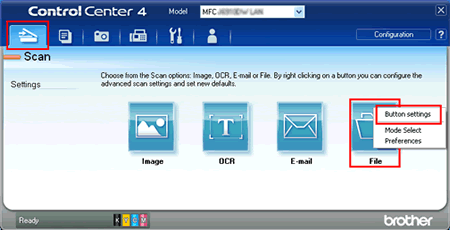
Click the Scan tab and right-click the File button. Then, choose Button settings.
-
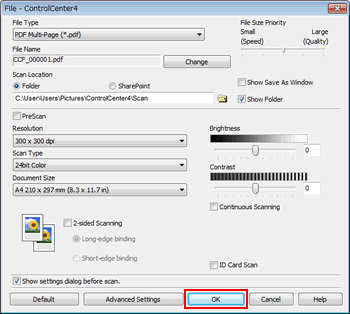
The settings window for Scan to File will appear. Configure the settings and click OK. For example, you can set the prefix text used for the file name of the scanned data in the File Name box. You can also set the folder to save the scanned data in the Destination Folder or Scan Location box.
How to change settings for Scan to E-mail:
-
Click the Scan tab and right-click the E-mail button. Then, choose Button settings.
-
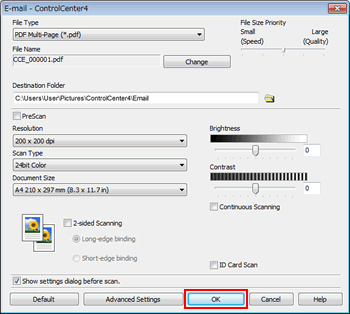
The settings window for Scan to E-mail will appear. Configure the settings and click OK. For example, you can choose the file format of attachment from the File Type drop-down list.
How to change settings for Scan to OCR:
-
Click the Scan tab and right-click the OCR button. Then, choose Button settings.
-
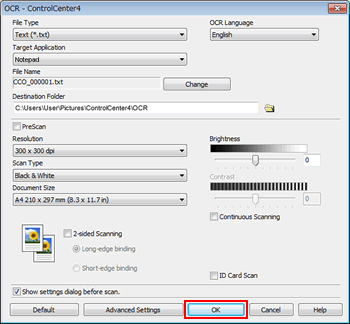
The settings window for Scan to OCR will appear. Configure the settings and click OK. For example, you can choose the word processing application where the converted text data will be displayed from the Target Application drop-down list. You can also choose the language you want to convert into from the OCR Language drop-down list.
How to change settings for Scan to Image:
-
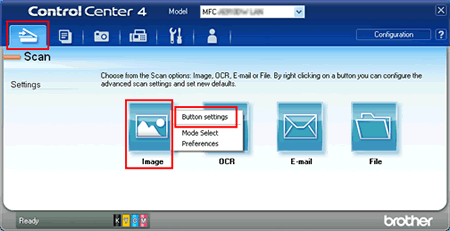
Click the Scan tab and right-click the Image button. Then, choose Button settings.
-
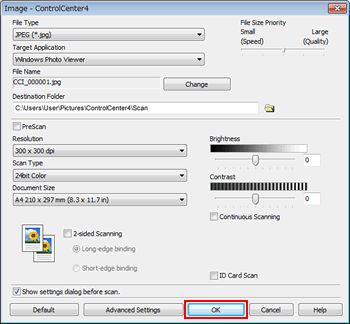
The settings window for Scan to Image will appear. Configure the settings and click OK. For example, you can choose the graphics application where the scanned image will be open from the Target Application drop-down list.
<How to change the settings for scanning by pressing your Brother machine's SCAN key>
In ControlCenter4, you can configure the settings for scanning by pressing the SCAN key on the control panel of your Brother machine.
-
Open Device Scan Settings window.
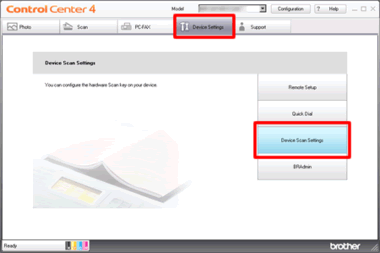
In Home Mode:
Click Device Settings tab => Device Scan Settings.
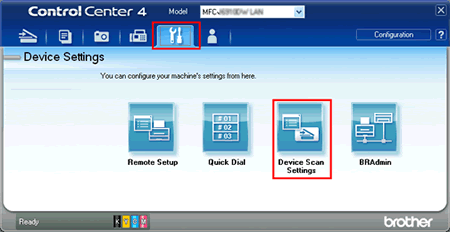
In Advanced Mode:
Click Device Settings tab => Device Scan Settings.
-
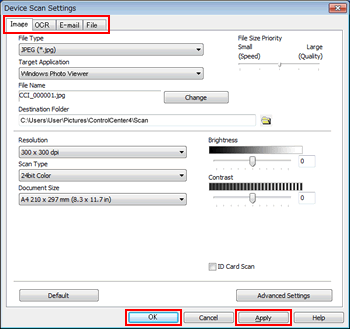
The Device Scan Settings window will appear. There are four scan options: Scan to File, Scan to E-mail, Scan to OCR and Scan to Image. Click the tab for the scan option you want to configure and configure the scan settings. Then, click Apply => OK.
Scan to OCR is not available for some countries.
ADS-1600W, DCP-1510, DCP-1610W, DCP-7055, DCP-7065DN, DCP-9055CDN, DCP-J1100DW, DCP-J140W, DCP-J152W, DCP-J4110DW, DCP-J4120DW, DCP-L3551CDW, HL-L2380DW, MFC-1810, MFC-1910W, MFC-7360N, MFC-7860DW, MFC-8510DN, MFC-8910DW, MFC-8950DW, MFC-9140CDN, MFC-9340CDW, MFC-9460CDN, MFC-9970CDW, MFC-J1300DW, MFC-J430W, MFC-J4510DW, MFC-J4620DW, MFC-J470DW, MFC-J4710DW, MFC-J480DW, MFC-J491DW, MFC-J5320DW, MFC-J5330DW, MFC-J5720DW, MFC-J5730DW, MFC-J5910DW, MFC-J5920DW, MFC-J5930DW, MFC-J5945DW, MFC-J625DW, MFC-J650DW, MFC-J6510DW, MFC-J6520DW, MFC-J6530DW, MFC-J6910DW, MFC-J6920DW, MFC-J6930DW, MFC-J6935DW, MFC-J6945DW, MFC-J825DW, MFC-J870DW, MFC-L2700DW, MFC-L2713DW, MFC-L2720DW, MFC-L2740DW, MFC-L2770DW, MFC-L3710CW, MFC-L3770CDW, MFC-L5755DW, MFC-L6700DW, MFC-L6900DW, MFC-L8690CDW, MFC-L8850CDW, MFC-L9550CDW, MFC-L9570CDW
Do you need any further assistance?
Content Feedback
Please note this form is used for feedback only.