SDX1000
FAQs & Troubleshooting |
SDX1000
Date: 19/11/2019 ID: faqh00101476_000
Installing the Calligraphy Pen
When drawing the calligraphy font or pattern, install calligraphy pen holder with calligraphy pen into the cutting machine in accordance with the following procedure.
- Change the pen adjuster.
- Check the indicator setting of the pen adjuster.
-
Install the calligraphy pen into the calligraphy pen holder.
Change the pen adjuster
As a default, pen adjuster A (for a 3.5 mm pen tip) is installed in the calligraphy stand.
When you draw a pattern with for a 2.0 mm pen tip, change it to the pen adjuster B with reference to the How to Change the Pen Adjuster.
 |
 |
 |
| Calligraphy stand | Pen adjusters A/B | Calligraphy pen (1) 2.0 mm pen tip (2) 3.5 mm pen tip |
The calligraphy pens that can be used with this machine are those with a 2.0 mm pen tip or 3.5 mm pen tip.
Use the pen adjuster A (for a 3.5 mm pen tip) in order to draw a pattern with for a 3.5 mm pen tip.
Use the pen adjuster B (for a 2.0 mm pen tip) in order to draw a pattern with for a 2.0 mm pen tip.
Check the indicator setting of the pen adjuster
The setting for the pen tip angle differs depending on the calligraphy font that will be used. Refer to the following table and use the pen with the appropriate setting.
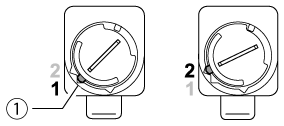 |
(1) Indicator |
| Font Name | Indicator Position | Included Accessory / Optional Accessory |
Model Name | |
| Italic |  |
1 |
Included Accessory | CADXCLGKIT1 |
| 30 patterns (20logos and 10ptterns) |
  |
|||
| Gothic font |  |
1 | Optional Accessory | CADXCLGP01 |
| Uncial font |  |
2 | ||
Calligraphy fonts with different scale settings cannot be combined and arranged.
You can also check the Indicator position on the screen that appears after selecting [Draw] on the preview screen as below.
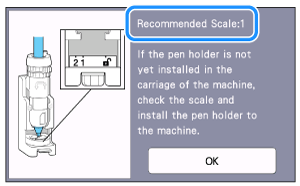 |
(1) Scale setting |
-
To change the indicator setting of the pen adjuster, push down on the release lever on the calligraphy stand.

(1) Release lever
-
Rotate the tab on the back of the pen adjuster to align the indicator with the setting for the calligraphy font to be used.

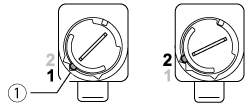
(1) Indicator
-
Return the release lever on the calligraphy stand to its original position.

Install the calligraphy pen into the calligraphy pen holder
-
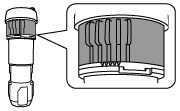
Make sure that the dial on the calligraphy pen holder is at the initial position.
If the dial is not at the initial position, pull up the dial, and then slowly turn it to the right until it can be lowered into the notch for the initial position.Dial is in the initial position Dial is NOT in the initial position 
-
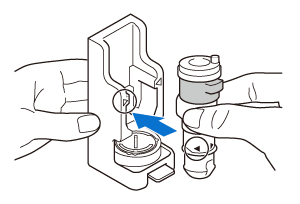
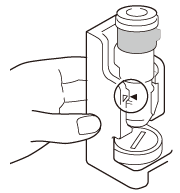
Place the pen holder in the calligraphy stand so that ▷ on the holder aligns with ◀ on the front of the stand.
-
Place the calligraphy stand on a level surface, and vertically hold the pen.
Insert the pen into the calligraphy pen holder so that the pen tip fits into the groove in the pen adjuster.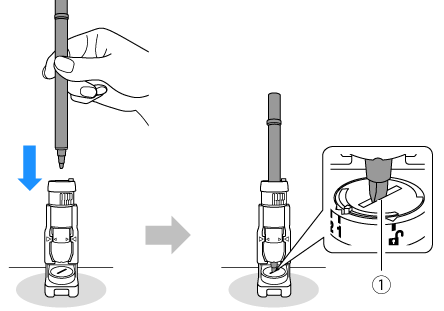
(1) Groove
-
While holding the calligraphy stand and pen holder, pull the gray dial up.
When the dial is up, it can be rotated left.
Slowly turn the dial to the left until it stops moving to the left, and then lower the dial so that the teeth are engaged.


-
Make sure that the tip of the calligraphy pen is in the groove of the pen adjuster.

(1) Groove
-
Push down on the release lever on the calligraphy stand.
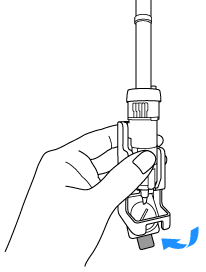
-
Pull the calligraphy pen holder straight out of the stand toward you, to remove the pen holder from the stand.
※If the pen holder is removed without the release lever pushed down, the pen tip may become damaged.
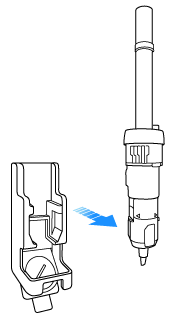
-
While holding the calligraphy pen holder, insert it into the carriage of the machine.
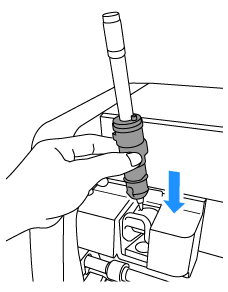
Do not hold the pen when inserting the pen holder into the carriage.
Otherwise, the pen will move out of place. If the pen is not proper position,the pattern cannot be drawn cleanly.
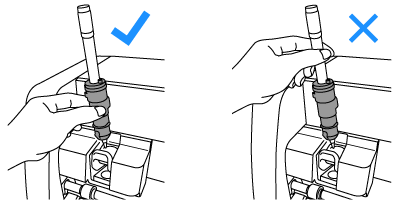
If the pen moves out of place, return the dial of the pen holder to the initial position, and repeat from step 5 again.
Dial is in the initial position
-
Push down on the holder lock lever.
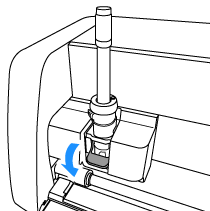
>>Draw the created pattern on the cutting machine.
Refer to the Draw Patterns with Calligraphy Pen.
SDX1000, SDX1200, SDX1250, SDX2250D
If you need further assistance, please contact Brother customer service:
Content Feedback
Please note this form is used for feedback only.
Please do not enter contact information or any other personal information here.
(We will not respond to any Feedback you send us.)