Innov-is VE2300
Preguntas frecuentes y solución de problemas |

Innov-is VE2300
Fecha: 14/05/2015 ID: faqh00000044_000
How do I adjust an alternate bobbin case(with pink marking or no marking) using an embroidery pattern?
A bobbin case with a green marking has been installed in this machine, with an alternate bobbin case (with pink marking or no marking) provided as an accessory.
When using the embroidery bobbin thread provided, please be sure to choose the green marked bobbin case when performing utility stitch sewing and embroidery functions.
When in the embroidery function mode, the alternate bobbin case (with pink marking or no marking) should be selected when substitute embroidery bobbin threads (other than what is accompanied with your machine) are being used.
The alternate bobbin case (with pink marking or no marking) can be easily adjusted when bobbin tension changes are required to accommodate different bobbin threads.
 |
 pink marking or no marking pink marking or no marking |
- This page describes how to adjust a bobbin tension for embroidery using an alternate bobbin case(with pink marking or no marking).
- Download an embroidery pattern for adjustment, embroider the pattern and check a result, then adjust an alternate bobbin case if necessary.
-
Do not adjust a bobbin case with green marking.
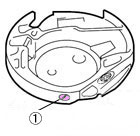
If a green marked bobbin case is adjusted, it may be broken and can not be used any more. - To adjust the bobbin tension for embroidery function, using the alternate bobbin case (with pink marking or no marking), turn the slotted-head (-) screw with a (small) screwdriver.
Refer to "Cleaning the case" for information on how to remove/install a bobbin case.
-
Prepare following items.
(1).Screwdriver(Small)
(2).Bobbin wound
with bobbin thread(3).Embroidery pattern
(will be downloaded
in Procedure 4 below.)(4).Fabric and
embroidery frame


-
Install a bobbin wound with bobbin thread into an alternate bobbin case set in a sewing machine.
For information on how to remove/install a bobbin case, refer to "Cleaning the case".
-
Make sure the upper thread tension is set to 4.0.
-
Download an embroidery pattern and transfer it to the sewing machine.
Click the "Download" link to download the embroidery pattern.
Following 3 methods are available to transfer the downloaded embroidery pattern to the sewing machine.-
USB media(Depending on the model available on the USB port connector for media.)
- Save the downloaded embroidery pattern into USB media.
- Recall the downloaded embroidery pattern from the USB media.
-
PC
-
Embroidery card
- Save the downloaded embroidery pattern into an Embroidery card.
- Select the downloaded embroidery pattern from the embroidery card.
-
USB media(Depending on the model available on the USB port connector for media.)
-
Sew the downloaded embroidery pattern on a fabric and check the result, referring to stitch samples below.
If you do not get a proper result, remove the alternate bobbin case from the sewing machine and adjust it.
For information on how to remove/install a bobbin case, refer to "Cleaning the case".
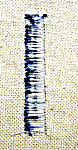
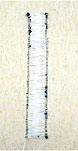
surface of fabric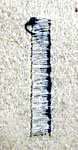
underside of fabricBe sure to check if a bobbin is installed correctly before you embroider the pattern.
If you can only see the bobbin thread on both sides of fabric as shown in the left picture, the bobbin is not installed correctly.
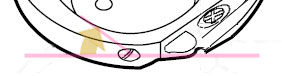
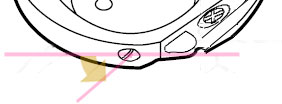
For details, refer to "Correctly installing a bobbinWhen you adjust an alternate bobbin case, turn a slotted-head(-) screw by a screwdriver(small).
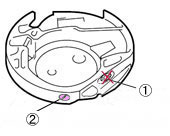
 DO NOT adjust the position of the Phillips (+) screw
 Adjust with a screwdriver(small).
- When adjusting the alternate bobbin case, be sure to remove the bobbin from the alternate bobbin case.
- DO NOT adjust the position of the Phillips (+) screw on the alternate bobbin case as this may result in damage to the bobbin case, rendering it unusable.
-
If the slotted-head screw (-) is difficult to turn, do not use force.
Turning the screw too much or providing force in either (rotational) direction may cause damage to the bobbin case.
Should damage occur, the bobbin case may not maintain proper tension.
|
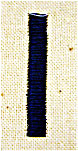
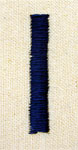
<Correct tension> * Upper thread slightly appears on the underside of fabric. |
||
 |
 |
|
| surface of fabric | underside of fabric | |
|
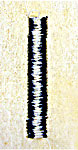
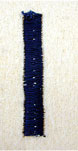
<Bobbin thread is loose> * Bobbin thread appears slightly on the surface of fabric. |
||
 |
 |
 |
|
surface of fabric |
underside of fabric |
|
If this occurs, turn the slotted-head screw (-) clockwise, being careful not to over-tighten the screw, approximately 30-45 degrees to increase bobbin tension.
|
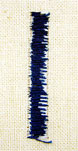
<Bobbin thread is tight> * Upper thread on the surface of fabric seems to be lifting/looping and bobbin thread is not seen on the underside of fabric. |
||
 |
 |
 |
|
surface of fabric |
underside of fabric |
|
If this occurs, turn the slotted-head screw (-) counterclockwise, being careful not to over-tighten the screw, approximately 30-45 degrees to decrease bobbin tension.
After adjusting an alternate bobbin case, make trial sewing to check thread tension.
If the thread tension is still incorrect, repeat the Procedure 5 until you can obtain a correct thread tension.
Preguntas frecuentes relacionadas
Innov-is 1200, Innov-is 1500D/1500, Innov-is 2500D, Innov-is 4000D/4000, Innov-is 4500D, Innov-is BP2100, Innov-is BP2150L, Innov-is VE2300, Innov-is VM5100, Innov-is VM6200D
Si necesita asistencia, contáctese con el servicio al cliente de Brother:
Comentarios sobre el contenido
Observe que este formulario solo se utiliza para comentarios.