HL-1211W
FAQs & Troubleshooting |

HL-1211W
Date: 14/12/2021 ID: faq00002794_030
Setup a Brother machine on a wireless (Wi-Fi) network using the supplied CD-ROM with a USB cable.
This FAQ explains how to configure your Brother machine for a wireless network using the Wireless setup wizard and a USB cable temporarily. (The computer must be on your network.)
Before configuring the wireless settings:
You must know your wireless network settings of the WLAN access point/router. Check and record the current wireless network settings below.
- Network Name (SSID: Service Set ID, ESSID: Extended Service Set ID)
- Network Key (Password, Security Key or Encryption Key, etc.)
Your Brother machine supports the use of the first WEP KEY only. If you are using a router that is using more than one WEP KEY, enter the KEY used for the first WEP KEY.
-
See the side of your WLAN access point/router.

- See the documentation provided with your WLAN access point/router.
- The initial Network Name could be the manufacturer's name or the model name.
If you don't know your wireless settings of your WLAN access point/router, click here to see the details of how to find SSID and Network Key.
Configure the wireless settings:
Follow the steps below.
NOTE: The screens may differ depending on operating system being used and your Brother machine.
-
Connect the AC power cord to your Brother machine and then connect it to an AC power outlet (electrical socket). Turn on your Brother machine.
DO NOT connect the USB cable yet.
- Turn on your computer.
-
Put the supplied CD-ROM into your CD-ROM drive.
For Windows users
For macOS 10.7 - 10.14 users
If you do not have the CD-ROM:
(Windows)
Go to Downloads section of this website and download Full Driver & Software Package. First, follow the installation instructions on the download page. Once the installation screen appears, follow the steps from STEP c for Windows users below.(Macintosh)
Go to Downloads section of this website and download Full Software Package. First, follow the installation instructions on the download page. Once the installation screen appears, follow the steps from STEP c for macOS 10.7 - 10.14 below.
If you do not find Full Software Package, download Wireless Setup Wizard. Follow the installation instructions on the download page.
After setting up your Brother machine, download Printer Driver. Follow the installation instructions on the download page.
If you do not find Printer Driver, download Brother iPrint&Scan from the App Store.For Windows users:

You can see the steps with video clips.
- The clip is being streamed from YouTube. (Opens in a new window.)
- Your machine may alter what is displayed on this video.
- The installation screen will appear automatically. If prompted, choose your model and language.
-
The CD-ROM main menu will appear. Click Install Printer Driver.
NOTE: When the User Account Control screen appears, click Allow or Yes.

- When the License Agreement window appears, click Yes if you agree to the License Agreement.
-
Choose Wireless Network Connection and then click Next.

-
Choose Brother Peer-to-Peer Network Printer, and then click Next.

-
If the Firewall/AntiVirus detected screen appears, choose Change the Firewall port settings to enable network connection and continue with the installation. (Recommended) and then click Next.

-
The screen for choosing your Brother machine may appear. If the screen does not appear, continue to STEP 5.
Check if your Brother machine appears in the list on the screen.
If you cannot find your Brother machine from the list, click Wireless Setup to configure the wireless settings. Continue to STEP 5.
If you can find your Brother machine, choose your Brother machine from the list. Then click Next and follow the on-screen instructions to install the printer driver for network connection. Even if you have printed with USB connection, you need to install the printer driver for network connection.

For macOS 10.7 - 10.14 users:
- Double-click the BROTHER icon on your desktop.
-
Double-click the Driver Download icon.

The download screen may appear when you click the Driver Download icon. Choose your OS and download Full Software Package.Then, double click the downloaded file to start installation. -
Choose Wireless Network Connection and then click Next.

-
The screen for choosing your Brother machine may appear. If the screen does not appear, continue to STEP 5.
Check if your Brother machine appears in the list on the screen.
If you cannot find your Brother machine from the list, click (Setup) > Wireless Device Setup Wizard to configure the wireless settings. Continue to STEP 5.
If you can find your Brother machine, choose your Brother machine from the list. Then click Next and follow the on-screen instructions to install the printer driver for network connection. Even if you have printed with USB connection, you need to install the printer driver for network connection.

-
The Installation confirmation screen may appear. If the screen does not appear, continue to STEP 5.
If this screen appears, you can configure your Brother machine for a wireless network using the Wireless setup wizard without USB cable. (The computer must be on your network.)
Confirm the message on the screen. Check the Checked and confirmed box and click Next.
Follow the on-screen instructions to configure your Brother machine for a wireless network and install the printer driver for network connection. Even if you have printed with USB connection, you need to install the printer driver for network connection.

-
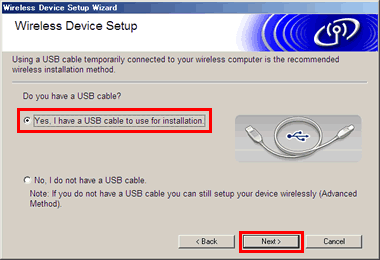
Choose Yes, I have a USB cable to use for installation. and then click Next.

If this screen appears, click Allow when you agree to use your confidential information stored in your keychain for configuring a wireless network.

-
If this screen appears, confirm you have the wireless security information. Check the Checked and confirmed box and click Next.

-
Connect the USB cable to the Brother machine and your computer.


-
Your wireless settings will automatically be detected. One of the following screens will appear depending on your computer environment being used.
Click here if "Installation confirmation" screen appears.
Click here if "Available Wireless Networks" screen appears.
If "Installation confirmation" screen appears:Confirm the displayed information. Check the Checked and confirmed box and click Next.

Your Network Name (SSID, ESSID) will be displayed. Choose Yes and then click Next.
Continue to STEP 12.

If "Available Wireless Networks" screen appears:
The list of currently available wireless network will be displayed. Choose the Network Name (SSID, ESSID) you would like to connect to and then click Next. Continue to STEP 10.
f the Network Name (SSID, ESSID) is not displayed in the list, continue to STEP 9.

If there are multiple similar Network Names (SSID, ESSID) in the list:
Some WLAN access point/routers can have more than one Network Name (SSID, ESSID). Refer to the instructions provided with your WLAN access point/router.
If so, choose the Network Name (SSID, ESSID) which you used when connecting your computer to the WLAN access point/router. -
If the Network Name (SSID, ESSID) is not displayed in the wireless network list, confirm the following:
After you confirm, click Refresh.- If the WLAN access point/router is turned off, turn on it.
- If your Brother machine is placed too far from your WLAN access point/router or there are obstructions between them, place the Brother machine as close to the WLAN access point/router as possible with minimal obstructions.
- Your Brother machine supports IEEE 802.11b, IEEE 802.11g and IEEE 802.11n. Confirm if your WLAN access point/router supports IEEE 802.11b, IEEE 802.11g or IEEE 802.11n, and if one of them is enabled.
If the WLAN access point/router is in a stealth mode, the Brother machine can not detect the Network Name (SSID, ESSID) automatically. Follow the steps below to add the Network Name (SSID, ESSID) manually.
-
Click Advanced.

-
Enter the Network Name (SSID, ESSID) and then click Next.

-
Enter the network information and then click Next. Continue to STEP 12.

-
If the following screen appears, follow this step.
If not, continue to STEP 11.

This screen will appear if you choose the Network Name (SSID, ESSID) of the unsecured WLAN access point/router. We recommend that you configure security settings of your WLAN access point/router to prevent unauthorized access to your network.- If you would like to configure security settings of your WLAN access point/router, click Cancel to exit the wizard. After configuring, try to start again from the beginning.
- If not, click OK and then continue to STEP 12.
-
Enter the Network Key and then click Next. (The Network Key is case sensitive.)

-
Confirm the settings are correct. Click Next to send the settings to the Brother machine.
- If you would like to change the IP Address, click Change IP Address and set the IP Address manually.
- If you click Cancel, the settings will be disabled.

-
If the wireless connection fails, the connection error screen will appear. Confirm the displayed information and then click Retry to go back to the screen in STEP 8. Try to start again from STEP 8.
[Example of the error screen]
If the connection error screen does not appear, continue to STEP 14.
If the connection error still appears after reconfiguring, click Retry again to go back to the screen in STEP 8, and click Cancel to exit the wizard.
We recommend you print WLAN report to determine the reason for the error. After eliminating the cause of the error, try again to configure the wireless network settings. Click here to see how to print WLAN report. -
Once the following screen appears, disconnect the USB cable from your computer and the Brother machine.

-
If the following screen appears, the wireless setup is now complete.
Click Next and follow the on-screen instructions to install the printer driver for network connection. Even if you have printed with USB connection, you need to install the printer driver for network connection.

If the printer driver for network connection has already been installed, click Cancel to finish.
Content Feedback
Please note this form is used for feedback only.