DCP-8155DN
FAQs & Troubleshooting |
DCP-8155DN
Date: 27.03.2023 ID: faq00002741_002
Duplex (two-sided) scan
For instructions on how to 2-sided (duplex) scan, click on the link below for your scanning method:
- Using ControlCenter4 (Windows Only)
- Using ControlCenter2 (Macintosh Only)
- Using the Scan key
- Using ScanSoft™/Nuance™ PaperPort™ SE (Windows Only)
-
Using Presto! PageManager (Macintosh Only)
Using Controlcenter4 (Windows Only)
A. ControlCenter4 Home Mode Users
B. ControlCenter4 Advanced Mode Users
NOTE: Illustrations shown below are from a representative product and may differ from your Brother machine.
A. ControlCenter4 Home Mode Users:
- Place a document to be scanned in the ADF (Automatic Document Feeder).
-
Open the ControlCenter4.
(Windows 7 or earlier)-
Click Start > (All) Programs > Brother > [model name] > ControlCenter4.
The ControlCenter4 application will be loaded in the Task Tray near the system clock. -
Right-click on the ControlCenter4 icon
 located in the Task Tray and left-click on Open.
-
Click
 Brother Utilities.
 - Click the dropdown list to select your model if it is not already selected.
- Click Scan.
-
Click ControlCenter4.

-
Click
 (Start) > (All apps >) Brother > Brother Utilities.
 - Click the dropdown list to select your model if it is not already selected.
- Click Scan.
-
Click ControlCenter4.
-
Click Start > (All) Programs > Brother > [model name] > ControlCenter4.
- While on the Scan Tab, select Custom and click Custom Settings.
-
Place a check in the box for 2-sided Scanning. You will then be able to select one of the following binding options:
- Long-edge binding
-
Short-edge binding
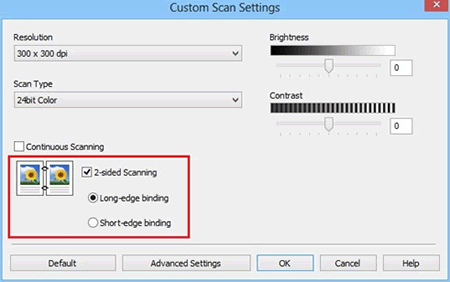
- Click OK.
- Press Scan. The document will now scan.
B. ControlCenter4 Advanced Mode Users:
- Place a document to be scanned in the ADF (Automatic Document Feeder).
-
Open the ControlCenter4.
(Windows 7 or earlier)-
Click Start > (All) Programs > Brother > [model name] > ControlCenter4.
The ControlCenter4 application will be loaded in the Task Tray near the system clock. -
Right-click on the ControlCenter4 icon located in the Task Tray and left-click on Open.
-
Click
 Brother Utilities.
 - Click the dropdown list to select your model if it is not already selected.
- Click Scan.
-
Click ControlCenter4.
-
Click (Start) > (All apps >) Brother > Brother Utilities.
- Click the dropdown list to select your model if it is not already selected.
- Click Scan.
-
Click ControlCenter4.
-
Click Start > (All) Programs > Brother > [model name] > ControlCenter4.
- Click on Configuration > Button Settings > Scan > select your desired Scan Type.
-
Place a check in the box for 2-sided Scanning. You will then be able to select one of the following binding options:
- Long-edge binding
-
Short-edge binding
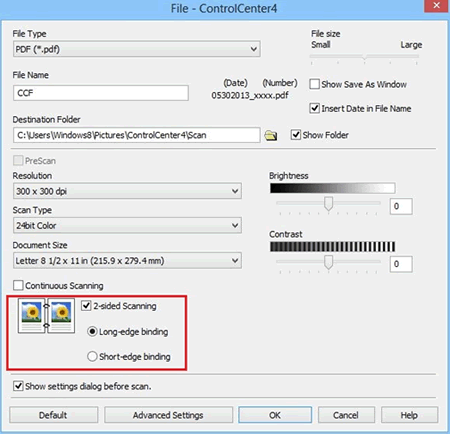
- Click OK.
- Click Scan that you configured and then click Scan. The document will now scan.
Using ControlCenter2 (Macintosh only)
- Place a document to be scanned in the ADF (Automatic Document Feeder).
-
Open the ControlCenter2.
To open the ControlCenter2 application, click Go from the Finder bar, Applications > Brother > ControlCenter. Double click the ControlCenter.
The ControlCenter will open and an icon will be placed in the dock. -
Click on Configuration > Scan > select your desired Scan Type.

-
Place a check in the box for 2-sided Scanning. You will then be able to select one of the following binding options:
- Long-edge binding
- Short-edge binding
- Click OK. All subsequent scans will use this setting.
- Click Scan that you configured and then click Start Scanning. The document will now scan.
Using the Scan key
- Place a document to be scanned in the ADF (Automatic Document Feeder).
- Press the SCAN Key on the Brother machine.
- Press Up or Down arrow key to select Scan to PC and then press OK.
- Press the Up or Down arrow key to select the desired Scan Type and then press OK.
- Press the Up or Down arrow key to select 1sided, 2sided (L) edge or 2sided (S) edge and press OK.
-
For network users only:
- If multiple network computer names appear, press the Up or Down arrow key to select the destination computer that you want to receive the scan and press OK.
- If the LCD prompts you to enter a PIN, enter the 4-digit PIN for the destination computer and press OK.
- Press START. The document will scan.
The selected Start button does not affect the scan's color settings. These settings are configured within the ControlCenter's Device Button Configuration.
- Place a document to be scanned in the ADF (Automatic Document Feeder).
- Press SCAN.
- Press Scan to PC.
- Press the scan option that you would like to complete.
-
For network users only:
- If multiple network computer names appear, press the Up or Down arrow key to select the destination computer that you want to receive the scan and press OK.
- If the LCD prompts you to enter a PIN, enter the 4-digit PIN for the destination computer and press OK.
-
Do one of the following:
- Press Duplex Scan and press Off, DuplexScan: LongEdge or DuplexScan: ShortEdge. Continue to STEP 7.
- To start scanning without changing additional settings, continue to STEP 7.
- Press START to begin the process.
The selected Start button does not affect the scan's color settings. These settings are configured within the ControlCenter's Device Button Configuration.
Using Scansoft™/Nuance™ PaperPort™ SE (Windows only)
-
Open PaperPort:
- Windows 7 and earlier: Click Start > (All) Programs > Nuance PaperPort > PaperPort.
- Windows 8: On the Start screen, click PaperPort tile from the Start screen.
- Windows 10: Click Start > (All apps >) Nuance PaperPort => PaperPort.
-
If the Scan or Get Photo panel is not already displayed on the left side of the screen:
Click Scan Settings. The Scan panel should then appear. - Under the scanner section click Select.
- Ensure that TWAIN has a check next to it and from the list of available scanners select the TWAIN driver for your model brother machine. (ex: TWAIN: TW-BROTHER [model name])
- Click OK. Your scanner should now be listed under the scanner section of the scan panel.
- Adjust any of the settings to your desired configuration.
- Place a check next to Display Scanner Dialog Box and Show Capture Assistant.
- Place the document you wish to scan in the Automatic Document Feeder (ADF) and click Scan.
- In the "Scanner Setup" dialog box adjust any of the settings to your desired configuration.
-
Ensure that 2-sided Scanning is checked. You will then be able to select one of the following binding options:
- Long-edge binding
-
Short-edge binding

- Click Start in the scanner window to begin the scan job.
-
When the scanning is complete, click Cancel. You will be prompted with the following options:
- Scan More Pages: Select this option if you wish to add additional pages to this scan job.
- Scan Other Side: Select this option to perform a manual duplex scan of documents with images on both sides of a page.
- Done: Select this option if you are finished scanning.
-
When you are done scanning you will be taken to the PaperPort Desktop and the scanned document should appear.
Using Presto! PageManager (Macintosh only)
-
Double click on the Presto! PageManager shortcut icon on the desktop or click Macintosh HD -> Application -> Presto! PageManager 9 for BR -> Presto! Page Manager SE 9.app or click Go -> Application -> Presto! PageManager 9 for BR -> Presto! Page Manager 9.35.app.
- Place your document on the ADF (Automatic Document Feeder).
-
In Presto click the Acquire button.

-
Place a check in 2-sided Scanning. You will then be able to select one of the following binding options:
- Long-edge binding
-
Short-edge binding

- Once you have configured all of your settings, click Start. The document will scan.
- Once the scan is complete, click Cancel.
DCP-8155DN, MFC-8910DW
Do you need any further assistance?
Content Feedback
Please note this form is used for feedback only.