I'm having a problem with the print quality. How can I resolve it?
Follow the instructions below to resolve the issue.
Step 1:
Check the following 4 points.
-
Check if paper you are using matches the type of paper we recommend.
The use of paper which curled or has been printed on another side already may cause the paper jam. The use of non recommended paper may cause the print quality issue. To avoid the issue, please use the recommended paper and try to print again.
Please refer to FAQ, "What is the recommended paper?".
-
Check if the media type setting in the printer driver matches the type of paper you are using.
Please refer to FAQ, "What kind of paper can I use?".
If not, select the appropriate media type and then try to print again.
-
Check if the toner cartridge is installed properly. If not, set it properly.
Please refer to the instructions, "How do I replace the toner cartridge?".
-
Check if the drum unit is installed properly. If not, set it properly.
Please refer to the instructions, "How do I replace the drum unit?".
If the issue still remains, please go to the step 2.
Step 2:
Please click the IMAGE which is similar to the issue you have.
If your issue doesn't match the images below, please refer to the related FAQ at the bottom of this page.
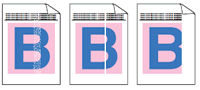
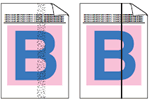
White lines, bands or ribbing across the page:
|
 |
Try the following points.
|
Back To Top >>
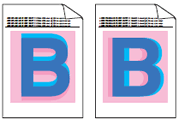
Colors are light or unclear on the page:
|
 |
Try the following points.
-
Make sure that the toner save mode is off from the control panel of the printer and the printer driver. If the toner save mode is on, change the setting to off and then try to print again.
Please refer to the instructions, "How can I activate/deactivate the Toner Save Mode?".
-
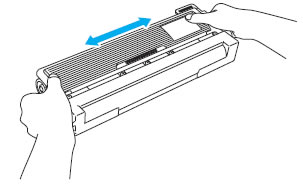
The toner may be solidified inside the toner cartridge. Shake all four toner cartridges gently as shown in the illustration below and then try to print again.
-
The window of LED head may be clouded or dirty. Wipe the windows of all four LED heads with a dry lint free soft cloth and then try to print again.
Please refer to the instructions, "How do I clean the LED head?".
-
Perform the print calibration to improve the color density and then try to print again.
Please refer to the instructions, "How do I improve the color density? (Print Calibration)".
|
Back To Top >>
White streaks or bands down the page:
 |
Try the following points.
-
The window of LED head may be clouded or dirty. Wipe the windows of all four LED heads with a dry lint free soft cloth and then try to print again.
Please refer to the instructions, "How do I clean the LED head?".
-
The drum unit may have the dust or glue on the drum surface. Clean the drum unit and then try to print again.
Please refer to the instructions, "How do I clean the drum unit?".
-
The toner cartridge may be damaged. Replace the toner cartridge as follows:
-
Click here to print the chart. [PDF, 185 KB]
-
Compare the color of your printed document with the printed chart to identify the missing color of the toner cartridge.
-
Replace the toner cartridge that matches the color causing this issue.
Please refer to the instructions, "How do I replace the toner cartridge?".
-
Try to print again
|
Back To Top >>
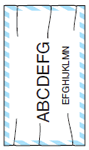
Vertical streaks in a light background:
|
 |
Try the following points.
-
The window of LED head may be clouded or dirty. Clean the LED head as follows:
-
Click here to print the chart. [PDF, 345 KB]
-
Compare the color of your printed document with the printed chart to identify the color of the LED head causing vertical streaks.
-
Clean the LED head that matches the color causing this issue with a dry lint free soft cloth.
Please refer to the instructions, "How do I clean the LED head?".
-
Try to print again.
|
Back To Top >>
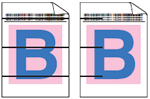
White spots or hollow print:
|
 |
Try the following points.
-
The drum unit may be stained. Clean the drum unit as follows:
-
Click here to print the chart. [PDF, 345 KB]
-
Compare the color of your printed document with the printed chart to identify the missing color of the drum unit.
-
Clean the drum unit that matches the color causing this issue. Please refer to the instructions, "How do I clean the drum unit?".
-
Try to print again.
-
Try to change the media type setting to thicker one such as "Thick" or "Thicker Paper" and print again.
-
Check the printer's environment. Conditions such as high humidity and high temperature can cause white spots or hollow print. Please use the printer with the following ranges of temperature and humidity:
Temperature: 10 ºC to 32.5 ºC (50 ºF to 90.5 ºF)
Humidity: 20% to 80% (without condensation)
If not, change the printer's location so that it matches the environment above.
|
Back To Top >>
Colored streaks or bands down the page:
|
 |
Try the following points.
-
The corona wire of the drum unit may be dirty. Take out the drum unit that matches the color causing this issue and clean the corona wire inside the drum unit by sliding the green tab. After cleaning the corona wire, make sure the corona wire cleaner is at a home position and then try to print again.
Please refer to the instructions, "How do I clean the corona wire of the drum unit?".
-
The toner cartridge and the drum unit may be damaged. Replace them as follows:
-
Click here to print the chart. [PDF, 345 KB]
-
Compare the color of your printed document with the printed chart to identify the color of the toner cartridge and the drum unit causing colored streaks or band.
-
Replace the toner cartridge that matches the color causing this issue with a new one and then try to print again.
Please refer to the instructions, "How do I replace the toner cartridge?".
-
Replace the drum unit that matches the color causing this issue with a new one and then try to print again.
Please refer to the instructions, "How do I replace the drum unit?".
|
Back To Top >>
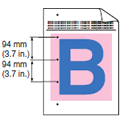
Colored spots at 94mm:
|
 |
Try the following points.
-
The drum unit may be dirty. Clean the drum unit as follows:
-
Click here to print the chart. [PDF, 345 KB]
-
Compare the color of your printed document with the printed chart to identify the color of the drum unit causing colored spots.
-
Clean the drum unit that matches the color causing this issue and then try to print again.
Please refer to the instructions, "How do I clean the drum unit?".
-
If this issue still remains, replace the drum unit that matches the color causing this issue with a new one and then try to print again.
Please refer to the instructions, "How do I replace the drum unit?".
|
Back To Top >>
Colored spots at 30mm:
|
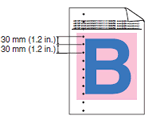 |
Try the following points.
-
The toner cartridge may be damaged. Replace the toner cartridge as follows:
-
Click here to print the chart. [PDF, 345 KB]
-
Compare the color of your printed document with the printed chart to identify the color of the toner cartridge causing colored spots.
-
Replace the toner cartridge that matches the color causing this issue and then try to print again.
Please refer to the instructions, "How do I replace the toner cartridge?".
|
Back To Top >>
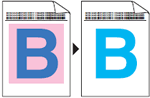
Colored lines across the page:
|
 |
Try the following points.
-
The toner cartridge and drum unit may be damaged. Replace them as follows:
-
If you already know which color of the toner cartridge and the drum unit need to be replaced, go to the step c.
If you don't know which color of the toner cartridge and the drum unit need to be replaced, click here to print the chart. [PDF, 345 KB]
-
Compare the color of your printed document with the printed chart to identify the color of the toner cartridge and the drum unit causing colored line.
-
Replace the toner cartridge that matches the color causing this issue with a new one and then try to print again.
Please refer to the instructions, "How do I replace the toner cartridge?".
-
Replace the drum unit that matches the color causing this issue with a new one and then try to print again.
Please refer to the instructions, "How do I replace the drum unit?".
|
Back To Top >>
Toner scatter or toner stain:
|
 |
Try the following points.
-
Check the printer's environment. Conditions such as high humidity and high temperature can cause the toner scatter or toner stain. Please use the printer with the following ranges of temperature and humidity:
Temperature: 10 ºC to 32.5 ºC (50 ºF to 90.5 ºF)
Humidity: 20% to 80% (without condensation)
If not, change the printer's location so that it matches the environment above.
-
The toner cartridge and the drum unit may be damaged. Replace them as follows:
-
Click here to print the chart. [PDF, 345 KB]
-
Compare the color of your printed document with the printed chart to identify the color of the toner cartridge and the drum unit causing the toner scatter and toner stain.
-
Replace the toner cartridge that matches the color causing this issue with a new one and then try to print again.
Please refer to the instructions, "How do I replace the toner cartridge?".
-
Replace the drum unit that matches the color causing this issue with a new one and then try to print again.
Please refer to the instructions, "How do I replace the drum unit?".
|
Back To Top >>
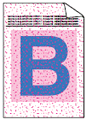
All one color:
|
 |
Try the following points.
-
The drum unit may be damaged. Replace the drum unit as follows:
-
Click here to print the chart. [PDF, 345 KB]
-
Compare the color of your printed document with the printed chart to identify the color of the drum unit causing all one color.
-
Replace the drum unit that matches the color causing this issue with a new one and then try to print again.
Please refer to the instructions, "How do I replace the drum unit?".
|
Back To Top >>
Completely blank or some colors are missing:
|
 |
Try the following points.
-
The toner cartridge and the drum unit may be damaged. Replace them as follows:
-
Click here to print the chart. [PDF, 345 KB]
-
Compare the color of your printed document with the printed chart to identify the missing color of the toner cartridge and the drum unit.
-
Replace the toner cartridge that matches the color causing this issue with a new one and then try to print again.
Please refer to the instructions, "How do I replace the toner cartridge?".
-
Replace the drum unit that matches the color causing this issue with a new one and then try to print again.
Please refer to the instructions, "How do I replace the drum unit?".
|
Back To Top >>
Uneven density appears periodically across the page:
Back To Top >>
Wrinkle:
|
 |
Try the following points.
-
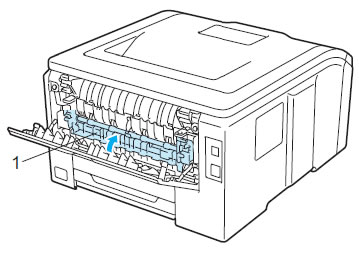
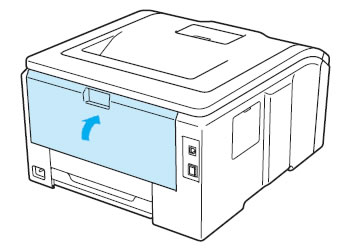
Make sure that the fuser cover (1) located inside of the back cover of the printer is closed properly. If not, close it fully and then try to print again.
-
Make sure that the back cover of the printer is closed properly. If not, close it fully and then try to print again.
Only if you want to print from the manual feed slot, keep the back cover open to feed the paper properly.
-
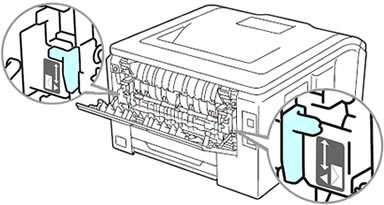
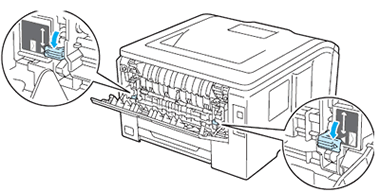
If the issue still remains, open the back cover and check the both gray levers inside the back cover are the envelope position. If not : one gray lever is the up position and another is the envelope position or the both gray levers are the up position, please change the position to the envelope one and then try to print again with the back cover opened.
|
Back To Top >>
Color misregistration:
|
 |
Try the following points.
-
Make sure that the printer is on a solid level surface. If not, replace the printer on such location and then try to print again.
-
Perform the auto color registration from the control panel of the printer. If this issue still remains, perform the manual color registration from the control panel of the printer and then try to print again.
Please refer to the instructions, "How do I adjust the print position of each color? ".
-
The drum unit may be damaged. Replace the drum unit as follows:
-
Click here to print the chart. [PDF, 345 KB]
-
Compare the color of your printed document with the printed chart to identify the color of the drum unit causing color misregistration.
-
Replace the drum unit of the color that matches the color causing this issue with a new one and then try to print again.
Please refer to the instructions, "How do I replace the drum unit?".
-
The belt unit may be damaged. Compare the color of your printed document with the printed chart and put in a new belt unit that matches the color causing color misregistration. And then try to print again.
Please refer to the instructions, "How do I replace the Belt Unit? ".
|
Back To Top >>
Offset image:
|
 |
Try the following points.
-
Open the back cover of the printer and check the both gray levers inside the back cover are the up position. If not: one gray lever is the up position and another is the envelope position, please change the both lever position to the up one, close the back cover and then try to print again.
If you print from the manual feed slot, change the both lever position to envelope one, close the back cover and then try to print again.
-
Check the printer's environment. Conditions such as high humidity and high temperature can cause offset image. Please use the printer with the following ranges of temperature and humidity:
Temperature: 10 ºC to 32.5 ºC (50 ºF to 90.5 ºF)
Humidity: 20% to 80% (without condensation)
If not, change the printer's location so that it matches the environment above.
-
The drum unit may be damaged. Replace the drum unit as follows:
-
Click here to print the chart. [PDF, 345 KB]
-
Compare the color of your printed document with the printed chart to identify the color of the drum unit causing offset image.
-
Replace the drum unit that matches the color causing this issue with a new one and then try to print again.
Please refer to the instructions, "How do I replace the drum unit?".
|
Back To Top >>
Poor fixing:
Back To Top >>
Curled or wavy:
Back To Top >>
Envelope (Thicker paper) creases:
|
 |
Try the following points.
|
Back To Top >>
Uneven density or Faded:
|
 |
Try the following points.
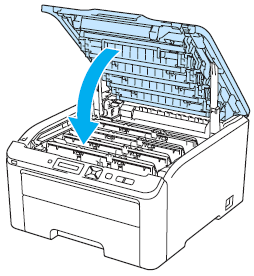
-
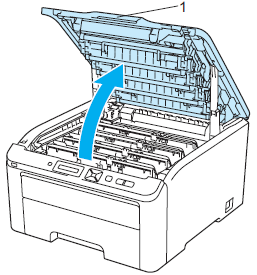
Fully open the top cover (1) of the printer.
-
Close the top cover of the printer again.
|
Back To Top >>