TD-4520DN
FAQs & Troubleshooting |
TD-4520DN
Date: 13/03/2024 ID: faqp00001494_003
How do I transfer templates or other data from the computer to the printer? (P-touch Transfer Manager)
For TD-4420DN(FC)/4550DNWB(FC) users:
Follow the instructions replacing "RD Roll" with "Linerless Roll".
You can transfer templates, databases and images from the computer to the printer.
Follow the procedure below:
-
Start P-touch Transfer Manager.
- Start P-touch Editor, and open the label template to be transferred.
-
Click [File] - [Transfer Template] - [Transfer].
The P-touch Transfer Manager window appears. A template is transferred to the [Configurations] folder.
The following method can also be used to start P-touch Transfer Manager.
For Windows 11 / Windows 10 / Windows Server 2019 / Windows Server 2016:
Click [Start Menu] - ([All apps]) - [Brother P-touch] - [P-touch Transfer Manager 2.x].
For Windows 8.1 / Windows 8 / Windows Server 2012 / Windows Server 2012 R2:Click [P-touch Transfer Manager 2.x] on the [Apps] screen.
For Windows 7 / Windows Server 2008 / Windows Server 2008 R2:
From the Start menu, click [All Programs] - [Brother P-touch] - [P-touch Tools] - [P-touch Transfer
Manager 2.x].
-
Select the printer that you want to transfer the template or other data to.
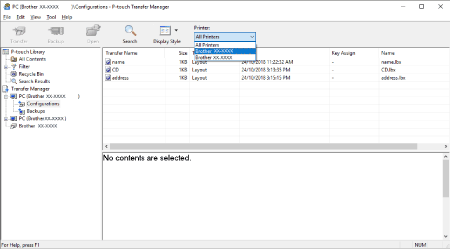
Before transferring data, check that the computer and the printer are correctly connected via a USB cable and that the printer power is On.
-
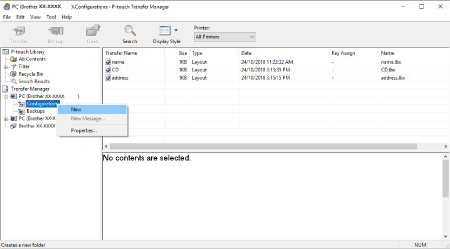
Right-click the [Configurations] folder, select [New], and then create a new folder.
-
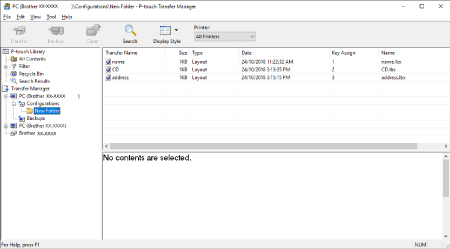
Drag all the templates or other data you want to transfer and place them in the new folder.
Each file is assigned a key number (memory location in the printer) when it is placed in the new folder.
-
You can confirm the available space in the transfer file memory by printing the Printer Setting Report.
TD-4210D / TD-4410D / TD-4420DN / TD-4520DN
- Turn on the printer.
- Load a 102 mm (4") or wider RD roll into the printer.
-
Press and hold the Function button (
 ) for two seconds.
See [Available memory] for the available space*.
TD-4550DNWB
- Turn on the printer.
- Load a 102 mm (4") or wider RD roll into the printer.
- Press Menu.
-
Press
 or
or  to select [Information], and then press OK.
 -
Press
 or
or  to select [Print Configuration], and then press OK.
 -
Press
 or
or  to select [All], [Usage Log], [Printer Settings] or [Transfer Data], and then press OK.
 -
Press
 or
or  to select [Start], and then press OK.
See [Available memory] for the available space*.
- You can view the templates and other data by selecting the folder in the [Configurations] folder, [All Contents] or one of the categories under [Filter], such as [Layouts].
-
You can confirm the available space in the transfer file memory by printing the Printer Setting Report.
-
To change the key number assigned to an item, right-click the item, select [Key Assign], and then select the desired key number.
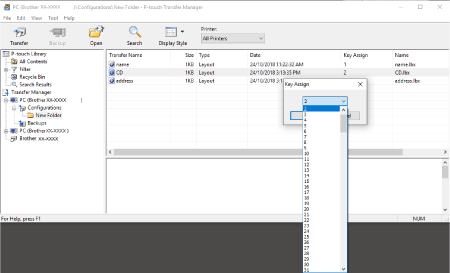
- Except for the data in databases, all data transferred to the printer is assigned a key number.
- If the template or other data transferred to the printer has the same key number as another template already saved on the printer, the new template will overwrite the old one. You can confirm the templates key number assignments saved on the printer by backing up the templates or other data.
- If the printer memory is full, remove one or more templates from the printer nonvolatile memory.
-
To change the names of templates or other data that you want to transfer, click on the desired item and enter the new name. The number of characters used for the template names may be limited depending on the printer model.
-
Select the folder containing the templates or other data that you want to transfer, and then click [Transfer]. A confirmation message will be displayed.
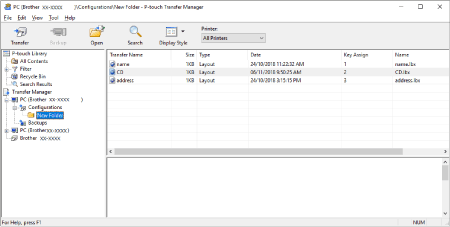
- You can also transfer individual items to the printer without adding them to a folder. Select the template or other data that you want to transfer, and then click [Transfer].
- Multiple items and folders can be selected and transferred in one operation.
- If you cannot send multiple files as a single transfer job, send the files as a few smaller transfer jobs.
-
Click [OK].
The selected templates, folders or other data are transferred to the printer.
Related FAQs
TD-4210D, TD-4410D, TD-4420DN/4420DN(FC), TD-4520DN, TD-4550DNWB / 4550DNWB(FC)
If you need further assistance, please contact Brother customer service:
Content Feedback
Please note this form is used for feedback only.