CM900
FAQs & Troubleshooting |

CM900
Date: 10/07/2017 ID: faqh00100472_000
What should I do if the adjustment of the embossing template position failed?
If the adjustment of the embossing template position failed, determine the cause according to the symptom, and then resolve it.
After solving the problem, adjust the embossing template position again. For details, refer to "What should I do if the initial setting (position adjustment) for region embossing failed?"
The template for adjusting the embossing position extends past the material and is cut.
Not even one square in the template for adjusting the embossing position is overlapping.
Part of the template for adjusting the embossing position is not cut.
The template for adjusting the embossing position extends past the material and is cut.
| Possible Causes | Remedy | |
| 1 | Paper smaller than A4 or Letter size is being used. | Use A4- or Letter-size thick paper to adjust the embossing template position. |
| 2 | The A4- or Letter-size paper used for making the adjustment is attached in the landscape orientation to the mat. |
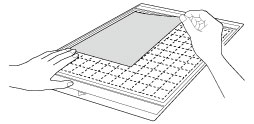
Attach the paper for adjusting the embossing template position in the portrait orientation to the mat, as shown below.
|
| 3 | The A4- or Letter-size paper used for making the adjustment is not attached aligned with the upper-left corner of the mat. |
Attach the paper for adjusting the embossing template position aligned with the upper-left corner of the mat.
|
Not even one square in the template for adjusting the embossing position is overlapping.
| Possible Causes | Remedy | |
| 1 | A blade incompatible with cutting the material for the adjustment is being used. |
Replace with the holder (turquoise).
|
| 2 | Paper thicker than specified is attached to the mat. |
When adjusting the embossing position, use white A4- or Letter-size thick paper that has not been embossed.
|
| 3 | While being cut, the paper for adjusting the embossing template position is shifted on the mat. |
The mat’s adhesive strength has decreased. |
| 4 | The blade is worn. |
Replace the blade with a new one. |
Part of the template for adjusting the embossing position is not cut.
| Possible Causes | Remedy | |||
| 1 | A blade incompatible with cutting the material for the adjustment is being used. |
Replace with the holder (turquoise).
|
||
| 2 | The amount that the blade extends from the holder is too small. |
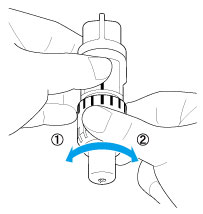
Remove the holder from the carriage, and then set the blade extension to 3.5.
|
||
| 3 | The middle tack adhesive mat (pink and turquoise) is not used. |
If any other cutting mat is being used, replace it with the middle tack adhesive mat.
|
||
| 4 | The mat’s adhesive strength has decreased, and the material is not secured. |
Replace the mat with a new one.
The cutting mats used by this machine have been redeveloped with a different design, type, function, etc. For details, refer to Important information about Mat. |
||
| 5 | The blade is worn. |
Replace the blade with a new one. |
||
| 6 | Material incompatible with making this adjustment is being used. |
When adjusting the embossing position, use white A4- or Letter-size thick paper that has not been embossed.
|
||
| 7 | Lint or dust has accumulated in the holder. |
Clean the holder.
|
||
| 8 | The cutting pressure is insufficient. | If a part of the pattern remains uncut, the cutting pressure may be insufficient. Increase the cutting pressure in increments of 1, and then perform trial cutting.  |
Related FAQs
CM300, CM600DX, CM700, CM800Q, CM900
If you need further assistance, please contact Brother customer service:
Content Feedback
Please note this form is used for feedback only.


