HL-L6250DN
FAQs & Troubleshooting |
HL-L6250DN
Date: 06/01/2020 ID: faq00100255_001
Restrict the functions available on your Brother machine and the number of prints.
You can use Secure Function Lock to restrict available functions and the number of prints.
NOTE: Illustrations shown below are from a representative product and may differ from your Brother machine.
> What is Secure Function Lock?
> How to set Secure Function Lock (for Administrator)
> How to use the machine (for users)
What is Secure Function Lock?
Secure Function Lock is a function to restrict available functions and the number of prints. Users need authentication to use machines and they can only use allowed functions. Also, you can reduce costs by avoiding unnecessary printing.
Available Functions(*)
- Restricting the number of prints
- Colour Print
(*); You can confirm available functions of your Brother machine by opening the Restricted Functions menu which appears when Secure Function Lock is activated in Web Based Management.
Authentication Method
- Entering password
The Brother machine enters Public Mode when Secure Function Lock is on. Anyone can use machines without any authentication in Public Mode. Therefore, we recommend restricting functions strictly to prevent unauthorised access. Aside from Public Mode, you need to create a new mode (group). For example, create groups such as Manager, Regular Staff, and Part-time Staff and set the functions you want to restrict for each group. Available functions for each user vary depending on the groups they belong to. Users can use the functions by logging on their groups with a password.
How to set Secure Function Lock (for Administrator)
Follow the steps below to set Secure Function Lock with Web Based Management. (The screens and setting items may differ depending on your Brother machine or Operating System.)
- Set an Administrator password.
- Set Secure Function Lock.
- Set function restrictions for Public Mode and each group.
- Set the frequency for page counter reset.
- Set users belonging to each group.
1. Set an Administrator password
We recommend setting an Administrator password to prevent unauthorised access to the machine. After the Administrator password / account has been set, user access is restricted to only allow changes to the settings in the General tab area.
-
Access Web Based Management.
> Click here to see how to access Web Based Management. -
If you have previously set your own password, go to STEP2.
If you have not previously set your own password, change the default login password.
> Click here to see how to change the password.
2. Set Secure Function Lock
-
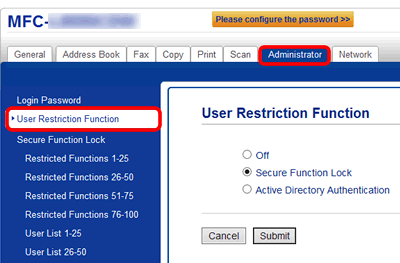
Click the Administrator tab. Click the User Restriction Function menu in the left navigation bar.
-
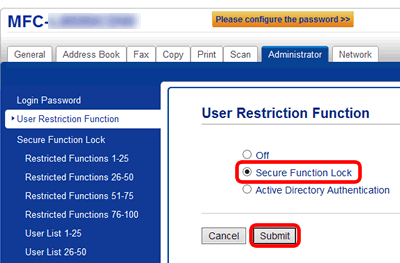
Choose Secure Function Lock and click Submit.
3. Set function restriction for Public Mode and each group
-
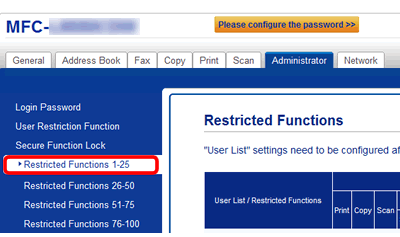
Click the Administrator tab. Click the Restricted Functions menu in the left navigation bar.
-
Set the restricted functions for Public Mode in the Public Mode row. Choose a check box to allow or clear a check box to restrict the function listed. Since all users can use the machine without a password in Public Mode, we recommend restricting all functions in Public Mode.

-
Create other groups under the User List.
For example, create groups such as Regular Staff, Part-time Staff, and Manager, choose a check box to allow or clear a check box to restrict the function listed for each group. If you want to limit the number of prints , choose the On check box in the Page Limits section and enter the number of prints in the Max. Pages column.
Click Submit after you set the functions you need.
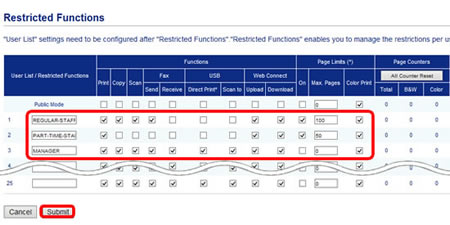
- You can register up to 14 alphanumeric characters as a group name.
- You cannot register 2 groups with the same name.
-
Follow the steps applicable for your case.
- If you choose the On box in Page Limits, go to Step 4. Set Counter Auto Reset.
- If not, go to Step 5. Set users who belong to the group.
4. Set the frequency for page counter reset
If you set the number of prints in Step 3, follow the steps below to set the frequency to reset the page counter.
-
Click the Counter Auto Reset menu in the left navigation bar.
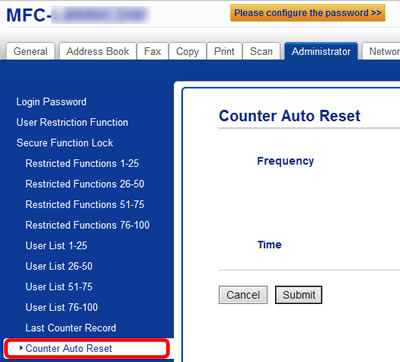
If you cannot find Counter Auto Reset, you must reset Page Counters manually. Go to Restricted Functions XX-XX on the left menu bar and click All Counter Reset.
-
Set Frequency and click Submit.
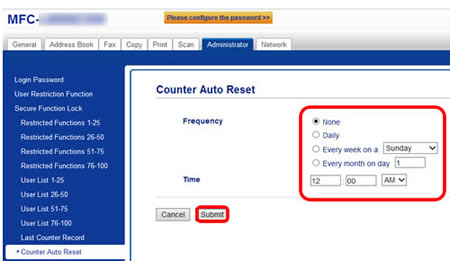
- Set the date and time of the machine correctly in advance.
- To reset Page Counters manually, go to Restricted Functions XX-XX on the left menu bar and click All Counter Reset.
- You can check the previous number of prints in Last Counter Record on the left menu bar.
5. Set users belonging to each group
-
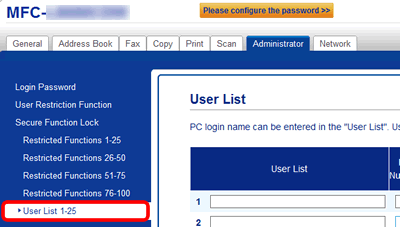
Click User List XX-XX.
-
Register each user.
User List:
Enter user’s name. To restrict printing from a computer, type a login name of the computer.
PIN Number:
Type a four-digit number.
User List / Restricted Functions:
Choose a group which you have created in Step 3.
Click Submit once you have finished.
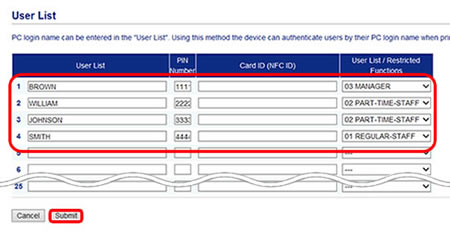
- The settings are now complete.
How to use the machine (for users)
The Brother machine enters Public Mode when Secure Function Lock is on. You need to switch users with a password to use restricted functions.
If Secure Function Lock is on, all menus are locked and you cannot change any setting even after you switch to an individual user.
Turn Secure Function Lock off if you need to change settings.
Enter a password
- Press the Up or Down arrow key to choose your user name. Press OK.
- Enter your four-digit user password and press OK. Make sure the user name you have chosen is displayed on the Control Panel. After a restricted user has finished using the machine, it will return to Public mode after one minute.
HL-L5050DN, HL-L5100DN(T), HL-L5200DW(T), HL-L6250DN, HL-L8260CDW
If you need further assistance, please contact Brother customer service:
Content Feedback
Please note this form is used for feedback only.