artwork 31
FAQs & Troubleshooting |
artwork 31
Date: 17/11/2015 ID: faqh00000580_002
How do I install the bobbin wound with thread? (For models equipped with a quick-set bobbin)
Make sure you turn off the machine while threading. If you accidentally step on the foot controller and the machine starts to sew, you could be injured.
-
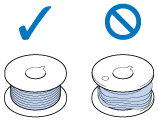
Prepare the bobbin wound properly before threading the lower thread.
Not winding the bobbin properly may cause the thread tension to loosen, and may break the needle.
-
Turn off the machine.
-
Raise the presser foot lever.
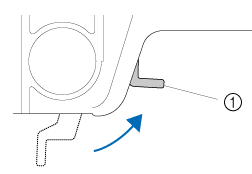
(1) Presser foot lever -
Raise the needle by turning the handwheel toward you (counterclockwise).
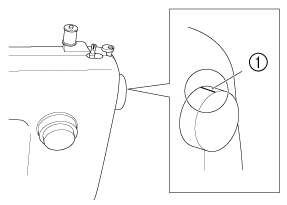
(1) Mark on the handwheel -
Remove the bobbin cover by sliding it and lift toward you.
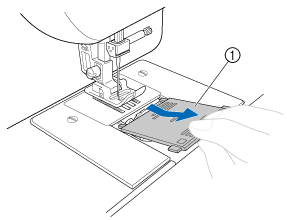
(1) Bobbin cover -
Put the bobbin in so the thread comes out in the direction shown by the arrow.
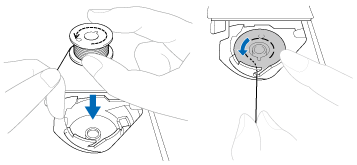
Make sure you set the bobbin so the thread unrolls in the right direction. If the thread unrolls in the wrong direction, it may cause the thread tension to be incorrect or break the needle.
-
Lightly hold down the bobbin with your right hand as shown (A), guide the thread through the slit (B).
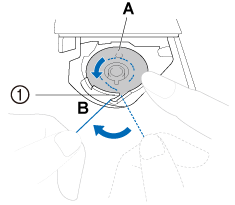
(1) Slit
Make sure you set the bobbin so the thread unrolls in the right direction. If the thread unrolls in the wrong direction, it may cause the thread tension to be incorrect or break the needle.
-
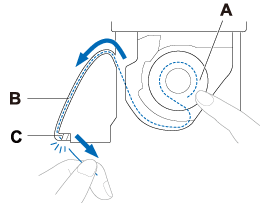
While lightly holding down the bobbin with your right hand (A), guide the thread through the slit (B) and lightly pull it with your left hand (C).
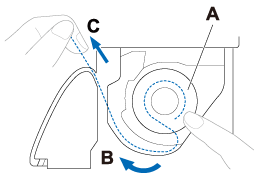
-
While lightly holding down the bobbin with your right hand (A), continue guiding the thread through the slit with your left hand (B) Then, cut the thread with the cutter (C).
If the thread is not correctly inserted through the tension-adjusting spring of the bobbin case, it may cause incorrect thread tension.
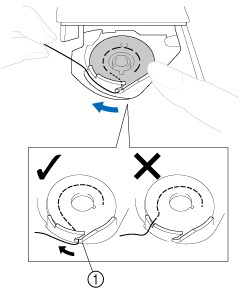
(1) Tension-adjusting spring -
Replace the bobbin cover. Put the projection into the bobbin race retainer groove and push closed.
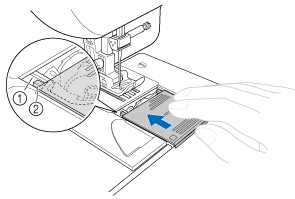
(1) Groove
(2) ProjectionStart sewing after threading the lower and upper thread. When sewing gathers or darts, you can draw up the lower thread by hand so that some thread will be left over. Refer to “How do I draw up the lower thread?”.
Related FAQs
AE2700, ArtCity 190, ArtCity 200, ArtCity 250A, ArtCity 300A, artwork 31, artwork 33A, artwork 37A, BN27, BN37, BQ25, Classic 20, Classic 30, Classic 40, Elite 45, Elite 55, GS2700, Hanami 17, Hanami 25, Hanami 27s, Hanami 37s, HF27, HF37, HF53, JK2500NT, JK2700NT, JSL-30, KYOTO, LX27NT, LX3500, LX37NT, ML500, ModerN 21, ModerN 27, ModerN 30A, ModerN 39A, PS70, RH127, RH137, RS21, RS31, RS40s, RS45s, Satori 100, Satori 200, Satori 300, Satori 400, STAR 17, STAR 25, STAR 27s, STAR 37s, STAR 555, STAR 55X, STAR 777, Style 20, Style 25, Style 30s, Style 35s, Universal 17, Universal 25, Universal 27S, Universal 37S, Vitrage M75, Vitrage M77, Vitrage M79, XQ2700, XQ3700, XR27NT, XR37NT, XT27, XT37
If you need further assistance, please contact Brother customer service:
Content Feedback
Please note this form is used for feedback only.