DC200ULE
FAQs & Troubleshooting |
DC200ULE
Date: 06/30/2021 ID: faqh00100316_000
About DesignNCut Manager
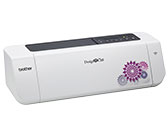
DesignNCut Manager is a dedicated control application used to cut out or draw patterns from DesignNCut.
You must install DesignNCut Manager application onto the computer in order to operate DesignNCut.
[IMPOTRTANT NOTICE]
Distribution of "DesignNCut Manager for mobile device" ended as of June 2021.
For new installation, please use DesignNCut Manager for computer.
For Computer
Go to Downloads page to install the DesignNCut Manager on your computer.
For a list of operating systems supported by the DesignNCut Manager, refer to the Support OS Information.
DesignNCut Manager Main Window
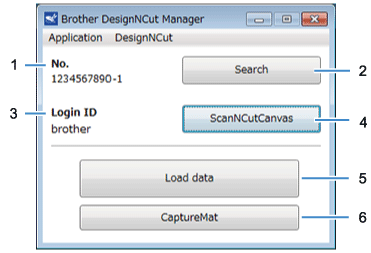 |
1. No. Displays the machine number of the connected machine. |
|
2. Search
Searches for connected machines. |
|
|
3. Login ID Displays the CanvasWorkspace user ID used for connecting to CanvasWorkspace. |
|
|
4. CanvasWorkspace Displays the window for registering with CanvasWorkspace. |
|
|
5. Load data
Selects the method for importing pattern data. Click to display a window for selecting how to import the data. |
|
|
6. CaptureMat Using CanvasWorkspace create pattern data from an image taken with a camera. |
DesignNCut Manager Settings
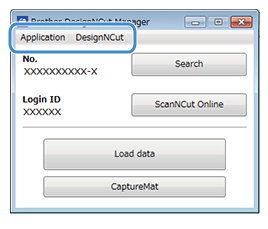
Click Application or DesignNCut in the main window to display the corresponding menu.
[Application] Menu
Settings for displaying DesignNCut Manager can be specified.
With the mobile device version, tap ![]() in the upper-right corner of the screen to display the menu.
in the upper-right corner of the screen to display the menu.
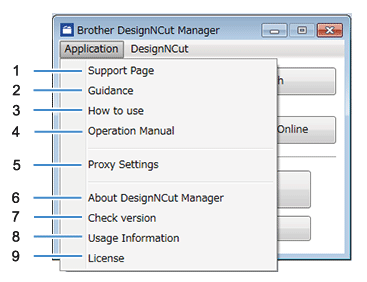 |
1. Support Page Displays the website for the Brother Solutions Center. |
|
2. Guidance Displays the setup procedures, from specifying network settings to registering with CanvasWorkspace. |
|
|
3. How to use Displays information on how to use DesignNCut Manager and the machine. |
|
|
4. Operation Manual (PC only) Displays the Operation Manual. |
|
|
5. Proxy Settings (PC only) Manually specify the proxy settings. |
|
|
6. About DesignNCut Manager (PC only) Displays information on the control application. |
|
|
7. Check version Displays the version information. |
|
|
8. Usage Information Displays the usage information. |
|
|
9. License Displays information on the software license. |
[DesignNCut] Menu
Settings can be specified for the various operations available when DesignNCut Manager and the machine are connected.
With the mobile device version, tap ![]() in the upper-left corner of the screen to display the menu.
in the upper-left corner of the screen to display the menu.
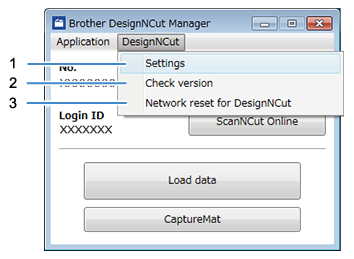
1. Settings (General)
Click Settings, then General.
After specifying the desired settings, click OK to apply the settings.
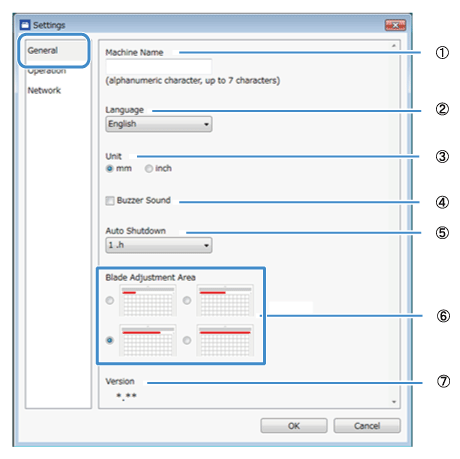 |
(1) |
You can specify a name for the connected machine. |
| (2) |
Select the machine’s display language. |
|
| (3) |
Select the measurement units displayed in the windows. |
|
| (4) |
Select whether or not an operation sound is produced, for example, when a button on the machine is pressed. |
|
| (5) |
Select the length of time that the machine is not used until it automatically turns off. If the machine is not used for 20 minutes, regardless of the specified length of time, it will enter the sleep mode, and the power indicator flashes. |
|
| (6) |
Select from 1/4, 2/4, 3/4 or all of the cutting area to be used for blade adjustment. |
|
| (7) |
Displays the version of this machine’s software. |
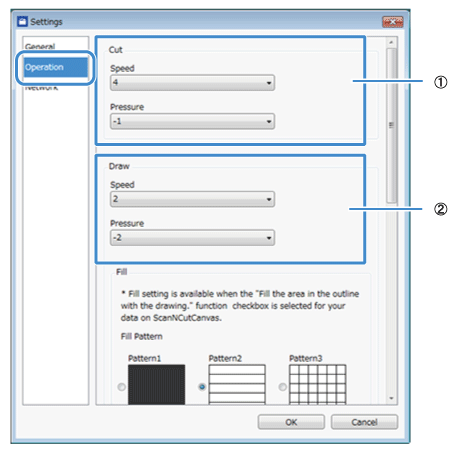
1. Settings (Operation)
Click Settings, then Operation.
 |
(1) |
Adjust the speed and pressure for cutting. For details on the appropriate cutting pressure, see Mat and Material Combinations . |
| (2) |
Adjust the speed and pressure for drawing. For best results, adjust the drawing pressure to the appropriate setting. Drawing with pressure that is too strong may damage the pen tip. |
|
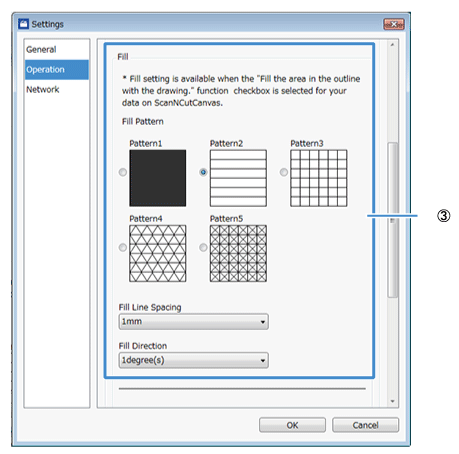 |
(3) |
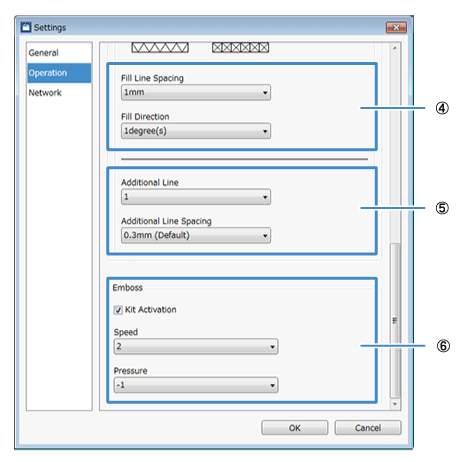
Select the design that will be used to fill patterns. |
 |
(4) |
With Fill Line Spacing, adjust the spacing of the lines filling the pattern. With Fill Direction, adjust the direction of the lines filling the pattern. |
| (5) |
With Additional Line, specify the number of lines to be added. With Additional Line Spacing, specify the spacing of the lines to be added. |
|
| (6) |
When a separately sold accessory kit is used, select this check box to enable its functions. |
1. Settings (Network)
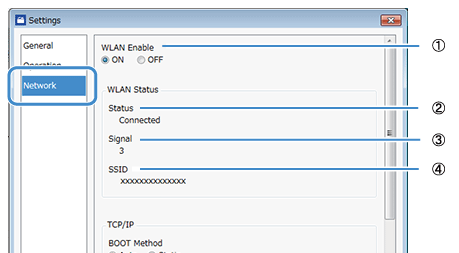
Click Settings, then Network.
After specifying the desired settings, click OK to apply the settings.
 |
(1) |
Select whether or not the machine will connect to the wireless network. |
| (2) |
Displays the connection status. |
|
| (3) |
Displays the machine’s signal strength as one of four levels. |
|
| (4) |
Displays the SSID of the wireless router that the machine is connected to. |
|
 |
(5) |
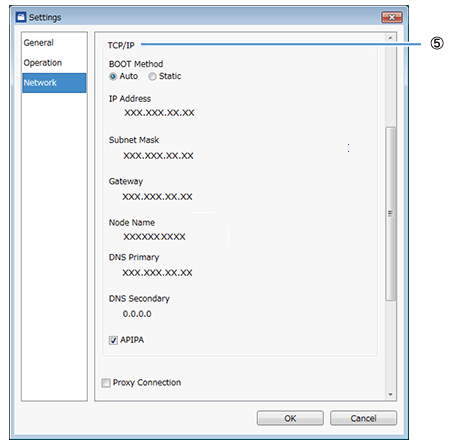
If Static is selected, TCP/IP settings can be manually entered. |
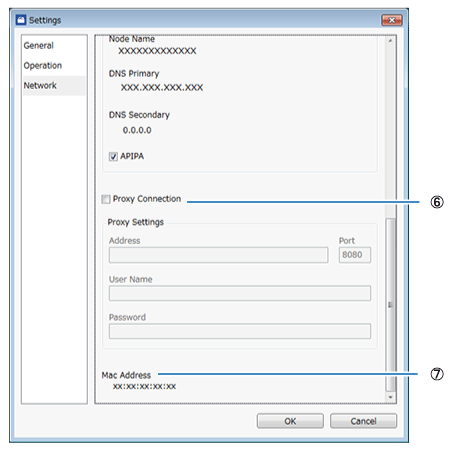 |
(6) | Use when proxy settings are required. |
| (7) | Displays the MAC address. |
2. Check version
Displays the status of the machine’s software.
* This does not appear when the machine is connected with a USB cable.
3. Network reset for DesignNCut
Initializes the wireless network settings.
DC200, DC200ULE
If you need further assistance, please contact Brother customer service:
Content Feedback
Please note this form is used for feedback only.