ADS-2600We
FAQs & Troubleshooting |

ADS-2600We
Date: 17/03/2023 ID: faq00002785_000
I cannot find the destination computer on the network when I try to scan a document using the machine's Scan key or control panel.
To scan a document to a computer on the network by using the SCAN key or control panel on your Brother machine, the computer must be configured in the SCAN to Button settings. If a computer on the network is not displayed on the machine's display (hereinafter called LCD) as a destination computer, follow the steps below to configure it:
NOTE: Illustrations shown below are from a representative product and operating system and may differ from your Brother machine and operating system.
For Windows users:
(Windows 11)
- Open scanner properties.
-
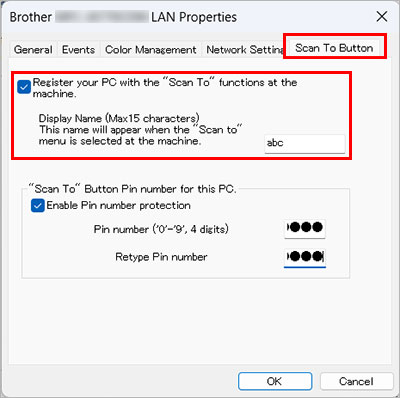
Click the Scan To Button tab and check the Register your computer with the "Scan To" functions at the machine check box. Then enter the name you like in the Display Name box. This name will appear when "Scan to" menu is selected at the machine. Your computer name is in the Display Name box as default, but you can overwrite it.

- If you want to avoid receiving unwanted documents, check the Enable Pin number protection check box and enter a 4-digit PIN number in the Pin number and Retype Pin number box. To send data to a computer protected by a PIN number, the LCD prompts you to enter the PIN number before the document can be scanned and sent to the computer.
- Click OK.
(Windows 7 / Windows 8 / Windows 10)
- Open Scanner Properties. (Click here to see how to open Scanner Properties.)
-
The Network Scanner Properties dialog box appears. Click the Network Setting tab and choose Specify your machine by address or Specify your machine by name.

- If you choose Specify your machine by address, enter the IP Address of the machine in IP Address box, and then click OK.
-
If you choose Specify your machine by name,
-
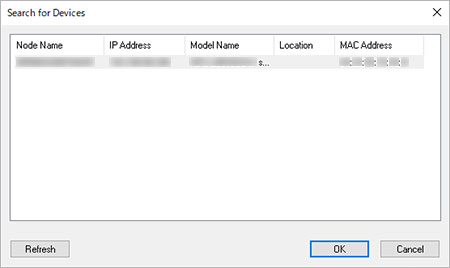
Enter the machine node name in the Node Name box, or click Browse and choose the Brother machine you want to use and click OK.

-
Click OK.
-
Enter the machine node name in the Node Name box, or click Browse and choose the Brother machine you want to use and click OK.
-
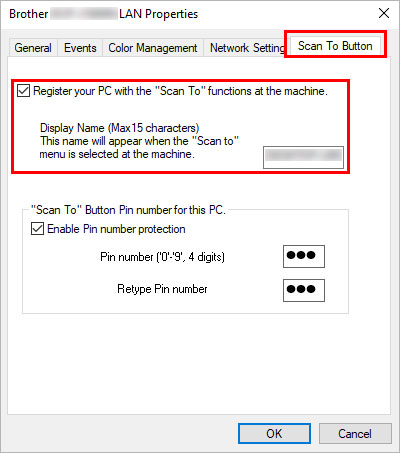
Click the Scan To Button tab and check the Register your computer with the "Scan To" functions at the machine check box. Then enter the name you like in the Display Name box. This name will appear when "Scan to" menu is selected at the machine. Your computer name is in the Display Name box as default, but you can overwrite it.

- If you want to avoid receiving unwanted documents, check the Enable Pin number protection check box and enter a 4-digit PIN number in the Pin number and Retype Pin number box. To send data to a computer protected by a PIN number, the LCD prompts you to enter the PIN number before the document can be scanned and sent to the computer.
- Click OK.
For Macintosh users:
Open the Device Selector and configure scanner settings for the scan from the control panel of the machine.
> Click here to see how to launch and use the Device Selector to configure the scanner settings.
Related FAQs
ADS-2600W, ADS-2600We, ADS-2800W, ADS-3600W, DCP-375CW, DCP-395CN, DCP-540CN, DCP-560CN, DCP-585CW, DCP-6690CW, DCP-7065DN, DCP-8155DN, DCP-9010CN, DCP-9015CDW, DCP-9040CN, DCP-9042CDN, DCP-9055CDN, DCP-J140W, DCP-J152W, DCP-J172W, DCP-J315W, DCP-J4110DW, DCP-J4120DW, DCP-J515W, DCP-J525W, DCP-J552DW, DCP-J562DW, DCP-J715W, DCP-J725DW, DCP-J752DW, DCP-J925DW, HL-L2380DW, MFC-255CW, MFC-257CW, MFC-295CN, MFC-440CN, MFC-465CN, MFC-490CW, MFC-5460CN, MFC-5490CN, MFC-5860CN, MFC-5890CN, MFC-640CW, MFC-6490CW, MFC-665CW, MFC-685CW, MFC-6890CDW, MFC-7360N, MFC-7362N, MFC-7440N, MFC-7460DN, MFC-7840W, MFC-7860DW, MFC-790CW, MFC-795CW, MFC-8370DN, MFC-8460N, MFC-8510DN, MFC-885CW, MFC-8860DN, MFC-8880DN, MFC-8890DW, MFC-8910DW, MFC-8950DW, MFC-9120CN, MFC-9125CN, MFC-9140CDN, MFC-9320CW, MFC-9325CW, MFC-9330CDW, MFC-9335CDW, MFC-9340CDW, MFC-9420CN, MFC-9440CN, MFC-9450CDN, MFC-9460CDN, MFC-9840CDW, MFC-990CW, MFC-9970CDW, MFC-J265W, MFC-J415W, MFC-J430W, MFC-J432W, MFC-J4410DW, MFC-J4510DW, MFC-J4620DW, MFC-J470DW, MFC-J4710DW, MFC-J475DW, MFC-J480DW, MFC-J5320DW, MFC-J5330DW, MFC-J5720DW, MFC-J5730DW, MFC-J5910DW, MFC-J5920DW, MFC-J5930DW, MFC-J615W, MFC-J625DW, MFC-J650DW, MFC-J6510DW, MFC-J6520DW, MFC-J6530DW, MFC-J6710DW, MFC-J6720DW, MFC-J6730DW, MFC-J680DW, MFC-J6910DW, MFC-J6920DW, MFC-J6930DW, MFC-J6935DW, MFC-J825DW, MFC-J870DW, MFC-J880DW, MFC-L2700DW, MFC-L2703DW, MFC-L2720DW, MFC-L2740DW, MFC-L5755DW, MFC-L6700DW, MFC-L6900DW, MFC-L8600CDW, MFC-L8690CDW, MFC-L8850CDW, MFC-L8900CDW, MFC-L9550CDW, MFC-L9570CDW
Do you need any further assistance?
Content Feedback
Please note this form is used for feedback only.