DC200
FAQs & Troubleshooting |

DC200
Date: 03/02/2020 ID: faqh00100742_000
About CaptureMat FUNCTION (Wireless Network Connection Only)
A printed image (paper or sticker), as stamped page or an original hand-drawn illustration, can be captured and its outline can be cut, drawn, or line emboss.
To use the CaptureMat function your computer and machine must be wirelessly connected.
To change your connection, refer to the Connection Guide.
Register Your Camera by Using the Calibration Sheet (Calibration Data)
-
Prepare the included calibration sheet and camera.

(1) Calibration sheet
-
Click [CaptureMat] in the main window of DesignNCut Manager.

-
Select New Camera from the Camera drop-down list.
The window for registering calibration sheet (calibration data) appears.

-
Place the included calibration sheet on a flat surface, and then photograph it from directly above.
Save the photo to the computer.-
You can download the calibration sheet from Manual section.
Click here for Letter size. Click here for A4 size. -
You can also print the calibration sheet with your printer by clicking [Print the calibration sheet] . on the DesignNCut Manager.


- Print the calibration sheet with actual size without scaling.

Image correctly photographed
Make sure to capture all of the dots in the calibration sheet and only capture the dots in the calibration sheets.
Camera too close to paper
If the camera is too close to the paper, calibration will not be performed
correctly.
Camera too far from paper
If the camera is too far away from the paper, calibration will not be
performed correctly.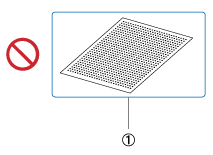
Paper at an angle
If the camera and paper are misaligned, calibration will not be performed
correctly.(1) Photographed area
- Take the photo in a well-lit location.
- Before taking the photo, wipe the camera lens with a soft dry cloth, and make sure that the lens is not dirty.
- When photographing, make sure that there are no objects or shadows on the paper.
- If the calibration sheet is dirty or folded, print a new copy of the calibration sheet and take a photo of the new sheet.
- When photographing, do not zoom or use a flash.
-
You can download the calibration sheet from Manual section.
-
Click [Select] , and then select the image saved in step 4.
The name of the imported image appears in the box.

The only image files that can be used are JPG files.
-
Under [2.Please input your camera name] , type in the name of the camera.

Depending on your camera, its name may automatically be entered when the image is selected in step 5.
-
When the following screen appears, click [OK] .
To import an image of the material to be cut, go to Importing an Image of Material.

The next time “CaptureMat” function is used, repeat steps 2 through 7 to register new camera (if the image that will be used was photographed with a camera different from the one that was registered).
Importing an Image of Material
-
Attach the material to be photographed to the mat.

- The 12" × 24" (305 mm × 610 mm) mat cannot be used.
- Before attaching the material to the mat, test attaching an edge of the material to the adhesive side of the mat.
- Try to attach the part to be cut toward the middle of the mat.
-
Place the material on a flat surface, and then photograph it from directly above so that the entire mat completely fills the camera screen.
Save the photo to the computer.

- Before photographing, attach the material, so it does not cover any area outside of the adhesive area of the mat.
- Hold the camera as level as possible when taking the photo.
- When photographing, do not zoom or use a flash.
- Take the photo so that the entire mat completely fills the camera screen. If the entire mat does not completely fill the camera screen, cutting data cannot be created.
- Make sure that your mat fills the camera screen, and that surrounding area is not on your screen.
- When photographing, make sure that there are no other objects or shadows on the mat.
- When photographing a solid white object use a dark background.
-
Select the name of the registered camera from the Camera drop-down list.

-
Click [Select] beside Mat Image.
When the dialog box for selecting the image appears, select the photo, and then click [Open].

The only image files that can be used are JPG files.
-
Click Send to CanvasWorkspace (Web) .
The image is imported into CanvasWorkspace (Web) .
Creating Cutting Data
Cutting data can be created using the Image Tracing functions in CanvasWorkspace (Web) .
-
Open CanvasWorkspace (Web) <https://canvasworkspace.brother.com> on your computer or tablet.
-
Log in to CanvasWorkspace (Web) .
-
Click
 in the CanvasWorkspace (Web) toolbar to display the Image Tracing dialog box.
-
Click [Select the image snapped by CaptureMat] , and then import an image sent from DesignNCut Manager.
For details on creating cutting data using the tracing functions, click in CanvasWorkspace (Web) , and then refer to “Tracing Images”.

-
After creating the cutting data, click [Download], then DesignNCut Transfer to send the cutting data to the machine.

DC200
If you need further assistance, please contact Brother customer service:
Content Feedback
Please note this form is used for feedback only.