AIRFLOW 3000
FAQs & Troubleshooting |

AIRFLOW 3000
Date: 02/12/2022 ID: faqh00101648_000
Threading the loopers
Turn off the machine before threading for safety.
Before threading the loopers
-
Raise the presser foot lifting lever to raise the presser foot.
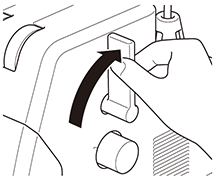
-
Open the front cover <A> and the knife cover <B>.
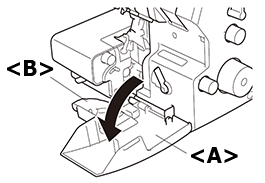
-
Move the air threading switching lever in the direction of the arrow.
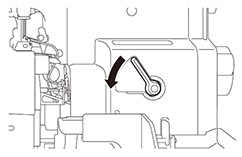
-
Turn the handwheel toward you until the pipes <C> snap into place to become joined.
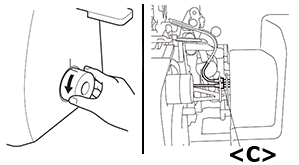
- Turn the main power and light switch to the "I" position.
Precautions for threading the loopers
IMPORTANT
- Use the air threading pushbutton only for threading. Do not use the air threading pushbutton for any purpose other than threading.
- Do not insert anything other than thread (or the threading wire) into the looper thread insertion hole. Otherwise, threading may no longer be possible, or damage may result.
- Do not allow liquids such as oil to adhere to the air threading pipes. Otherwise, threading may no longer be possible, or damage may result.
- When using the air threading pushbutton, do not look into or block (for example, with your finger) the hole at the end of the looper.
- Do not try to forcefully close the front cover without returning the air threading switching lever to the position where the pipes are separated. Otherwise, damage may result.
Cutting the tip of the thread with scissors makes it easier to insert it into the looper thread insertion hole.
Any thread can be used for threading.
With air threading, it may not be possible to use woolly nylon threads or thick threads to thread the loopers. See "When not to use air threading".
Threading the lower looper
-
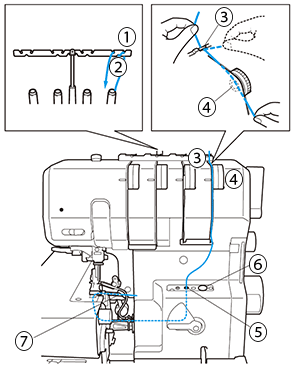
Pull the thread off the spool, and then thread (1), then (2) of the thread tree from back to front.
-
Pass the thread through the thread guide (3) on the top of the machine.
-
Pass the thread through the tension disc (4) beside the lower looper thread tension dial.
-
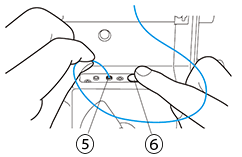
Leaving 30 to 40 cm (12 to 16 inches) of excess thread, insert 1 to 2 cm (1/2 inch) of thread into the lower looper thread insertion hole (5), and then press the air threading pushbutton (6).
-
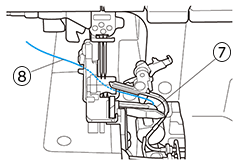
Make sure that the thread comes out of the hole (7) at the end of the lower looper.
-
Pull out the thread that came out of the hole at the end of the lower looper, pass it under the presser foot, and then pull it to the back of the machine (8).
Threading the upper looper
-
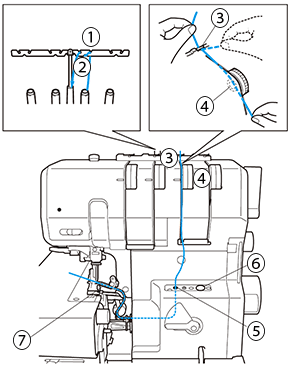
Pull the thread off the spool, and then thread (1), then (2) of the thread tree from back to front.
-
Pass the thread through the thread guide (3) on the top of the machine.
-
Pass the thread through the tension disc (4) beside the upper looper thread tension dial.
-
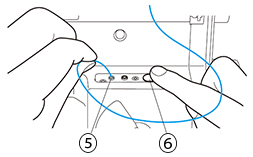
Leaving 30 to 40 cm (12 to 16 inches) of excess thread, insert 1 to 2 cm (1/2 inch) of thread into the upper looper thread insertion hole (5), and then press the air threading pushbutton (6).
-
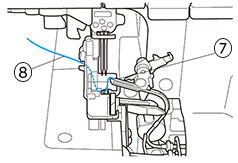
Make sure that the thread comes out of the hole (7) at the end of the upper looper.
-
Pull out the thread that came out of the hole at the end of the upper looper, pass it under the presser foot, and then pull it to the back of the machine (8).
After threading the loopers
-
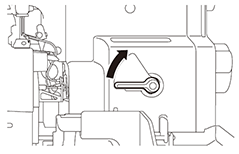
To separate the pipes, move the air threading switching lever until locked.
-
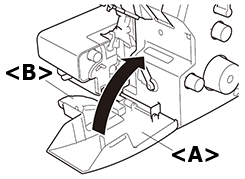
Close the front cover <A>. Closing the front cover also closes the knife cover <B>.
-
Lower the presser foot lifting lever.
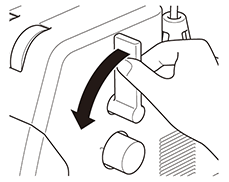
The front cover will not close unless the pipes are separated.
When not to use air threading
It may be difficult to insert woolly nylon thread or thick thread into the looper thread insertion hole, or threading with these types of thread may not be possible, even after pressing the air threading pushbutton.
In these cases, thread the loopers with either of the following methods.
Using the included threading wire
Turn off the machine before threading for safety.
IMPORTANT
- Do not press the air threading pushbutton while using the threading wire, otherwise the machine may be damaged.
-
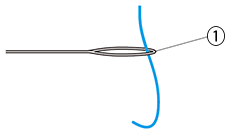
Pass 2 to 3 cm (about 1 inch) of the sewing thread through the loop of the threading wire (1).
-
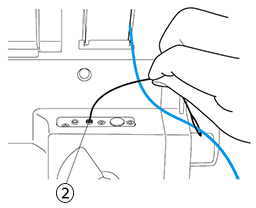
Insert the threading wire into the looper thread insertion hole (2).
-
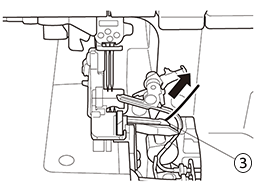
Feed in the threading wire by hand until it comes out of the hole (3) at the end of the looper.
-
Pull out the threading wire until enough thread has come out (4).
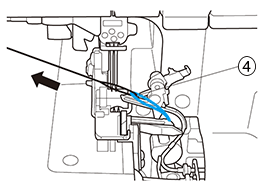
Using thread that can be used with air threading (spun thread)
Turn off the machine before threading for safety.
IMPORTANT
- Do not press the air threading pushbutton while threading with the sewing thread, otherwise the machine may be damaged.
-
Use the air threading to thread the looper with spun thread.
-
Cut the spun thread 20 to 30 cm (8 to 12 inches) from the looper thread insertion hole (1).
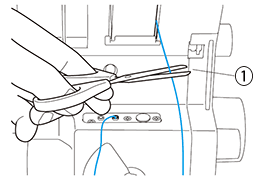
-
Thread the machine with the sewing thread up to the looper thread insertion hole.
-
Tie the sewing thread to the spun thread (2).
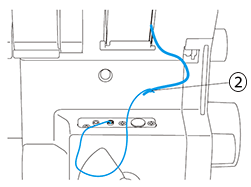
-
Pull the spun thread coming out of the hole at the end of the looper until enough sewing thread has come out (3).
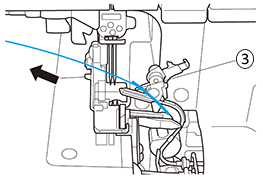
AIRFLOW 3000
If you need further assistance, please contact Brother customer service:
Content Feedback
Please note this form is used for feedback only.