MFC-9120CN
FAQs & Troubleshooting |
MFC-9120CN
Date: 14/02/2023 ID: faq00002561_000
Configure or change the settings of the ControlCenter 2 or 3 scanning options
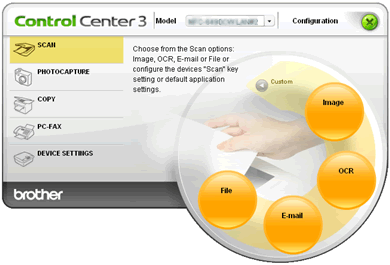
There are four scan options: Scan to Image, Scan to OCR, Scan to E-mail and Scan to File:
-
Image (Default: For Windows: Microsoft® Paint / For Macintosh: Apple® Preview)
Lets you scan a page directly into any graphic viewer/editor application. You can select the destination application, such as Microsoft® Paint, Corel® Paint Shop Pro®, Adobe® Photoshop®, Apple®Works 6 Paint, Apple® Safari or any kind of image editing application on your PC.
-
OCR (Default: For Windows: Microsoft® Notepad / For Macintosh: Apple® TextEdit)
Lets you scan a page or document, automatically run the OCR application and put text (not a graphic image) into a word processing application. You can select the target word processing application, such as Microsoft® Notepad, Microsoft® Word, Corel® WordPerfect®, Apple®Works 6 applications or any word processing application on your PC.
-
E-mail (Default: your default E-mail software)
Lets you scan a page or document directly into an E-mail application as a standard attachment. You can select the file type and resolution for the attachment.
-
File
Lets you scan directly to a disk file. You can change the file type and destination folder, as needed.
If you want to scan and save a document in PDF format or scan multiple pages into one file, refer to the Related FAQs at the end of the page.
How to launch the ControlCenter:
For Windows Users:
-
Open the ControlCenter.
(Windows 7)
Click Windows/start -> (All) Programs -> Brother -> [model name] -> ControlCenter.
The ControlCenter application will be loaded in the Task Tray near the system clock. (It appears as a blue square.)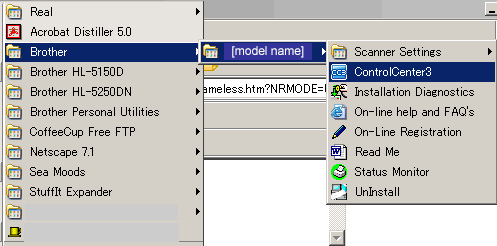
(Windows 8 or later) if applicable*
*: Click here to see the operating systems compatibility information.-
(Windows 8)
On the Start screen, click . If
. If  is not on the Start screen, right-click somewhere on an empty spot, and then click, All Apps from the bar.
(Windows 10 / 11)
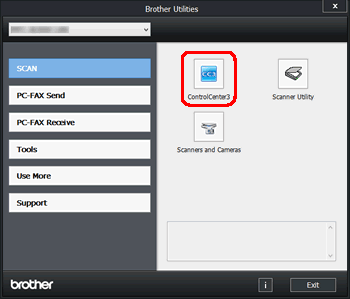
Click Start => (All apps =>) Brother. - Click Brother Utilities.
- Select your model name from the pulldown list.
-
Click ControlCenter.
The ControlCenter application will be loaded in the Task Tray near the system clock. (It appears as a blue square.)
-
(Windows 8)
-
Double-click on the ControlCenter icon located in the Task Tray to launch the program window.

For Macintosh Users:
There may be two different versions of the ControlCenter2 software available depending on your model and operating system. If you are not sure which version you have, try the steps for each version is turn.
-
To open the ControlCenter2 application, click Go from the Finder bar, Applications => Brother => ControlCenter. Double click the ControlCenter.
The ControlCenter will open and an icon will be placed in the dock.

-
To open the ControlCenter2 application, click Go from the Finder bar, Applications => Brother => ControlCenter.app or Macintosh HD => Library => Printers => Brother => Utilities => ControlCenter => ControlCenter. app.
Double click the ControlCenter.app.
The ControlCenter will open and an icon will be placed at the top of right of the screen near the system time. In the future you may click on this icon and select Open to launch the application.

- If you do not see the ControlCenter software, then you may be using the current version of ControlCenter. For instructions on how to use this version, refer to Current Version.
-
If your hard drive icon (Macintosh HD icon) is not on the desktop:
- Click Finder > Preferences....
- In the General tab, check "Hard disks" in the "Show these items on the desktop:"
-
Close the Finder Preferences window.
Your hard drive icons will appear on the desktop.
<Modern user interface>
<Classic user interface>

How to configure or change the settings:
For Macintosh Users:
The screens shown below are from the ControlCenter for Windows, they differ from the ControlCenter for Macintosh but you can follow the same steps below to configure or change the settings.
Scan to Image (example: Microsoft® Paint)
- Click Configuration button.
- Select SCAN -> Image.
- Click the Software Button tab.
-
Select the correct application from the Target Application drop-down list.
*You can add an application to the list by clicking the Add button or delete an application by clicking the Delete button.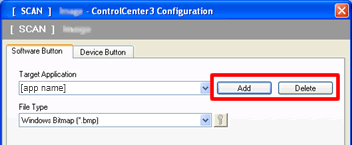
-
To add an application click the Add then enter or select followings:
- Application Name (up to 30 characters) ....(1)
- Application Location ....(2)
- File Type ....(3)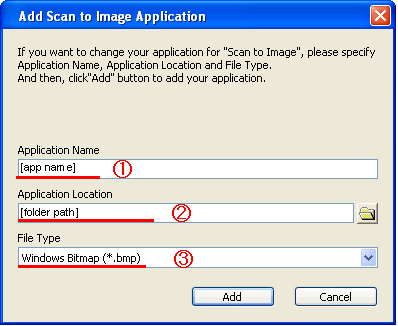
- Click the Add.
- Change the other settings, if needed.
-
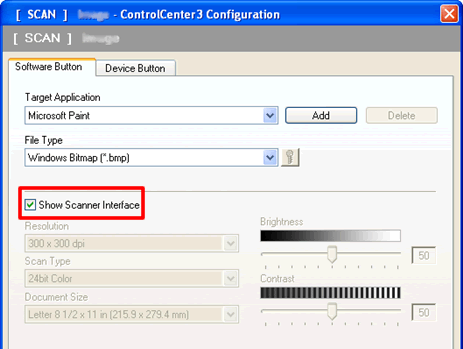
If you want to scan and then crop a portion of a page after pre-scanning the document, check the Show Scanner Interface box.

- Click OK.
Scan to OCR (Word Processing program)
- Click Configuration button.
- Select SCAN -> OCR.
- Click the Software Button tab.
-
Select the destination word processing application from the Target Application drop-down list.
*You can add an application to the list by clicking the Add button or delete an application by clicking the Delete button.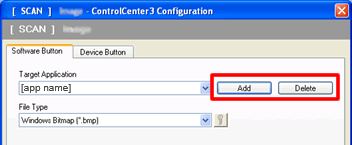
-
To add an application click the Add then enter or select followings:
- Application Name (up to 30 characters) ....(1)
- Application Location ....(2)
- File Type ....(3)
- Click the Add.
- Change the other settings, if needed.
-
If you want to scan and then crop a portion of a page after pre-scanning the document, check the Show Scanner Interface box.

- Click OK.
Scan to E-mail
- Click Configuration button.
- Select SCAN -> E-mail.
- Click the Software Button tab.
-
Select your preferred E-mail application from the E-mail Application drop-down list.
When you first start ControlCenter a default list of compatible E-mail applications will appear in the drop-down list. If you are having trouble using a custom application with ControlCenter you should select an application from the list.
* You can add an application to the list by clicking the Add button or delete an application by clicking the Delete button.
-
To add an application click the Add then enter or select followings:
- Application Name (up to 30 characters) ....(1)
- Application Location ....(2)
- File Type ....(3)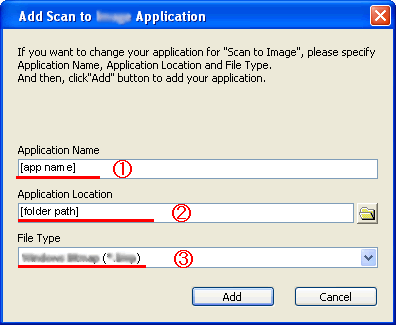
- Click the Add.
- Change the other settings used to create the file attachments, if needed.
-
If you want to scan and then crop a portion of a page after pre-scanning the document, check the Show Scanner Interface box.

- Click OK.
Scan to File
- Click Configuration button.
- Select SCAN -> File.
- Click the Software Button tab.
-
To change the File Name, enter the file name you want to use for the document (up to 100 characters) in the File Name box.
File name will be the file name you registered, current date and sequential number.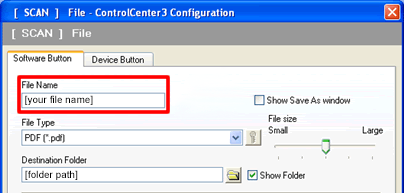
-
Select the file type for the saved image from the File Type drop-down list.
By clicking the icon or the Browse... button select the Destination Folder you want to save the file to.
-
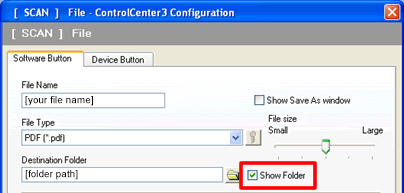
To display where the scanned image is saved when scanning is finished, check the Show Folder box.
-
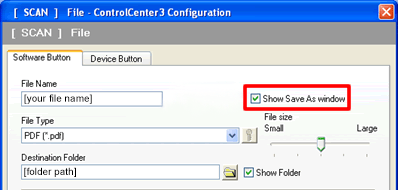
To let you specify the destination of the scanned image every time you scan, check the Show Save as Window box.
-
If you want to scan and then crop a portion of a page after pre-scanning the document, check the Show Scanner Interface box.
-
Click OK.
Related FAQs
DCP-110C, DCP-115C, DCP-120C, DCP-130C, DCP-135C, DCP-145C, DCP-150C, DCP-155C, DCP-165C, DCP-185C, DCP-195C, DCP-330C, DCP-350C, DCP-375CW, DCP-385C, DCP-395CN, DCP-540CN, DCP-560CN, DCP-585CW, DCP-6690CW, DCP-7010, DCP-7030, DCP-7040, DCP-8060, DCP-8065DN, DCP-8070D, DCP-8085DN, DCP-9010CN, DCP-9040CN, DCP-9042CDN, DCP-J125, DCP-J315W, DCP-J515W, DCP-J715W, MFC-210C, MFC-215C, MFC-230C, MFC-235C, MFC-240C, MFC-250C, MFC-255CW, MFC-260C, MFC-265C, MFC-290C, MFC-295CN, MFC-3240C, MFC-3360C, MFC-410CN, MFC-425CN, MFC-440CN, MFC-465CN, MFC-490CW, MFC-5440CN, MFC-5460CN, MFC-5490CN, MFC-5840CN, MFC-5860CN, MFC-5890CN, MFC-620CN, MFC-640CW, MFC-6490CW, MFC-665CW, MFC-685CW, MFC-7220, MFC-7225N, MFC-7320, MFC-7340, MFC-7420, MFC-7440N, MFC-7450, MFC-7820N, MFC-7840N, MFC-7840W, MFC-790CW, MFC-795CW, MFC-8370DN, MFC-8380DN, MFC-8460N, MFC-8480DN, MFC-885CW, MFC-8860DN, MFC-8880DN, MFC-8890DW, MFC-9010CN, MFC-9120CN, MFC-9320CW, MFC-9420CN, MFC-9440CN, MFC-9450CDN, MFC-9840CDW, MFC-990CW, MFC-J220, MFC-J265W, MFC-J410, MFC-J415W, MFC-J615W
If you need further assistance, please contact Brother customer service:
Content Feedback
Please note this form is used for feedback only.