QL-500
FAQs & Troubleshooting |
QL-500
Date: 04/09/2020 ID: faqp00001040_003
How to use Excel data to print labels (P-touch Editor 5.x for Windows)


Please follow the instructions below:
-
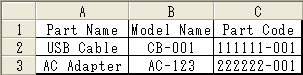
Preparing the database
Use the file "Parts.xls" in the folder at Program Files "C:\Program Files\Brother\Ptedit5x\Samples" or "C:\Program Files (x86)\Brother\Ptedit5x\Samples".
-
Specifying the size of the label
In the Paper palette, specify the tape length and width.

-
Connecting the database
-
Click [File] - [Database] - [Connect...].
<Using Professional mode as an example. You can edit on Express mode as well.>

-
Select the prepared Excel file. Check "Header Row Contains Field Names" and "Connect as read-only", and then click the [Next] button.

-
The database appears.

If the file being used contains multiple sheets, the Select Database Table dialog box appears. Select the sheet that you want to use.
-
Click [File] - [Database] - [Connect...].
-
Merging data into a layout as text
-
Specify the font that will be used in the layout:
- In the Font box on the Text Properties, specify the font (e.g. "Arial").
- In the Font Size edit box on the Text Properties, specify the font size (e.g. "14").
- The font and size can also be changed after text is pasted into the layout.
-
Click the field name "Part Name" and drag the field name into the layout window. The dialog box appears. Select "Text".


-
In the same way, merge the field name "Model Name".

-
Specify the font that will be used in the layout:
-
Merging data into the layout as a bar code
-
Click the field name "Part Code" and drag it into the layout window. The dialog box appears. Select "Bar Code".


- Double-click the merged bar code data.
-
Click the [Setup] tab in the Bar Code Properties dialog box. To adjust width,, select "Small" for "Width". To adjust alignment, select "Center" for "Show Characters". After specifying the desired settings, click the [OK] button.

Depending on the selected barcode protocol, the data may not be displayed.
("Invalid" or "Incorrect check digit" appears.)
If the barcode cannot be displayed, any of the following may be the cause :- The data that cannot be used with the barcode is included.
- The data does not include the specified number of digits.
- The check digit calculation is incorrect.
-
Click the field name "Part Code" and drag it into the layout window. The dialog box appears. Select "Bar Code".
-
Aligning the objects
-
Click [Edit] - [Select All] to select all of the objects.

-
In the Layout palette, click the "Align Horizontal Center" button. All objects will be aligned along their horizontal centers.

-
You can also align all objects vertically along the label width with the "Align Vertically Center" button.


-
Click [Edit] - [Select All] to select all of the objects.
-
Printing
-
Click
 in the Print palette.

-
The Print dialog box appears. Select "All Records" for "Print Range". After specifying the desired settings, click the [Print] button.

For details on selecting a record range, refer to the following table.
Print Range Records to be printed All Records Print all records. Current Record Print the current record. Marked Record(s) Print only the marked records. Record Range Print records in the range specified by "From" and "To". -
Click
PT-1230PC, PT-1650, PT-18R, PT-1950, PT-2100, PT-2430PC, PT-2700, PT-2730, PT-3600, PT-9500PC, PT-9600, PT-9700PC, PT-9800PCN, PT-D450, PT-D600, PT-E550W, PT-E850TKW, PT-P700, PT-P750W, PT-P900W, PT-P950NW, QL-1050, QL-1050N, QL-1060N, QL-500, QL-550, QL-570, QL-580N, QL-650TD, QL-700, QL-720NW, QL-800, QL-820NWB, RJ-3050, RJ-3150, RJ-4030, RJ-4040, TD-4000, TD-4100N, TD-4410D, TD-4420DN
If you need further assistance, please contact Brother customer service:
Content Feedback
Please note this form is used for feedback only.