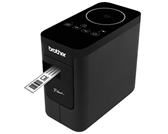
PT-P750W
FAQs & Troubleshooting |
How can I print from a computer via a wireless network? (Wireless Direct mode)
Set up the wireless connection while installing the printer driver:
![]() For Windows
For Windows
![]() For Mac (macOS 10.15 or earlier)
For Mac (macOS 10.15 or earlier)
For Windows:
-
Download the Software/Document Installer from the [Downloads] section of this website. The installer allows you to install the printer driver and additional software, such as P-touch Editor and the Printer Setting Tool.
-
Double-click the downloaded file to begin the installation.
-
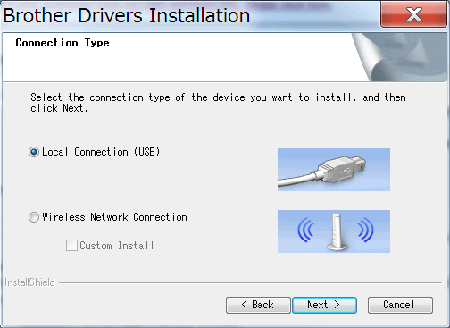
In the [Connection Type] dialog box, select [Local Connection (USB)].
Click [Next], and then follow the on-screen instructions.
-
When the installation is finished, press and hold the printer's Wireless Mode button for one second to turn on the wireless mode. When the Wi-Fi LED is lit, release the Wireless Mode button.
-
Start the Printer Setting Tool on your computer, and then click the [Communication Settings] button.
For more information about the Printer Setting Tool, see "Using the Printer Setting Tool (for Windows)".
-
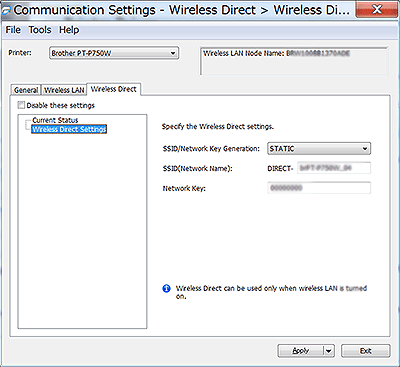
Confirm the SSID (Network Name) and Password (Network Key) in the [Wireless Direct] tab.
-
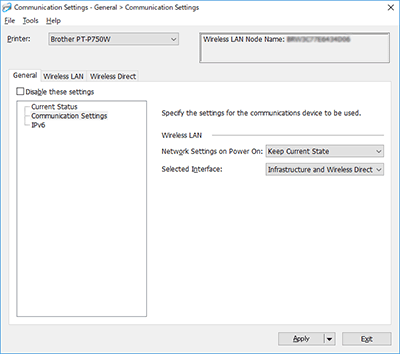
Select [Keep Current State] for [Network Settings on Power On] and confirm that [Infrastructure and Wireless Direct] is selected for [Selected Interface] in [Communication Settings] in the [General] tab.
-
Connect your computer to the SSID you confirmed in step 6 and connect to the printer.
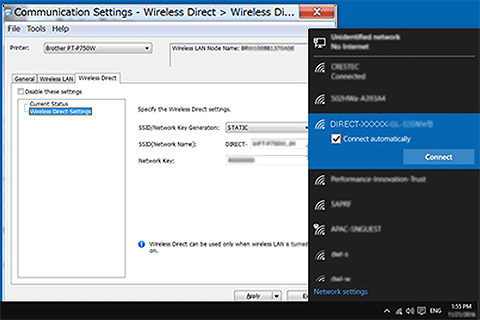
Wait until the connection is established.-
The printer's default SSID (Network Name) and password (Network Key):
- SSID: “DIRECT-brPT-P750W****” where “****” is the last four digits of the product's serial number
(you can find the serial number label by opening the cassette cover.)
- Password: 00000000 - If you want to print the SSID and password, press the Wireless Mode button twice. (Use 0.94" (24 mm) tape.)
- While connected to the printer using Wireless Direct, your computer cannot connect to the Internet. To stay connected to the Internet while using the printer, connect the printer using the wired connection.
- For Windows 10 or later, check [Connect automatically].
-
The printer's default SSID (Network Name) and password (Network Key):
-
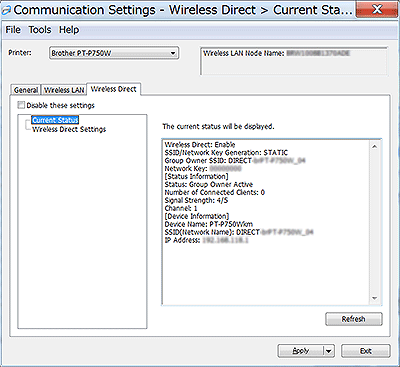
In the Printer Setting Tool, confirm the IP address in [Current Status] in the [Wireless Direct] tab.
-
Open the [Devices and Printers] window. For more information, see "How to open the Devices and Printers window".
Windows 8 or later:
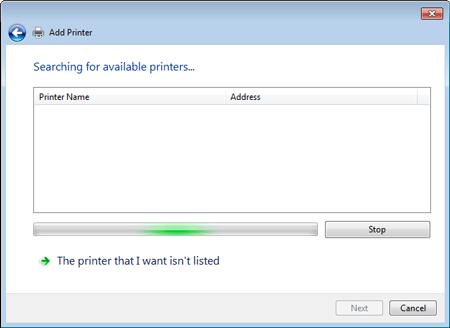
Click [Add a printer], and then select [The printer that I want isn't listed].
Windows 7:
Click [Add a printer], and then select [Add a network, wireless or Bluetooth printer].
Click [The printer that I want isn't listed].
-
Windows 8 or later:
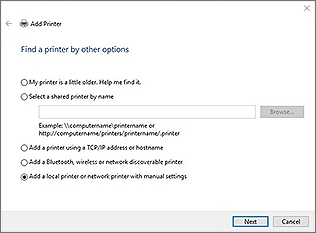
In the [Find a printer by other options] dialog box, select [Add a local printer or network printer with manual settings], and then click [Next].
When [Choose a printer port] dialog box is displayed, select [Create a new port:] - [Standard TCP/IP Port] in [Type of Port], and then click [Next].
Windows 7:
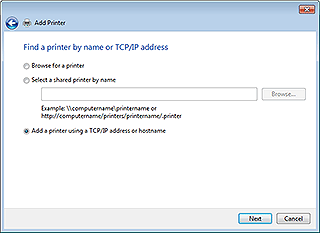
In the [Find a printer by name or TCP/IP address] dialog box, select [Add a printer using a TCP/IP address or hostname], and then click [Next].Windows 8 or later
Windows 7
-
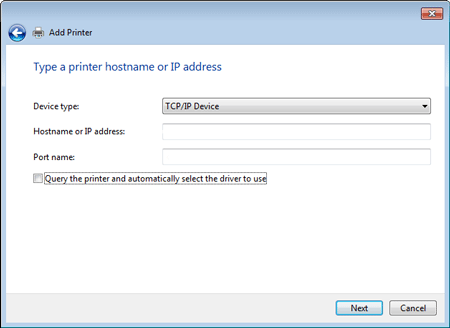
Enter the IP address you confirmed in step 9, and then click [Next].
- When the [Which version of the driver do you want to use?] dialog box appears, select [Use the driver that is currently installed (recommended)], and then click [Next].
- Confirm the printer name, and then click [Next]. You have finished connecting your computer to the printer.
- Open the [Devices and Printers] window again, right-click your printer's icon, and then click [Printer Properties].
-
In the [Ports] tab, confirm that:
a) The printer's IP address is the same as the address you confirmed in step 8.
b) The [Standard TCP/IP Port] option is selected (not the WSD port).
Click [Apply]. - Make sure that the Editor Lite LED is off. Start the P-touch Editor and select the printer from the list.
- You can now edit and print labels wirelessly from your computer.
For Mac (macOS 10.15 or earlier):
- Download the Full Software Package from the [Downloads] section of this website.
- Double-click the downloaded file, and then start the installer from [Start Here OSX].
-
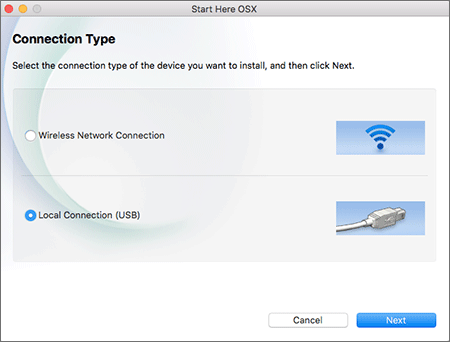
In the [Connection Type] dialog box, select [Local Connection (USB)] and follow the on-screen instructions.
-
When the installation is finished, press and hold the printer's Wireless Mode button for one second to turn on the wireless mode. When the Wi-Fi LED is lit, release the Wireless Mode button.

Make sure that the P-touch Utility is installed on your computer. If it is not, download it from the [Downloads] section of this website.
-
Connect the printer and computer with a USB cable, and start the P-touch Utility.
For more information, see "Using the P-touch Utility (for Mac OSX)".
-
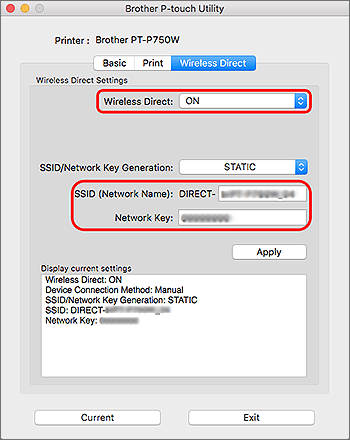
In the [Wireless Direct] tab, set [Wireless Direct] to [ON].
Confirm the SSID (Network Name) and Password (Network Key).
-
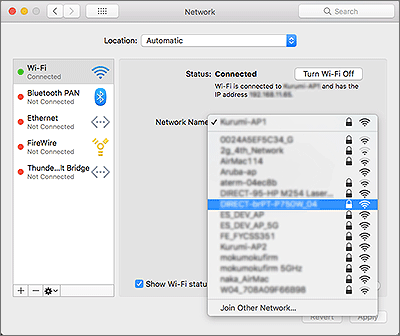
From your computer, select the SSID you confirmed in step 6, and then connect to the printer.
-
The printer's default SSID (Network Name) and password (Network Key):
- SSID: “DIRECT-brPT-P750W****” where “****” is the last four digits of the product's serial number
(you can find the serial number label by opening the cassette cover.)
- Password: 00000000 - If you changed the password using the Communication Settings, you must enter it after selecting the printer.
- If you want to print the SSID and password, press the Wireless Mode button twice (use 0.94" (24 mm) tape.)
-
The printer's default SSID (Network Name) and password (Network Key):
-
When you are prompted to enter a password, enter the Password (Network Key) you confirmed in step 6.
Wait until the connection is established. - From the Apple menu on your Mac, open [System Settings]/[System Preferences] - [Printers & Scanners], and then click [Add Printer, Scanner, or Fax] or the [+] button.
-
Select the printer you want to use from the Name list, and then select "[model name] + CUPS" from the [Use] list.
- Click the [Add] button.
- Disconnect the USB cable.
- Confirm that the Editor Lite LED is off. Start the P-touch Editor and select the printer from the list.
- You can now edit and print labels wirelessly from your computer.
Content Feedback
To help us improve our support, please provide your feedback below.
