QL-720NW
FAQs & Troubleshooting |
How can I connect the printer to my mobile device via Wi-Fi® ?
|
First you must configure the wireless network settings of your printer to communicate with your wireless router/access point.
(e.g. QL-720NW)
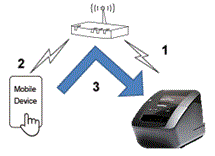
- Connect your printer to your wireless router/access point.
- Connect your mobile device to the same wireless router/access point. (You can skip this step if your device is already connected to a Wi-Fi® network.)
- You can now print from your mobile device wirelessly.
If your wireless router/access point supports WPS (Wi-Fi Protected Setup™), do the following:
If your wireless router/access point does not support WPS (Wi-Fi Protected Setup™), go to "Connect the printer to the wireless router/access point using your computer (Infrastructure mode)".
Connect using a wireless router/access point (WPS)
-
First, confirm that your wireless router/access point has the WPS symbol, and place the printer close to the wireless router/access point.

-
Turn on the printer.
-
Press and hold the Wi-Fi button until the Wi-Fi (  ) indicator flashes in green.
-
Press the WPS button on your WLAN router/access point.
-
When the connection is established, the Wi-Fi ( ) indicator lit in green.
If you cannot connect using a wireless router/access point:
Connect the printer and the wireless router/access point using your computer.
Go to "Connect the printer to the wireless router/access point using your computer (Infrastructure mode)".
-
Connect your mobile device to the wireless router/access point. (You can skip this step if your device is already connected to a Wi-Fi network. Go to Step7.)
a. Tap [Settings] - [Wi-Fi] on the mobile device, and slide the toggle button to activate the Wi-Fi function.
b. Select the SSID (Network Name) of the wireless router/access point that you connected to in step 4, and then enter the password. The connection between your mobile device and the wireless router/access point will be established.
-
Start the application in your mobile device, and tap the settings icon.
-
Select the printer from the list.
-
You can now print from your mobile device wirelessly.
Connect the printer to the wireless router/access point using your computer (Infrastructure mode)
|
Before you proceed, make sure your computer is equipped with a Wi-Fi interface that is connected to a wireless network. If it is not, the computer will not be able to connect to your printer wirelessly. |
(e.g. QL-720NW)
-
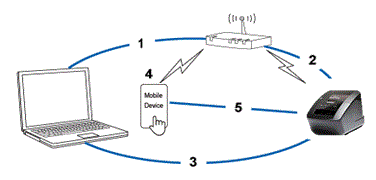
Connect your computer to your wireless router/access point.
-
Connect your printer to the same wireless router/access point.
-
Connect your printer and computer.
-
Connect your mobile device to the same wireless router/access point. (You can skip this step if your device is already connected to a Wi-Fi network.)
- Connect your mobile device and printer.
Before you begin, confirm the SSID (Network Name) and the password (Network Key) of your wireless router/access point.
-
Download the printer driver from the [Downloads] section of this website.
-
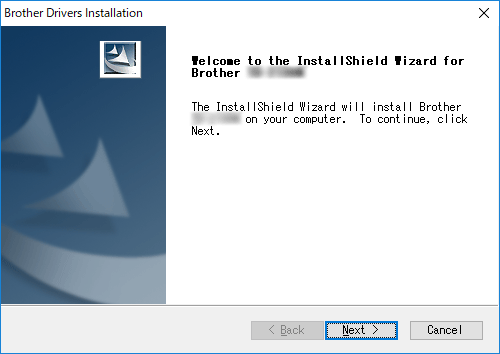
Double-click the downloaded file to begin the installation.
-
Click [Next].
-
When the screen for selecting the connection method appears, select [Wireless Network Connection], and then click [Next].
QL-710W QL-720NW 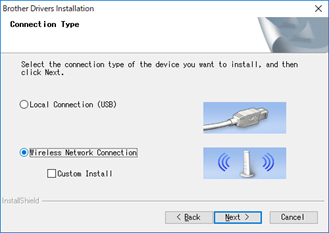
-
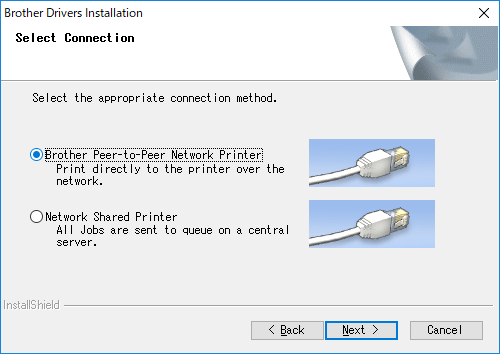
Select [Brother Peer-to-Peer Network Printer] and then click [Next].
-
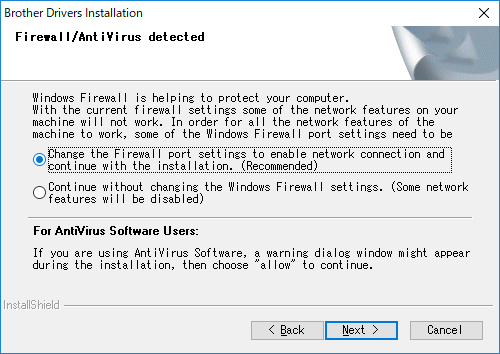
Select [Change the Firewall port settings to enable network connection and continue with the installation. (Recommended)], and then click [Next].
-
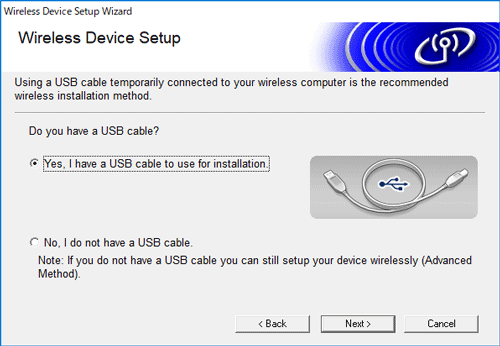
Prepare the USB cable, select [Yes, I have a USB cable to use for installation], and then click [Next].
Follow the on-screen instructions.
- The wizard will search for wireless networks available to your printer.
-
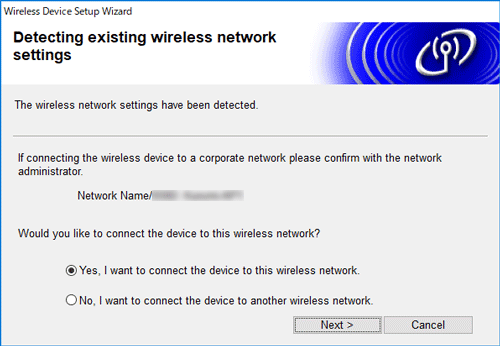
Select the SSID (Network Name) noted beforehand, and then click [Next].

-
Confirm the wireless network settings, and then click [Next]. The settings will be sent to your printer.
-
Follow the on-screen instructions to complete the software installation.
- When the installation is complete, click [Finish] to close the installer window.
- When the connection is established, the Wi-Fi LED lit in green.
-
Connect your mobile device to the wireless router/access point. (You can skip this step if your device is already connected to a Wi-Fi network. Go to Step15.)
a. Tap [Settings] - [Wi-Fi] and slide the toggle button to activate the Wi-Fi function.
b. Select the SSID you connected to in step 9. Your device and the wireless router/access point will be connected. - Start your mobile application, and then tap the Settings icon.
- Select the printer from the list.
-
You can now print from your mobile device wirelessly.
Before you begin, confirm the SSID (Network Name) and the password (Network Key) of your wireless router/access point.
-
To connect via Wi-Fi, download the Wireless Device Setup Wizard from the [Downloads] section of this website.
To print using your printer, download the P-touch Editor from the website above. For OS X 10.11 or lower users, Printer Driver must be installed to print.
- After you download the Wireless Device Setup Wizard, double-click the downloaded file.
-
Follow the on-screen instructions to configure the wireless settings between the printer and your wireless router/access point.
We recommend using a USB cable to complete the connection.
-
When selecting the wireless router/access point, make sure you select the SSID that you confirmed previously.
-
Connect your mobile device to the wireless router/access point:
Tap [Settings] - [Wi-Fi] and slide the toggle button to activate the Wi-Fi function.If your device is already connected to a Wi-Fi network, go to Step 7.
-
Select the SSID that you used previously. The connection between your device and your wireless router/access point will be established.
-
Start your mobile application and tap the Settings icon.
-
Select the printer from the list.
- You can now print wirelessly from your device.