DCP-585CW
FAQs & Troubleshooting |
Scan and save a document in PDF format (Scan to File)
(If you don't find the Related FAQs at the end of the page, that means this note is not applicable for your machine.)
The Scan to File feature allows you to scan a document and automatically save it into a specified location on your computer in PDF format.
Follow the instructions below to configure and use the Scan to File feature.
Step 1: Configure the Scan to File feature
-
The first two steps have two kinds of instructions respectively for Windows and Macintosh. Refer to the instructions applicable for your computer and then continue to step 3.
-
If the ControlCenter is not installed in your PC, go to the Downloads section.
For Windows Users:
Download and install the Full Driver & Software Package.
For Macintosh Users:
Download and install the Scanner Driver.
For Windows Users:
-
Open the ControlCenter.
(Windows 7)
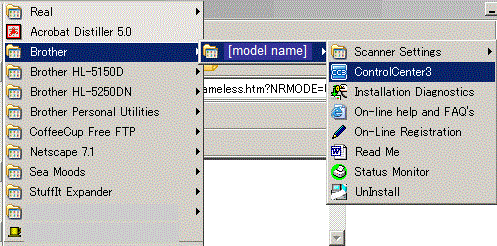
Click Windows/start -> (All) Programs -> Brother -> [model name] (Where [model name] is the model number of the machine) -> ControlCenter.
The ControlCenter application will be loaded in the Task Tray near the system clock. (It appears as a blue square.)
(Windows 8 or later) if applicable*
*: Click here to see the operating systems compatibility information.-
(Windows 8)
On the Start screen, click . If
. If  is not on the Start screen, right-click somewhere on an empty spot, and then click, All Apps from the bar.
(Windows 10/ Windows11)
Click (Start) => (All apps =>) Brother.
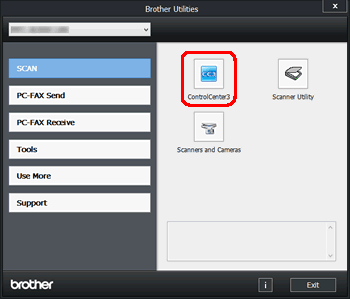
- Click Brother Utilities.
- Choose your model name from the pulldown list.
-
Click ControlCenter.
The ControlCenter application will be loaded in the Task Tray near the system clock. (It appears as a blue square.)
-
(Windows 8)
-
Double-click on the ControlCenter icon located in the Task Tray to launch the program window.

For Macintosh Users:
-
Open the ControlCenter by clicking Macintosh HD -> Library -> Printers -> Brother -> Utilities -> ControlCenter -> ControlCenter.app
The ControlCenter application will be loaded in the Task Tray near the system clock.

-
Click on the ControlCenter icon located in the Task Tray, and then click Open to launch the program window.
<Modern user interface> 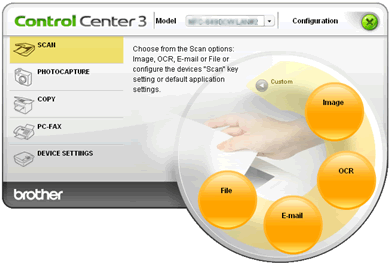
<Classic user interface> 
-
Click on Configuration -> SCAN -> File.
-
The Scan to File configuration window will appear.
<For Windows Users> 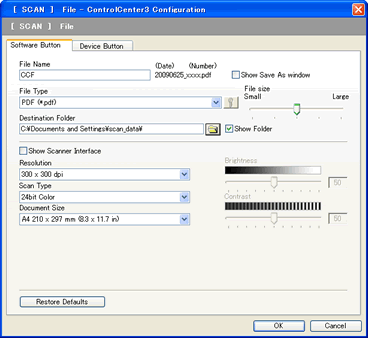
<For Macintosh Users> 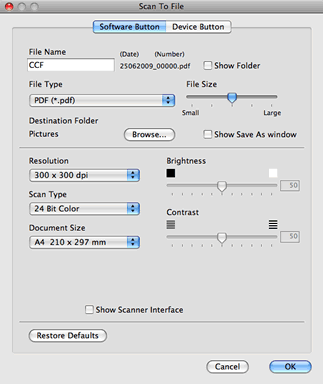
-
The Software Button tab configures the Scan to File button within the ControlCenter software interface. The Device Button tab configures the Scan key on the Brother machine. Choose the tab you want to configure.
-
You can configure the following properties:
File Type:
This is where you can change the format that the file will be saved in. Please choose PDF(*.pdf) to scan and save the data in PDF format.
Destination Folder:
This is where you specify the location where the file will be saved. You may also select "Show Save As window" if you wish to be prompted each scan for the destination location to save the file.
Resolution:
This is how sharp an image will be based on the dots per inch scanned (DPI). The higher the DPI the clearer the image will be, however the scan time and document size will increase.
Scan Type:
This is the color scan option. The higher the color quality selected the longer the scan job will take to complete and the larger the file size will be.
Document Size:
Set the size of the document being scanned.
Brightness:
Adjust the setting (-50 to 50) to obtain the best image. The default value is 0, representing an average. You can set the level by dragging the slide bar to the right or left to lighten or darken the image respectively for the setting.
Contrast:
You can increase or decrease the contrast level by moving the slide bar to the left or right. You can also type a value in the box for the setting. An increase emphasizes dark and light areas of the image, while a decrease reveals more detail in gray areas.
Show Scanner Interface:
Check this box if you want to pre-scan the document and crop a portion of the page before completing the scan.
- Once you have configured each setting click OK. All subsequent scans will use these settings.
Step 2-1: Use the Scan to File feature from the ControlCenter
-
Place the document to be scanned on the scanner glass (Flatbed) or Automatic Document Feeder (ADF) depending on the model of your Brother machine.
-
Launch the ControlCenter following the instructions in Step 1.
-
Double-click on the ControlCenter icon located in the Task Tray to launch the program windows.
-
On the SCAN menu, click the File button.
-
The document will now scan and be saved into the specified location in PDF format, according to the setting you made in the Software Button tab of the Scan to File configuration window of the ControlCenter.
Step 2-2: Use the Scan to File feature using the Scan key on the Brother machine
-
Make sure that the ControlCenter has been launched and loaded in the Task Tray near the system clock.
-
Place the document to be scanned on the scanner glass (Flatbed) or Automatic Document Feeder (ADF), depending on the model of your Brother machine.
-
Press the Scan key on the Brother machine and select Scan to PC -> File, or Scan to File.
-
Press OK.
- Press Start , Black (Mono) Start or Color (Colour) Start to begin the scanning. The document will now scan and be saved into the specified location in PDF format, according to the settings you made in Device Button tab of the Scan to File configuration window of the ControlCenter.
Related Models
DCP-110C, DCP-120C, DCP-130C, DCP-165C, DCP-330C, DCP-350C, DCP-375CW, DCP-385C, DCP-395CN, DCP-585CW, DCP-7020, DCP-7030, DCP-7040, DCP-8060, DCP-8065DN, DCP-8080DN, DCP-8085DN, DCP-9040CN, DCP-9045CDN, DCP-J125, MFC-210C, MFC-230C, MFC-240C, MFC-250C, MFC-255CW, MFC-290C, MFC-295CN, MFC-3240C, MFC-3340CN, MFC-3360C, MFC-420CN, MFC-440CN, MFC-465CN, MFC-490CW, MFC-495CW, MFC-5440CN, MFC-5460CN, MFC-5490CN, MFC-5840CN, MFC-5860CN, MFC-5890CN, MFC-5895CW, MFC-620CN, MFC-640CW, MFC-6490CW, MFC-665CW, MFC-685CW, MFC-6890CDW, MFC-7220, MFC-7225N, MFC-7340, MFC-7345N, MFC-7420, MFC-7440N, MFC-7820N, MFC-7840W, MFC-790CW, MFC-795CW, MFC-820CW, MFC-845CW, MFC-8460N, MFC-8480DN, MFC-8660DN, MFC-8670DN, MFC-8680DN, MFC-8690DW, MFC-885CW, MFC-8860DN, MFC-8870DW, MFC-8890DW, MFC-9010CN, MFC-9120CN, MFC-9125CN, MFC-9320CW, MFC-9325CW, MFC-9420CN, MFC-9440CN, MFC-9450CDN, MFC-9840CDW, MFC-990CW, MFC-J220, MFC-J265W, MFC-J270W, MFC-J410W, MFC-J415W, MFC-J615W, MFC-J630W