MFC-9120CN
FAQs & Troubleshooting |
Clean the Drum Unit
Clean the drum unit following StepA or StepB below:
- If your printout has any small white or colored spots, follow the "StepA: Small spots on the printed pages".
- If your printout has colored spots at 94 mm (3.7 in.) intervals, follow the "StepB: Large spots on the printed pages".
Do NOT use flammable substances, any type of spray, or an organic solvent/ liquid that contains alcohol or ammonia to clean the inside or outside of the machine. Doing this may cause a fire or electrical shock.

StepA: Small spots on the printed pages
- Open the manual feed slot cover.
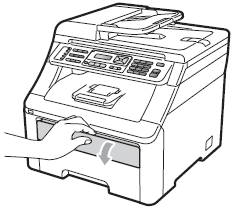
- Using both hands, slide the manual feed slot paper guides to the width of the paper that you are going to use.
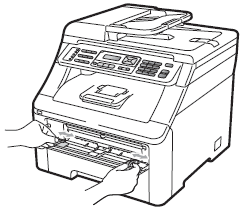
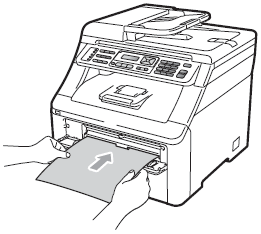
- Using both hands, put one blank sheet of paper in the manual feed slot until the front edge of the paper touches the paper feed roller. Wait until the machine automatically feeds the paper. When you feel the machine pull in the paper, let go.
- Make sure that the paper is straight and in the correct position on the manual feed slot. If it is not, the paper may not be fed correctly, resulting in a paper jam.
- Do not put more than one piece of paper in the manual feed slot at any one time, as it may cause a jam.
- If you put paper in the manual feed slot before the machine is in the Ready mode, an error may occur and the machine will stop printing.
- Make sure that the machine is in the Ready mode.
Press Menu => Printer => Drum Cleaning.
- Press Black(Mono) Start or Color(Colour) Start. The machine will pull in the piece of paper and start cleaning the drum unit.
- When the machine has finished cleaning, "Completed" appears on the LCD. Press Stop/Exit so that the machine returns to the Ready mode.
- Repeat steps 3 to 6 two more times using a new blank sheet of paper each time. Upon completion please discard the used paper. If the print problem is not resolved please contact Brother Customer Service.
StepB: Large spots on the printed pages
- Turn off the machine's power switch. Unplug the telephone line cord first (if applicable), disconnect all cables and then unplug the power cord from the AC power outlet (electrical socket).
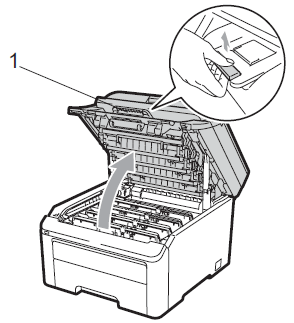
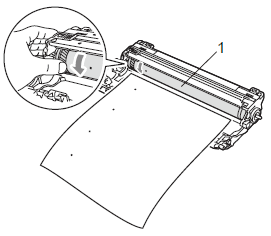
- Fully open the top cover by lifting up on the handle (1).
When the scanner is open, you cannot open the top cover.
- See the print sample to identify the color causing the problem. The color of the spots is the color of the drum you should clean. For example, if the spots are cyan, you should clean the drum for cyan. Take out the drum unit and toner cartridge assembly of the color causing the problem.
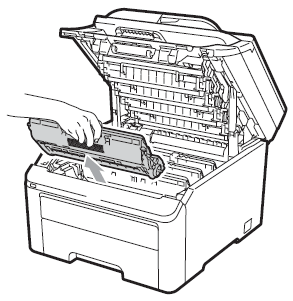
- We recommend that you place the drum unit and toner cartridge assembly on a clean, flat surface with a sheet of disposable paper or cloth underneath it in case you accidentally spill or scatter toner.
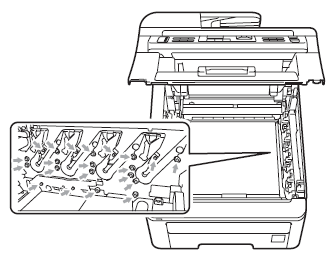
- To prevent damage to the machine from static electricity, DO NOT touch the electrodes shown in the illustration.
- Push down the green-labelled lock lever (1) and take the toner cartridge out of the drum unit.
Handle the toner cartridge carefully. If toner scatters on your hands or clothes, wipe or wash it off with cold water at once.

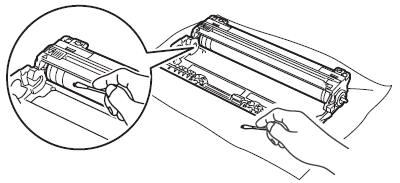
- Put the print sample in front of the drum unit, and find the exact position of the poor print.
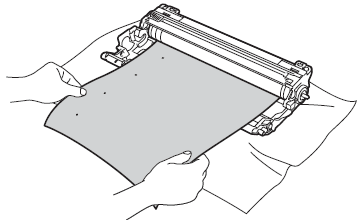
- Turn the drum unit gear by hand while looking at the surface of the OPC drum (1).
- When you have found the mark on the drum that matches the print sample, wipe the surface of the OPC drum with a dry cotton swab until the dust or glue on the surface comes off.
DO NOT clean the surface of the photosensitive drum with a sharp object.
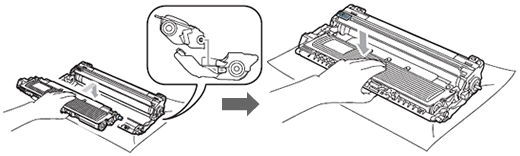
- Put the toner cartridge back firmly into the drum unit until you hear it lock into place.
Make sure that you put in the toner cartridge correctly or it may separate from the drum unit.
-
Slide each drum unit and toner cartridge assembly into the machine. Make sure that you match the toner cartridge color to the same color label on the machine.
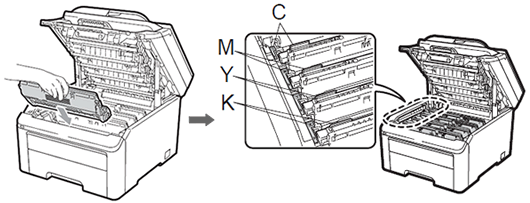
C=Cyan, M=Magenta, Y=Yellow, K=Black - Close the top cover of the machine.
- Plug the machine's power cord back into the AC power outlet first (electrical socket), and reconnect all cables and telephone line cord (if applicable). Turn on the machine's power switch.
Content Feedback
To help us improve our support, please provide your feedback below.